EASY Quilted Coasters Using Leftover Quilt Scraps

It's no secret that I love a good quilted coaster project...in fact, this is the fifth quilted coaster tutorial I've shared with you! If you've missed one in the past, you can check out my other tutorials here: (Mini Heart, Mini Christmas Joy Block, Scrappy Quilted Coaster and Mini Pumpkin Block).
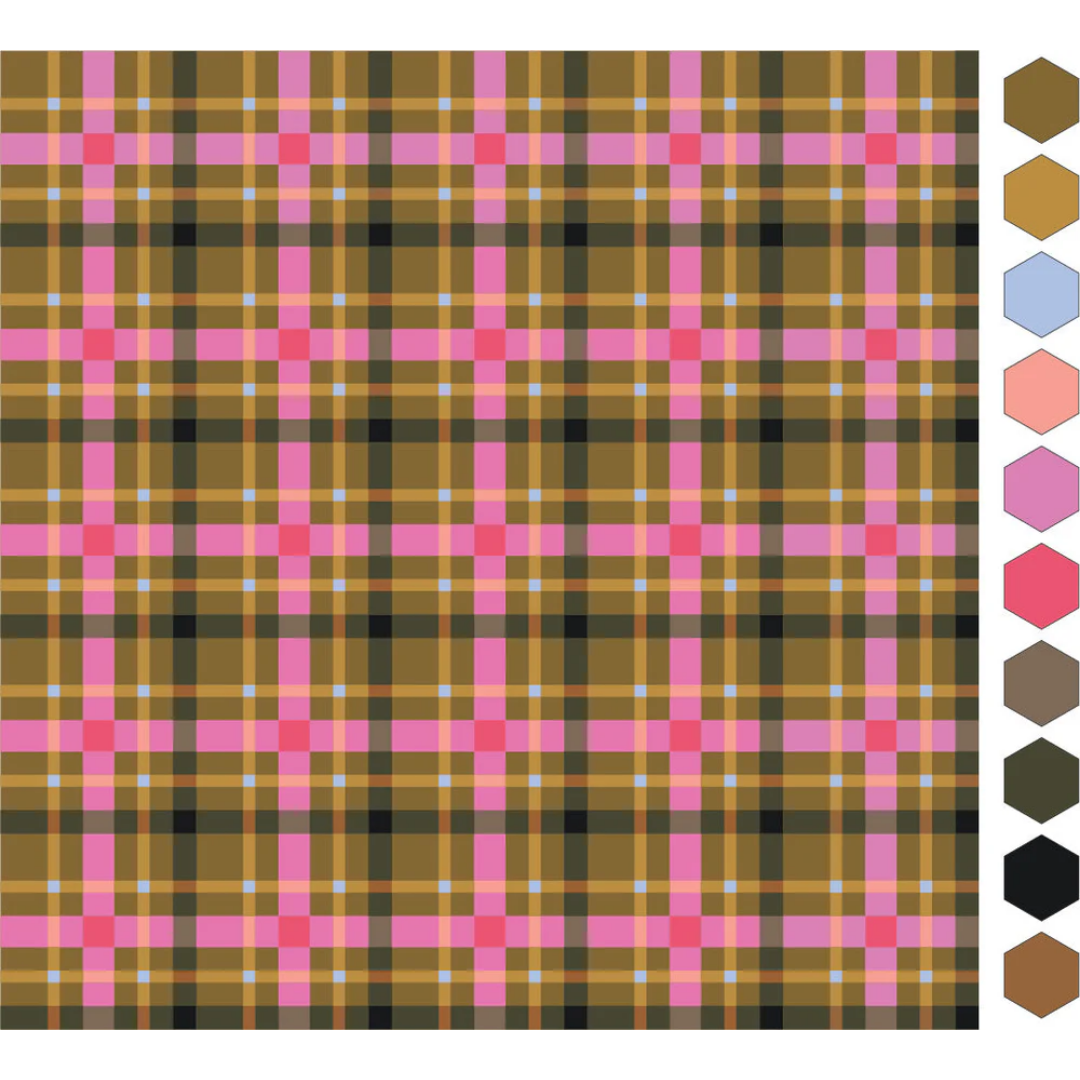
Back to the matter at hand...my newest quilt pattern, Petite Plaid, uses strip sets as part of the block construction. A few quilt sizes will have remnant strip sets after creating all of your blocks. Instead of adding those strip sets to the scrap pile, why not turn them into fun quilted coasters?
While this tutorial is written using Petite Plaid remnants, you could use any leftover fabric or strip sets, it just needs to be a few inches larger than your desired coaster size. Note: This tutorial is based on a 4-6” coaster. Feel free to adjust to your desired size, just make sure your batting is 1-2” larger than the coaster top on all four sides.
Here's what you'll need:
- Petite Plaid strip set remnant (or any strip set remnant) measuring 5.5"-7"
- Scrap fabric for backing; you'll need to trim this to be the exact size as your quilted coaster top. I recommend waiting to cut this piece until later on.
- Scrap batting, at least 1” larger than your desired coaster size
- Sewing machine, thread, scissors
- Clear quilting ruler
- Rotary cutter
- Cutting mat

Deciding on your coaster measurement
First, you'll need to decide what size you want your coaster to measure. I like a single coaster to measure anywhere from 4.5"-6". Once you decide what size you're making, you'll need to add approximately 1" to give you your cut measurement. So for example, I cut my starting coaster fabric at 5.5" and the finished coaster ended up measuring a little larger than 4.5" square.
Why the difference? We'll be sewing 1/4" around the perimeter of the coaster, so we'll subtract that; but also, your quilted coaster will shrink just a tiny bit after quilting (depending on your quilting density). And because of the nature of how these coasters are made, you'll loose a little bit of your fabric as it's turned inside out around the edge. So your finished coaster will likely measure anywhere from 5/8" - 1" smaller than your starting square.
Cut your coaster top
Working on your cutting mat, place your ruler on top of your strip set remnant. Line up your ruler with the strip set until you are happy with the placement. Here’s where you can have a little fun with your coaster! You can place your ruler anywhere and in any orientation you like on the strip set. Be creative! Just make sure there is at least 1/2" or so between the edge of your ruler and any seam lines to reduce bulk when turning or binding.
Cut your desired starting square size. For this example, I'm cutting at 5.5".

You'll notice that I'm cutting all the way across my strip set. This is so that I can get two coasters, side by side. Definitely keep that in mind as you are deciding what size you want to cut...it's nice to maximize fabric if you can!
Here's an example of how to use a smaller square ruler to cut the starting piece. Remember to move the ruler around to position the pieced strips at least 1/2" away from where you're cutting, if possible.

You can also cut your strip set at a 45 degree angle to create diagonal strips across the coaster. They don't have to be perfectly 45 degrees, but if you'd like, you can use the 45 degree line on your ruler to align with a seam and give you a reference point.

You can also achieve the same result with a longer ruler. Here's what that would look like:


Personally, I like the look of the diagonal stripes, but the vertical/horizontal stripes give you a better use of your fabric. So it's totally up to you how you'd like to cut your piece!
Quilt your top and batting
Place the coaster top on your batting; pin in place if desired.

Quilt as desired; no backing fabric is needed since this will be inside the coaster. If you prefer to not have batting directly against your feed dogs, you can add a backing fabric. This backing layer will get covered up later, so this is a great time to use up scraps since no one will see the inside!
For this project, I did diagonal cross hatch lines, but I also think vertical/horizontal lines would look great as well (especially if you cut your strip set at a 45 degree angle).

Since my seams are diagonal, I used one seam as my starting reference point. I aligned the right edge of my presser foot with a seam in the center of my coaster, then I quilted my first line using a 2.5mm stitch length and my walking foot. After I quilted the first line, I used the right edge of my presser foot as my reference point to add subsequent lines. Remember, just like with a full size quilt, it's best to start in the middle with your quilting since it allows you to smooth out the top as you go.


Once I quilted all of my lines in one direction, I rotated my quilt sandwich and used a ruler and hera marker to mark a new 45 degree line going in the opposite direction and did the same thing.


Once I was done quilting lines the lines were around 3/4" apart, so I decided to add more quilting to make it a little more dense. I love dense quilting!
Quick Tip: I have noticed that since dense quilting creates more tiny holes in the quilt sandwich, the coaster isn't quite as absorbent as one with less holes. This isn't something that bothers me, as I tend to use my coasters for room temperature or hot drinks but if you plan to use it for lots of cold drinks that create more moisture on the outside of the cup/glass, I would consider doing less dense quilting.


You'll quilt this coaster just like you would a normal quilt. Start and end your quilting lines on the batting layer. We'll secure those quilting lines in the next few steps!

Once your coaster top is quilted to the batting, trim away the excess batting so it aligns with the edge of the coaster top. At this stage, you might notice that you're trimming away a little bit of your coaster top. That's okay, the goal is to get this coaster square with 90 degree corners. I usually end up trimming away around 1/16" or so of my coaster top around the edge. This is one of the reasons why we build in wiggle room at the beginning!
Add your backing
Trim your backing fabric to the same size as your quilted coaster top. Place the backing fabric right sides together with the quilted coaster and align the edges. Pin or clip in place.


Using a 1/4" seam allowance, sew around the perimeter. You'll want to leave approximately a 2" opening for turning the coaster right side out. Backstitch at the beginning and ending of the opening to secure the seam.

At the corners, stop stitching 1/4" away from the perpendicular edge, then pivot with your needle down and continue stitching your 1/4" seam allowance.


Clip the corners of your coaster to reduce bulk.

Topstitch and finish
Turn your coaster right-side out, making sure to push out the corners completely. It can be helpful to use something like a screwdriver to push out those corners. Just don't use a seam ripper or scissors!


Carefully fold the raw edges of the opening in toward the center of the coaster and pin or clip in place.


Sew a line of topstitching 1/8" from the edge around the entire perimeter of the coaster to close the gap. You can back stitch to start your seam and secure your threads or, I like to start with my needle and bobbin thread above my coaster so that I can tie them in a knot and bury the tails...more on that in a sec!


Once I get about 3/4 of the way around my coaster, I like to go ahead and bury my tails from where I started. I've found that if I wait to do it at the end, it's easy to get tangled.
So I tie my needle and bobbin thread in a knot twice (sometimes three times), then I thread both tails in a hand sewing needle. I'll insert the needle in the same hole that the tails are coming from, then I'll travel the needle through the batting layer (not through to the other side) and I'll have it come back out about 1" or so away from where I started. Then I'll pull it through and trim those tails.


Then I'll do the same thing for the ending tails after I finish topstitching and viola!


Enjoy your coaster, and don’t forget to share your creations! We love seeing your projects — tag us at #petiteplaidquilt #loandbeholdpatterns and @loandbeholdstitchery.


Happy quilting!
In case you missed it...