Quilting Supplies for Beginners--and Beyond
"How do I get started with quilting?" and “What are your favorite quilting tools?” are two of the questions I get asked the most…and two of the questions I have strong opinions about! I am so happy to share some of my favorite supplies with you.
First, I’ll share my list of the must-haves for a beginner quilter. Then, I’ll share my favorite tools for more advanced quilters…you know, those tools that you don’t have to have but will fall in love with. As a bonus, you can download both lists as handy PDF checklists. Let’s go!
Quilting supplies for beginners
On this list, you’ll find the items most quilters need to enjoy making their first quilt.
It’s true that historically, quilters didn’t use things like rotary cutters or even sewing machines. But the supplies on this list will make your life MUCH easier.
There is some up-front cost with quilting, but the good news is that most of these items will last you for many years and dozens of quilts! Plus, I’ll be sure to point out what items you can easily thrift…or even skip.
I hope this list helps you get started on your quilting journey!
SEWING SUPPLIES
Sewing machine
Let’s start with the big one: a sewing machine. You’ll definitely want to have one…but it doesn’t have to be fancy or new! My interest in quilting started when I inherited my grandmother’s (50-year-old) sewing machine. It was old and needed some work, so I took it to my local quilt shop, where they fixed it up for about $100. Worth every penny!
I’ve upgraded a couple times since (to a Janome 2212 and then a Janome 6700P), but that first machine was great for learning on. Start small! You basically just need a machine that can do a simple straight stitch.
I recommend: Use what’s available to you. If you plan to buy, the Janome 2212 is an affordable starter machine.

Quarter inch presser foot (optional)
This attachment for your sewing machine helps you achieve an accurate 1/4” seam–which is the standard seam allowance in the quilting world. There are other ways to perfect your seam allowance, but this presser foot is nice to have.
I recommend: Presser feet are somewhat brand-specific, so any ¼” foot that works with your machine!
Quilt pattern
I recommend picking a quilt pattern before you buy your fabric, because your pattern will tell you how much fabric you need. These days you can get paper patterns or instant digital patterns. Either option works just fine, so it’s down to your preference!
I recommend: Celtic Crossing - Our easiest quilt pattern, designed for beginners!

Quilting fabric
I made my first quilt out of some of my favorite blouses of my grandmothers. This quilt is one of my most treasured possessions.
That said, I do recommend using standard quilting cotton for your first quilt. It’s the easiest fabric type to work with, especially as you’re learning the basics.
I recommend: Check out local craft and quilt shops in your area, or shop online at reputable stores like Cottoneer or Lamb and Loom (in the US) or Piece Fabric Co. (in Canada). We also carry a variety of fabric bundles and quilt kits in our own shop!

Needles
Make sure you get some fresh needles for your sewing machine...and that you change our your needles on a regular basis! I recommend an 80/12 needle for piecing and a 90/14 needle for quilting.
I recommend: Schmetz Microtex 80/12 and Schmetz 90/14 - For piecing and for quilting, respectively.
Thread
I stick with cotton thread for my projects. You can choose from lots of brands and colors, but for piecing, I like Aurifil 50-weight in white or another light color. For machine quilting, I either use 40 or 50 weight. For more on choosing thread, check out our guide to quilt thread.
I recommend: Aurifil 50-weight thread - I use white or another light color for most of my quilts.
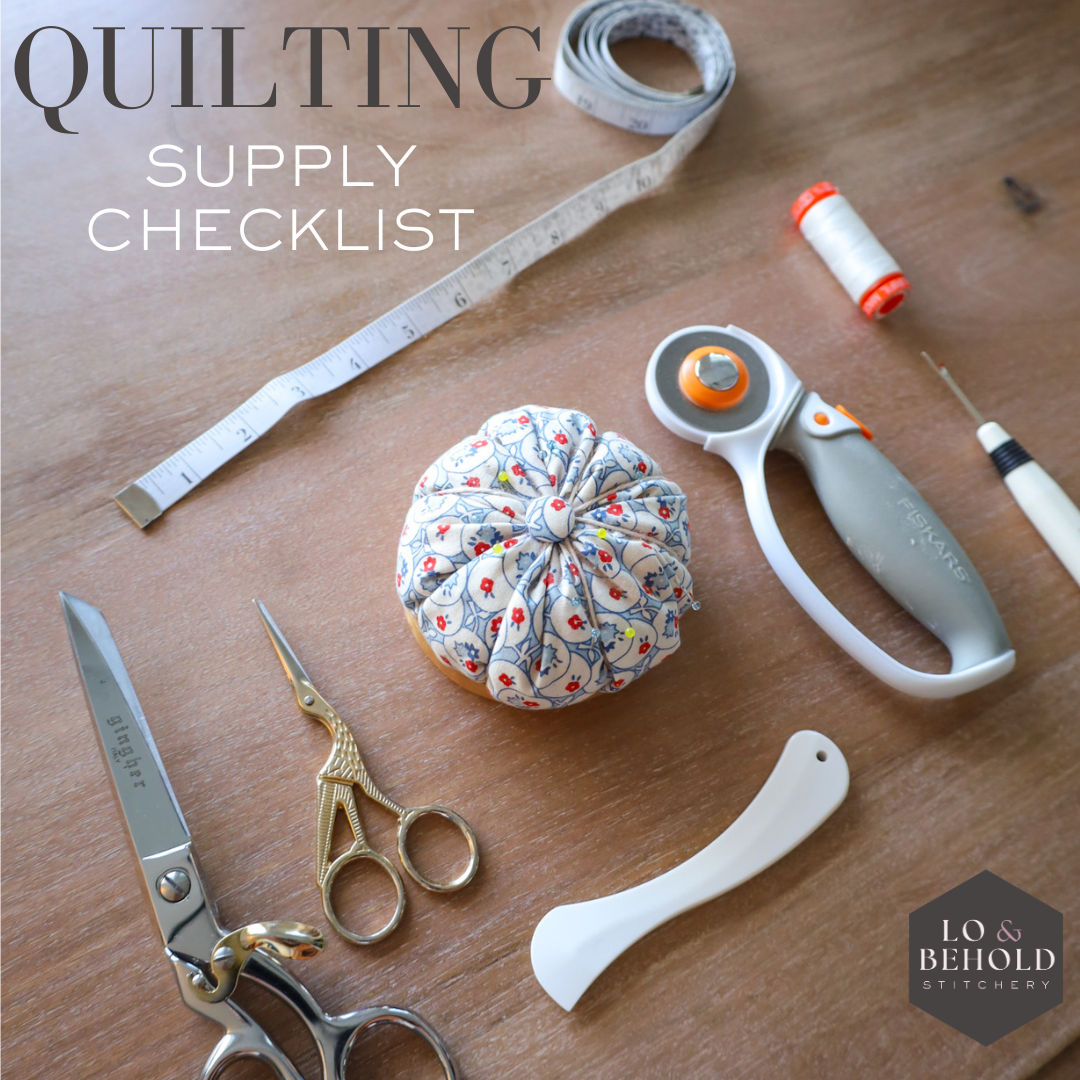
Straight pins
You don’t need fancy ones, but you will want plenty of pins for piecing!
I recommend: Clover Fine Patchwork Pins - They’re thin, sharp, and I like the color of them!

Seam ripper
Let's face it: We all make mistakes! I use my seam ripper ALL. THE. TIME.
I recommend: Clover Seam Ripper - It’s not fancy, but it gets the job done!
CUTTING TOOLS
Rotary cutter
Most quilters use rotary cutters to cut their fabric instead of scissors. They’re faster to use…and usually more accurate. Just be careful, and watch your fingers!
I recommend: Fiskars 45mm Rotary Cutter - I use this for almost all my cutting.
Self-healing cutting mat
Since you’ll be using a rotary cutter, you’ll also need a mat to cut on. If you are going to be cutting your fabric from yardage, I recommend getting a cutting mat that is at least 24" tall (typically 24"x36").
I recommend: Fiskars 24” x 36” Self Healing Cutting Mat - This large mat gives you room to grow.

Rulers
You’ll use your ruler alongside your rotary cutter to cut your fabric. It’s nice to have several different rulers (in fact, I bought my square rulers as a handy set), but you can get by with a single 24” ruler.
I recommend: Omnigrip 6” x 24” Ruler - It’s big enough to cut yardage, and it has convenient 30 and 45 degree marks.
Fabric scissors
While I do most of my cutting with a rotary cutter, I reach for my fabric scissors a lot while sewing. Small scissors are great for trimming dog ears or thread, and I use large scissors for cutting my batting and backing. Make sure you use fabric scissors (like Fiskars or Gingher brand), not office scissors.
I recommend: Stork Embroidery Scissors - These are small and convenient…and sharp!
Iron and ironing board
You can use any iron and ironing board you already have on hand. If you don’t have one, check at thrift stores in your area! You don't need anything fancy. :) It’s helpful to have a steam function, but lots of quilters make do with a spray bottle.
I recommend: Sunbeam Classic Steam Iron - It’s basic and it’s budget-friendly.

BASTING AND QUILTING TOOLS
Depending on your plans, you may want to hold off on buying these supplies. If you decide to send your quilt to a longarmer for quilting, you won’t need these at all. But if you end up doing the quilting yourself, add these to your shopping list.
Batting
Batting is the middle layer of your quilt, and there are TONS of options out there. You can choose from a thin to thicker loft, made from cotton, wool, polyester, even bamboo. You can learn all about your options in our guide to quilt batting. Whatever you choose, remember to give yourself some wiggle room with your batting. If you will be sending your quilt to a longarmer, allow for 4" extra on each side; if you are quilting it yourself, 2-3" extra per side should suffice.
I recommend: Quilter’s Dream Cotton (Request) - I love this low-loft 100% cotton batting.
Basting pins or basting spray
You can use either safety pins or special spray glue to baste your quilt. It’s a matter of personal preference…some quilters swear by pin basting, while others will only spray baste!
I recommend: Curved safety pins - Pins are cheap and reusable–and these curved ones make basting much easier!

Tape
You'll need this for basting your quilt. I typically use painters tape.
I recommend: ATack Painter’s Tape - This is a great size for basting, and it has just the right amount of stick!
Walking foot
If you plan on machine-quilting (as opposed to sending it to a longarmer or hand-quilting), you will use your sewing machine to quilt all three layers together. I HIGHLY recommend using a walking foot for this step, as it will keep the layers of your quilt from shifting as you quilt.
I recommend: Like other presser feet, refer to your sewing machine manual for the one that works with your specific machine.

Hera marker or temporary marker (optional)
Even if you do simple straight-line quilting, you may find it helpful to mark your planned lines on your quilt top. You won’t want your lines to show up on your finished quilt, so you should use a disappearing ink pen or a Hera marker.
I recommend: Hera Marker - I love mine, and I never have to worry about leaving permanent marks.
OTHER SUPPLIES
Color catchers
I ALWAYS wash my quilt right after completion with color catchers. These help prevent any color bleeding that may occur.
I recommend: Shout Color Catchers - I use one to five (depending on the quilt size and colors).
Quilt class (optional, but recommended!)
I know from experience that quilting can be intimidating…so a good teacher can make all the difference! If you have questions or concerns about anything on this list, a quilt class may be just what you need to help you on your quilting journey.
I recommend: Beginner Quilting Academy - Our eight-week online starter courses takes you from knowing zero about quilting to a fully confident beginner. Doors open next month, but you can get on the waitlist now!

Quilting supplies for advanced quilters
If you’ve been quilting for a while, this is the list for you. These tools can make your life easier, help you make more advanced quilt patterns…or just give you a little luxury as you sew! (They also make great gifts for the quilters in your life.)
HANDY EXTRAS
While first-time quilters don’t necessarily need these tools, they’re useful for anyone who plans to make more!
Diagonal seam tape
You can individually mark each diagonal seam before you sew…or you can put diagonal seam tape on your sewing machine to make those diagonal seams a breeze.
I recommend: Cluck Cluck Sew Diagonal Seam Tape - One roll can last forever.
Clapper
One of my best tips for flat seams is to use a tailor’s clapper. It may not look like much, but put this wooden tool on a freshly pressed seam, and you’ll be amazed by the result. If you plan to sew quilts with lots of small pieces (like many of Lo & Behold’s intermediate patterns), this tool is key to keeping your blocks flat.
I recommend: Wood Clapper - This clapper is a good shape and size for most pressing.

Wool pressing mat
Wool mats also help with those flat seams. They hold and distribute heat better than your usual ironing board, so it’s like your block is getting pressed from both sides. (For best results, use your clapper and your wool mat together!)
I recommend: XL New Zealand Wool Pressing Mat - This wool mat is big enough to press entire blocks.
Seam roller
While I wouldn’t use a seam roller instead of an iron, this little tool is a great supplement! It gives you flatter seams than finger pressing…making it perfect for tasks like joining your binding strips.
I recommend: Quick Press Seam Roller - This seam roller is made of wood for a higher quality tool.
Rulers, rulers, and more rulers
Having a wide variety of quilting rulers to choose from can make quick work of both cutting fabric and trimming blocks. While I reach for my 8” x 8” ruler the most, I love having different sizes of rulers at hand…and having specialty rulers for tasks like trimming flying geese!
I recommend: Bloc-Loc Rulers - These rulers make it easy to accurately trim HSTs, HRTs, and flying geese. I also like Stripology rulers for cutting long strips…plus all the various rulers sizes on this Amazon list!

TOOLS FOR GROWING SKILLS
These supplies will help you take your quilting to the next level…perfect for tackling more advanced patterns and techniques!
Acrylic templates or template sheets
When you start working with templates (like on patterns with curved piecing), you’ll want a sturdier solution than printed paper. Pattern-specific acrylic templates are the easiest (and most durable) option, but you can also use template plastic sheets to transfer any pattern’s template.
I recommend: Curved Acrylic Template Set - Our very own template set makes Orange Peel blocks, Half Circle blocks, and Drunkards Path blocks and works with three of our curved patterns, making it a great investment.

Different kinds of needles and thread
It’s so fun to experiment with your quilting technique, whether you try hand quilting or different kinds of machine quilting. Different thread weights and types of needles can give you really different results, so it’s good to try out a variety of products and see what you like!
I recommend: Needle and Thread Sampler - This sampler lets you explore all kinds of quilting notions in one convenient package.
Upgraded sewing machine
There’s nothing wrong with a basic sewing machine, but upgraded machines can give you more throat space, decorative stitches, and other tools to expand your quilting horizons.
I recommend: I love my Janome 6700P…but it’s such a personal choice, so mostly I recommend looking at my tips for shopping for a sewing machine to find what works for you.
Quilting courses
Even if you’ve made dozens of quilts, there’s always more to learn…from curved piecing to applique to color theory. A good class can give you the support, knowledge, and motivation you need to master more advanced skills.
I recommend: Lo & Behold Quilting Courses - With Triangle School, Curve College, and Quilt Finishing Fellowship, we can help you all along your quilting journey!

QUALITY-OF-LIFE UPGRADES
These supplies are all about comfort and convenience. Are they necessary? No. Are they nice? Yes!
Rotating cutting mat
If you’ve ever put off trimming a stack of half-square triangles, you need a rotating mat! It will help you trim half-square triangles faster than ever before.
I recommend: OLFA Rotating Cutting Mat - This self-healing mat is the perfect size for most HSTs.
Design wall
There’s nothing wrong with laying out your quilt blocks on a table or the floor, but I love having a design wall. I use mine all the time to audition block placement and find the perfect layout.
I recommend: BXI Quilt Design Wall - These flannel boards work in all kinds of spaces, but you can add extra boards to fit even the largest quilts.
Ditch quilting foot
You can stitch in the ditch with any presser foot, but these sure make it easier. I love mine for machine-sewing binding.
I recommend: Since presser feet are brand-specific, just find one that works with your machine!
Ruler grip
I like adding a grip to my 24” rulers to make them easier to hold in place. As an added bonus, a grip will keep your fingers safely out of the way of your rotary cutter!
I recommend: Omnigrid Ruler Grip - This grip is easy to place and to move.
Swatch cards
Apps like PreQuilt are great for auditioning colorways, but we all know how colors can look totally different on your screen. So once I’ve figured out the general colors I want, I use swatch cards to dial in on the exact fabric I need.
I recommend: KONA Color Card or PURE Solids Color Card - I love sewing with Kona and AGF solids, so these get tons of use.

Happy quilting!
-Brittany
Updated August 13, 2025 - We updated the beginner's supply checklist and added a whole new list of supplies for advanced quilters! .
.
.
This post contains affiliate links meaning I may receive a small commission from each sell. Rest assured, I only share my favorite items with you!