Pin Basting 101: How to Baste Your Quilt, No Spray Needed
I’ll admit it: Basting is my least favorite part of the quilting process! It’s not nearly as satisfying as piecing or quilting, it takes a long time, and I used to struggle to get good results. (Plus, thinking about “basting” makes me crave Thanksgiving turkey!)
When I first started quilting, I used spray baste, because that’s what someone told me to use. I kept that up for a while, but I started to have problems (like my fabric shifting) and decided to try pin basting…and it was so much better! Don’t get me wrong, I still don’t enjoy basting, but I’m much happier with pin basting than I ever was with spray.
So when I teach people to make quilts, I always recommend pin basting…and that’s the technique I’m going to walk you through today!
TABLE OF CONTENTS
- How to pin baste your quilt sandwich
- Pin basting with a table
- Pin basting vs. other types of basting
- You may also like…
-
Pin basting FAQ
How to pin baste your quilt sandwich
Pin basting takes a bit of time, but the actual process is pretty simple. I’ll walk you through the steps and show you how I do things.

STEP 1: GATHER THE RIGHT SUPPLIES
First up, you’ll need supplies. To successfully pin baste (and end up with a smooth and stable quilt sandwich), you need the right tools. Fortunately, you really don’t need much…just a few simple things:
- Curved safety pins: I have three sizes I use, but the medium/large size are the most useful.
- Painter’s tape: I like the 2” extra wide kind. (Duct tape works in a pinch.)
- Safety pin closer (optional): This can really save your fingers!
- Completed quilt top: Pin basting works with any quilt top. I’m using the First Gift pattern today along with a wholecloth quilt.
- Quilt batting
- Backing fabric
You also need to find a good place to do your pin basting. You’ll want to find some smooth floor space, like tile or wood flooring. Some people even like to use a garage or driveway! Carpet doesn’t work, because you’ll need to tape your backing to the floor.
(You’ll probably want to run over the floor with a broom or even a mop before you move on to the next step.)
💡 |
Basting on a table
|
STEP 2: PREP YOUR QUILT BACKING
Depending on your quilt size, you might need to piece your backing together (if you haven’t already). As a general rule of thumb, you’ll want 4" of extra backing on each side of your quilt. So if your quilt top is 36" x 48", you'll need your backing to measure 44" x 56". (Essentially, add 8" to your final quilt measurements).
If you’re cutting it close and don’t have quite enough fabric for that extra 8”, that’s probably okay. I’ve definitely squeaked by with less (but it comes down to personal preference).
If you do need to piece your backing, make sure to press your seam nice and flat. (I have some tips for flat seams that can help.) Personally, I like to press my backing seam open.
Once your backing is all ready, lay it out face down on the floor, and grab your painter’s tape. Then start taping your backing down! I like to start in one corner and work my way around the quilt, placing a piece of tape every four to six inches or so.

Try to make your backing fabric taut but not TIGHT. If it’s too tight, your backing will start pulling away from your tape while you baste. Plus, you don't want your backing fibers to be stretched or distorted in any way while you’re doing the actual quilting! So aim for taut and smooth, not tight like a drum.
STEP 3: ADD YOUR BATTING LAYER.
Next, it's time to place your batting layer. Just like with your backing fabric, you’ll want your batting to be a bit larger than your quilt top…maybe just an inch or so smaller than your backing. So for that 36” x 48” quilt top we talked about, you’d want around a 43” x 55” piece of batting.
💡 |
Batting recommendations
|
The extra backing and batting lets you see all three layers of your quilt sandwich (quilt top, batting, and backing) as you quilt…and that can help you avoid issues like getting your backing folded under the quilt or running out of room as the quilt shifts during quilting.
For now, just lay your batting on top of the backing fabric, roughly centered, and gently smooth it out. The middle of your quilt sandwich is ready to go!

STEP 4: PLACE YOUR QUILT TOP.
Now we’re ready to add your quilt top. Make sure you’ve given it a good press and that you have nice flat seams. You’ll be so much happier with your end result if you take the extra time to do this!
When your top is nice and smooth, go ahead and lay it in the center of your batting layer. Start in the middle and smooth out your quilt top, working your way to the edges. Try to get out any wrinkles and puckers. A tiny wrinkle here and there isn’t the end of the world (fabric’s gonna fabric), but do your best to get things nice and smooth.

.Again, it's worth taking your time on this step, because it will absolutely affect how your finished quilt turns out.
As you smooth, try to keep your quilt top roughly centered on your batting layer. Again, you want to see at least 3” of extra batting on each side of the quilt top.

Once you’re happy with how your quilt sandwich looks, you’re ready for pinning!
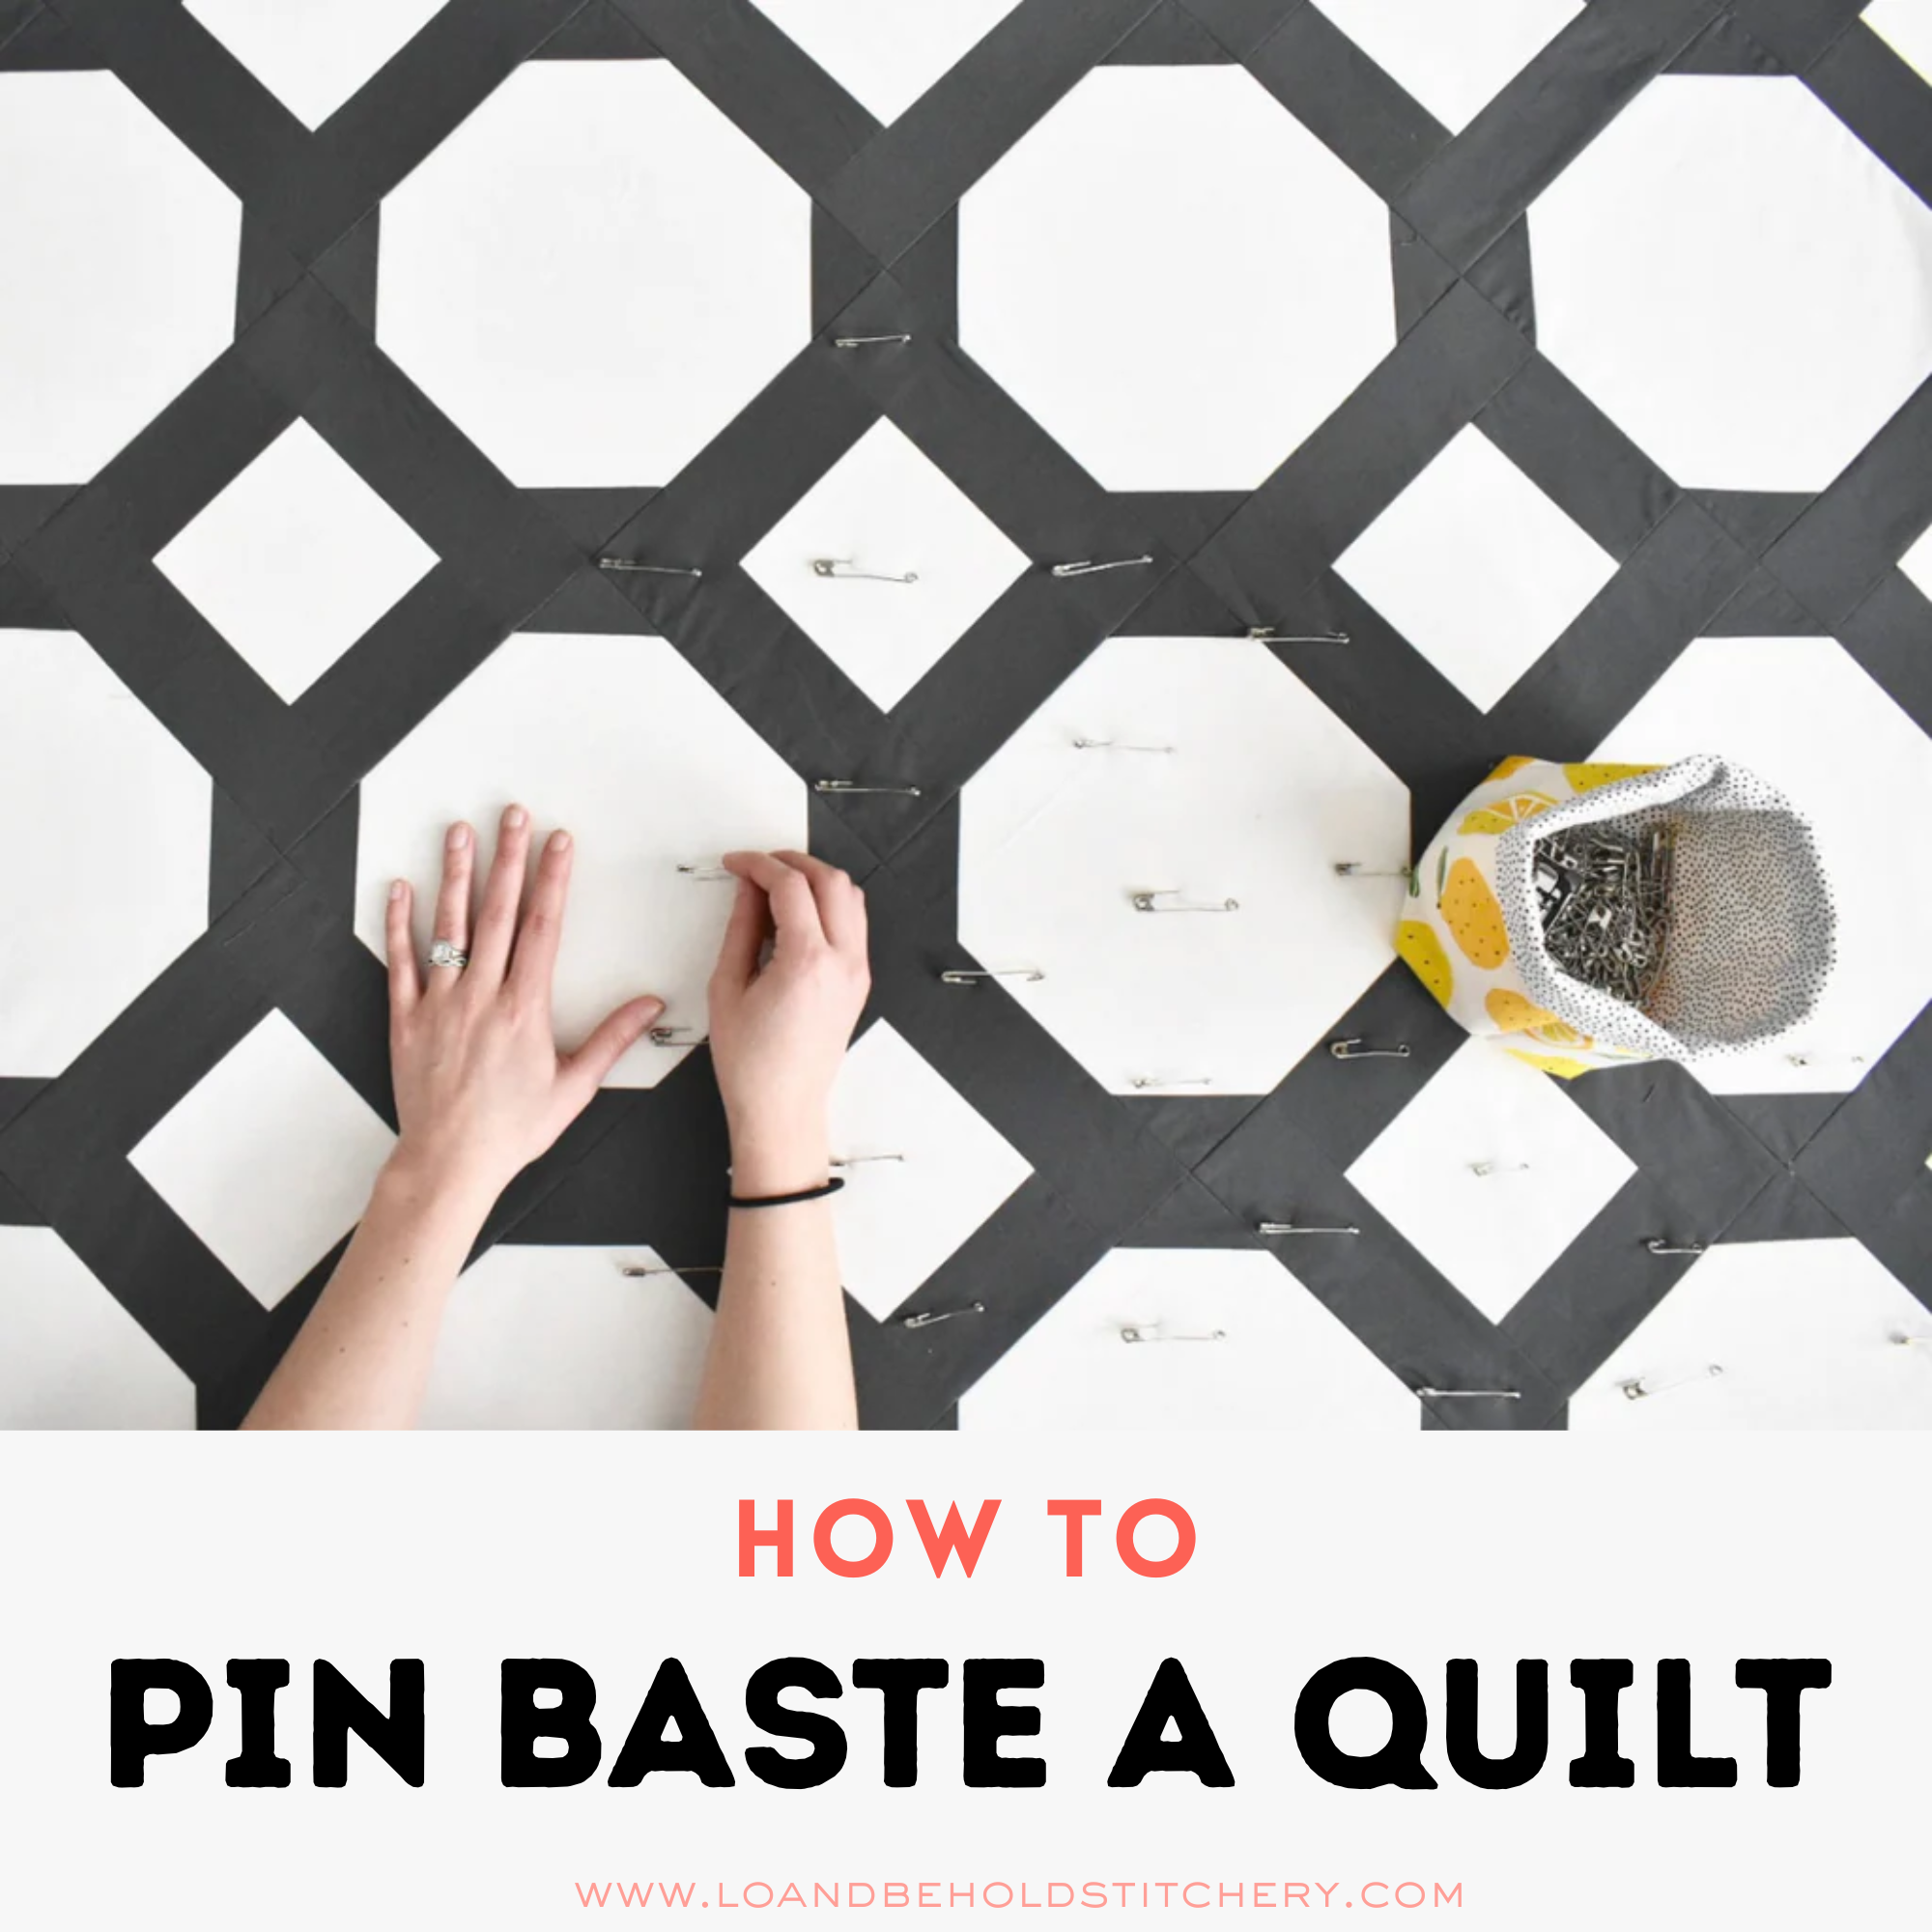
STEP 5: PIN FROM THE MIDDLE OUT.
Grab your safety pins, and start pinning your quilt sandwich together. As you place each pin, make sure it goes through all three layers: top, batting, and backing. (Curved safety pins make this much easier than regular safety pins.)
I recommend starting your pinning in the middle of your quilt, in case things shift as you baste. (A little shifting is okay, because we have that extra batting and backing!)
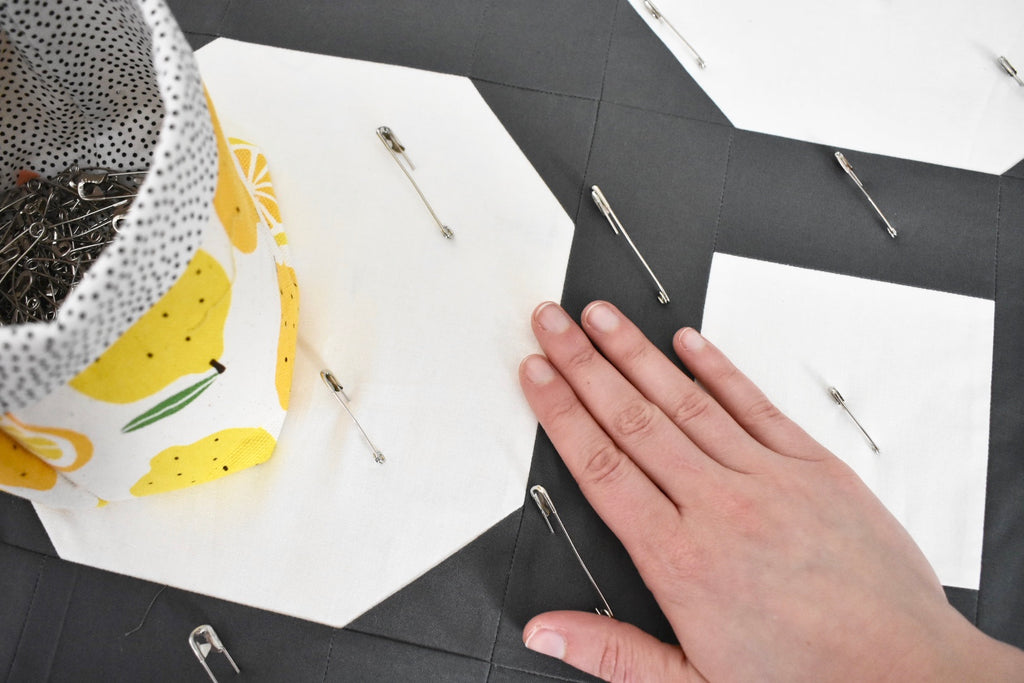
I try to pin every 4-6” or so…which is roughly the width of my hand. I’m definitely a looser pinner than many people. Some quilters recommend placing a pin every 2”! You might want to think about your quilt size as you decide how much pinning to do. If I’m working on a larger quilt, I’ll pin more densely than I would with a smaller project.
But really, it comes down to your comfort level. And as a general rule, it’s better to use too many pins than too little.
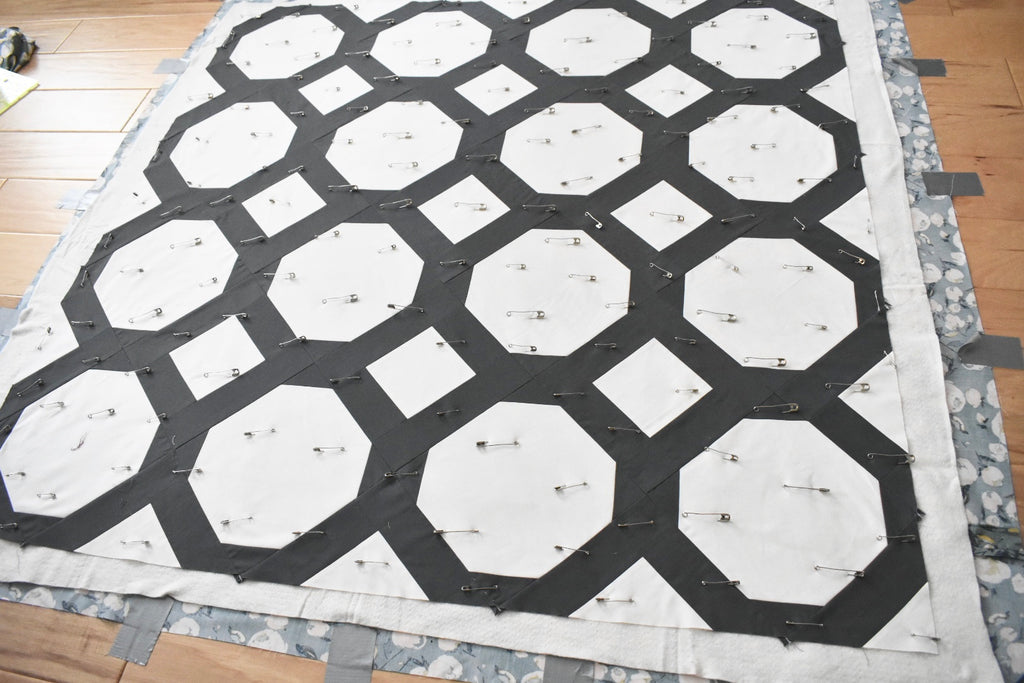
Once all of your pins are in place, it’s time to un-tape your quilt and start quilting! All that care you took while basting will keep your quilt nice and stable while you quilt…and help you end up with a beautiful finished product!
💡 |
Learn to quilt your own projects
|
Pin basting with a table
So what if you don’t want to pin baste on the floor? I get it! Maybe you don’t have any workable floor space for basting, or you have health issues that make spending time on the floor difficult, or you just don’t feel like crawling around on your hands and knees. No problem!
You can adapt this tutorial and baste your quilt on a table (or kitchen island) instead. Here’s how:
1. Put your backing right side down on the table. Unless you have a really big table, your project will probably hang off. That’s fine! We’ll baste in chunks.
2. For now, smooth out the part that’s on top of your table, and hold your backing in place with extra wide painter’s tape or clamps.

3. Add your batting, smoothing it out flat. As usual, try to leave an extra couple inches of backing visible on the edges.
4. Place your quilt top on the batting, and smooth things out again. Remember to leave a couple inches of extra batting.

5. Pin the section you’re working on, working from the center out.
6. Untape or unclamp your basted section, and adjust your project so that your unbasted portion is now on top of the table.


7. Repeat the previous steps, smoothing, pinning, and adjusting until you’ve finished basting your entire quilt!

Depending on your table size, you may be able to work on your quilt in halves…or you might have to work in quadrants or even smaller sections. That’s okay! Take it slow, keep things as smooth and taut as you can, and it will work out fine.
If you want to see these steps in action, I’ve got a video on Instagram that shows my process.
I’ve basted quite a few quilts this way. Once you get a little practice, you might be surprised as to how much you love this alternative to basting on the floor!
Pin basting vs. spray basting and thread basting
Like I said up top, I used to exclusively spray baste back in the day…but I never loved it. Still, some people really do swear by spray basting, and other quilters insist on thread basting!
All three kinds of basting can work well, so you may want to experiment and see what you like best. Here are some things to consider as you decide which method to use:
COST
Pin basting doesn’t cost very much…you only have to buy safety pins, and you can reuse them over and over (and over!).
Thread basting is pretty cheap too, since you just need a needle and thread (which you probably already have on hand).
Spray basting is the most expensive method, since you have to buy basting spray…and since you can’t reuse it, the cost can really add up!

TIME
Many people like spray basting because it’s so fast. You just spray between the layers, smooth things out, and let it dry.
Pin basting takes quite a bit longer, since you have to open and close each safety pin. And if you’re a dense pinner, those pins really add up!
Thread basting falls somewhere between the other two. You can use large stitches (several inches long, in fact), which makes it go quickly…but you’ll have to rethread your needle every so often, and even fast hand sewing is still slower than spraying.
HEALTH
If you spray baste, you need to be sure to spray in a well ventilated area (and even then, a respirator mask isn’t a bad idea!). The fumes aren’t good for you, and they’re not great for the environment either.
Pin basting and thread basting are both more environmentally friendly, and you don’t need to worry about fumes. At worst, you poke yourself a few times.
That being said, pin and thread basting can be harder on people with certain health issues, like arthritis…and in those cases, spray basting is a nice alternative!
So really, there’s no one best method for basting. Of course, I’m a dedicated pin baster these days…and maybe, with the help of this tutorial, you will be too!

Happy basting!
-Brittany
FAQ about pin basting
WHAT IS PIN BASTING?
Pin basting is when you use safety pins to pin the three layers of your quilt sandwich (backing, batting, and quilt top) together. Pin basting, like other kinds of basting, keeps your quilt from shifting around as you quilt it.
HOW MANY PINS DO I NEED TO BASTE A QUILT?
You almost always need more safety pins than you think to baste a quilt! The exact number depends on how big your quilt is and how densely you want to pin.
To calculate how many pins you need, divide your quilt height by the pin spacing you want and add one (so you have a pin for both edges of your quilt). Then do the same with your quilt width. Multiply those two numbers together to find out how many pins you need.
For example, if you have a 40” x 40” baby quilt and want to pin every 4 inches, you’d divide 40 by 4 (which gives you 10), and add 1, (for 11). Since this is a square quilt, we’ll just multiply 11 by 11 to get our total number of pins: 121.
CAN YOU USE STRAIGHT PINS TO BASTE A QUILT?
Yes, you technically can use straight pins to baste a quilt, but most quilters prefer safety pins. The closed design makes them safer (fewer poked fingers!) and less likely to shift around on you. If you’re not already comfortable pin basting, I definitely recommend using safety pins instead of straight pins.
🔄 |
Post updated 3/25/2026
|
.
.
.
.\\\
This post may contain some affiliate links meaning I may receive a small commission from each sell. Rest assured, I only share my favorite items with you!