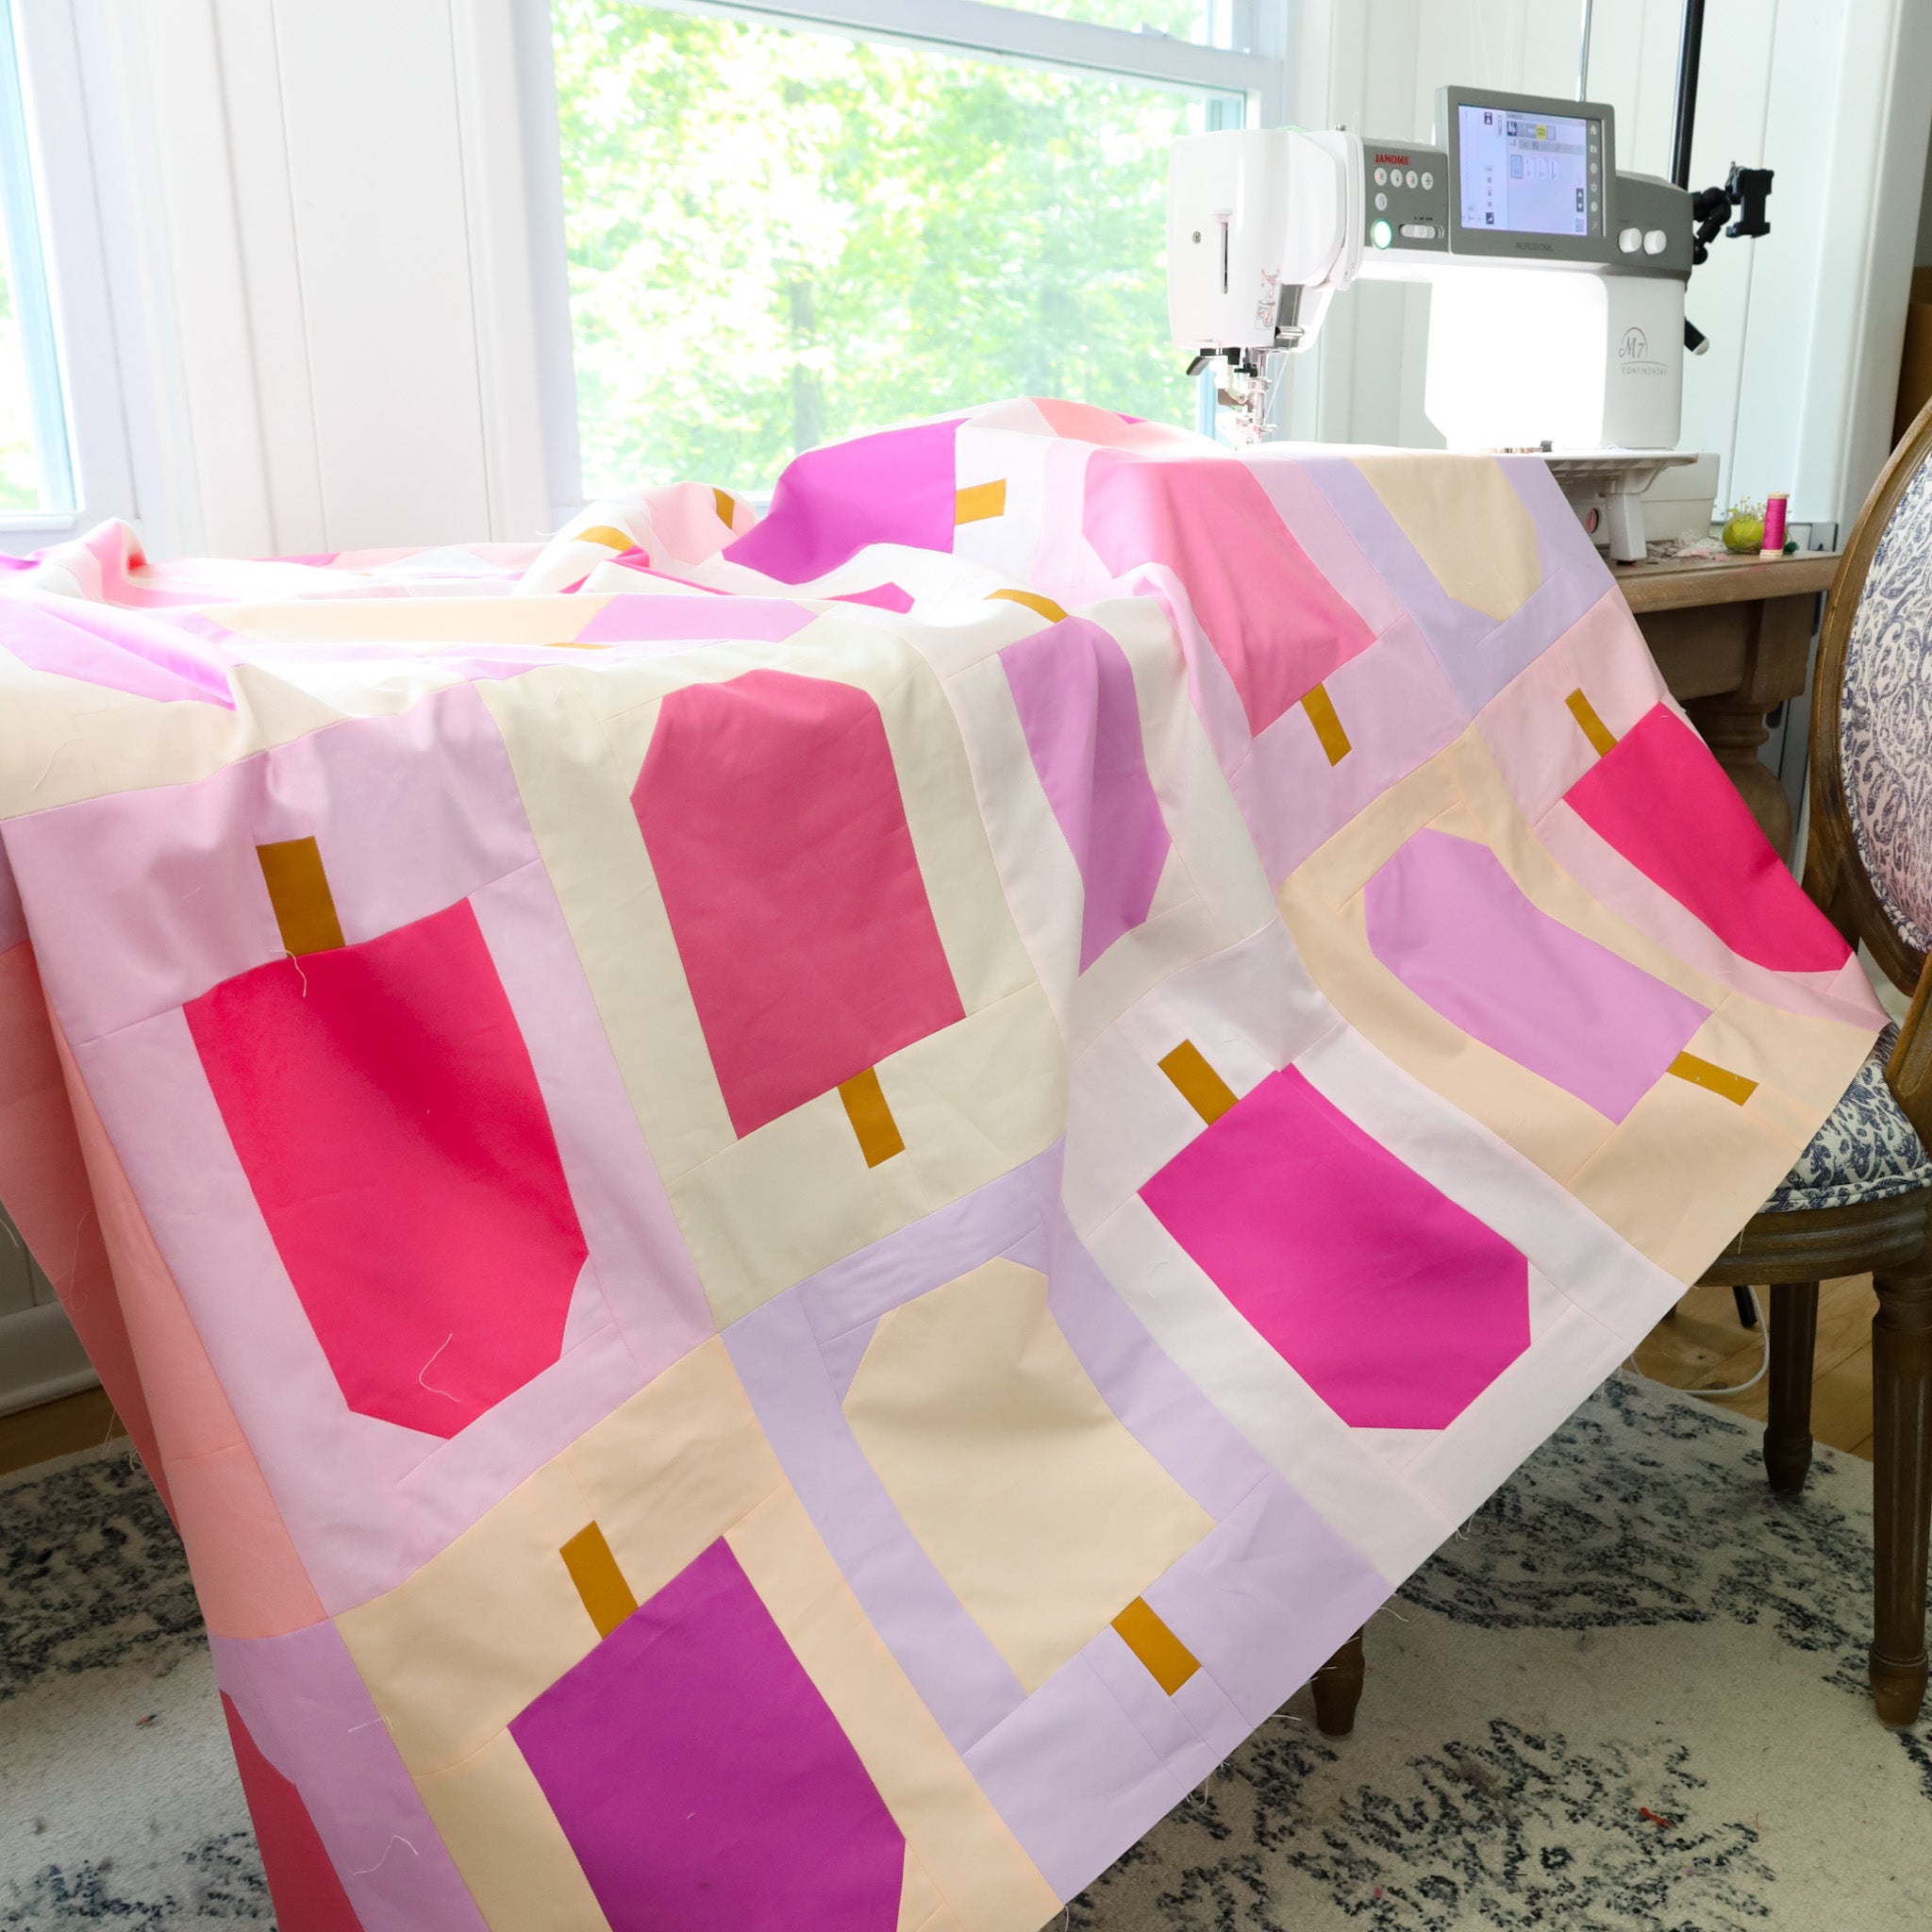
It is the 8th and final week of the Knitted Blooms Quilt Along! By this week, you should have all of your blocks assembled & ready to be sewn together! Before we get started, here are some helpful links that you might find handy:
I recommend back-stitching this seam, especially if it is going to be around the perimeter of your quilt top
Use pins!
Be careful not to flip seams as you are sewing.
07:23 - Pressing Row Seams - Alternate the direction that you press the rows seams from row to row. This will create nesting seams.
07:56 - Sewing Rows together
09:05 - Pressing Row seams - I like to press these seams open but you are welcome to press them to one side if you'd like.
09:45 - Optional stay-stitching - This is a seam that is ~1/8" away from the perimeter of your quilt top and it secures the seams around your quilt. It's optional and not required if you back-stitched all of your seams around the perimeter of your blocks/quilt...however, it's nice to have that extra security.
10:40 - our GRAND PRIZE!
Week 5 + 6 Prizes:
The winners of Brittany's Favorite Things Bundle for Week 5 + 6 is @gjanette2 and @brentex99! Send us an email here to claim your prize!
Click here for kits for this Knitted Blooms quilt!
Your Instagram account must be public for us to see your entry.
Take a progress photo of this week's progress. Please make sure that your photo does not include any part of the pattern pages. That is for your eyes only!
]]>
https://www.loandbeholdstitchery.com/blogs/quilt-alongs/knitted-blooms-quilt-along-weeks-5-62025-03-07T18:19:17-05:002025-03-07T18:19:40-05:00Knitted Blooms Quilt Along - Weeks 5 + 6Brittany Lloyd
Hello and welcome back!
It's Week 5 + 6 of the Knitted Blooms Quilt Along. These two weeks are all about Block Assembly. Before we get started, here are some helpful links that you might find handy:
This week is all about Block Assembly! It's when the magic truly starts to happen. :) You'll go through this process a little differently based on if you are making the Traditional/ 4 Color version or the Modern version. For the Modern (multi-color) version, I like to work block-by-block but for the other two versions, since all blocks are the same, I like to chain piece all rows at the same time. Let's dive in!
MINUTE MARKS:
02:00 - Seam allowances
03:53 - Laying out the rows.
04:20 - Chain piecing Row 1s
05:20 - Pressing seams open
05:47 - Troubleshooting
07:00 - Continuing to add rows
08:00 - Squaring up the quadrants
08:36 - Creating the Block Sashing
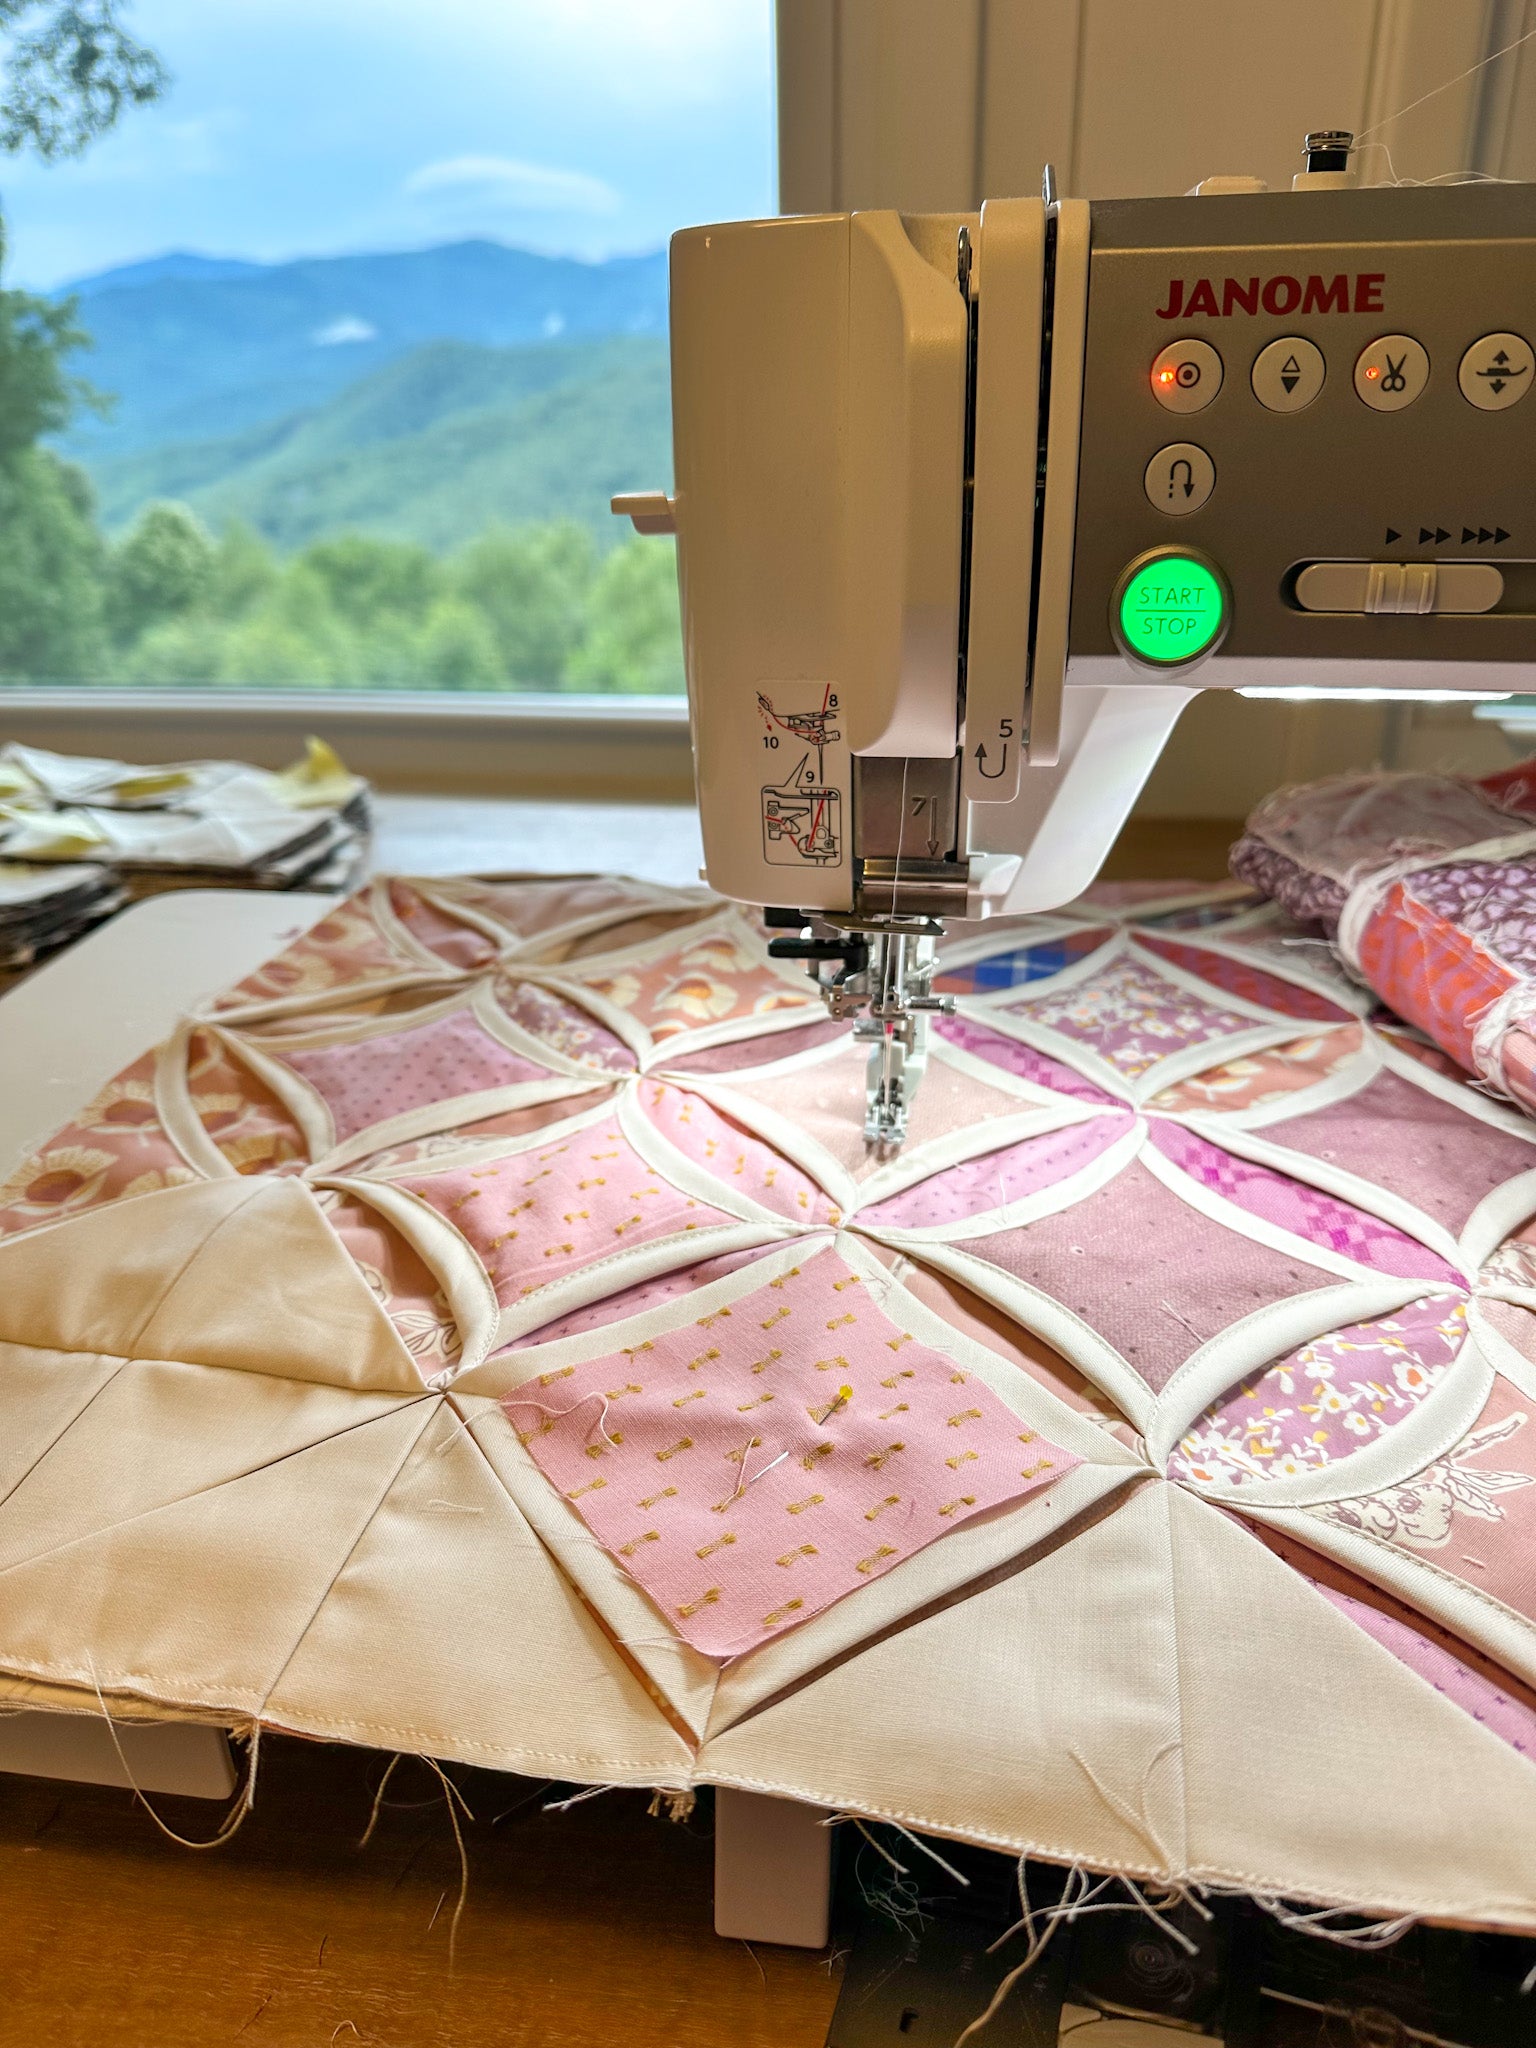
09:52 - Block Assembly
12:50 - Ruler trick for your quadrant seams
14:30 - Weeks 5+6 prizes
WEEK 5 + 6 HIGHLIGHTS:
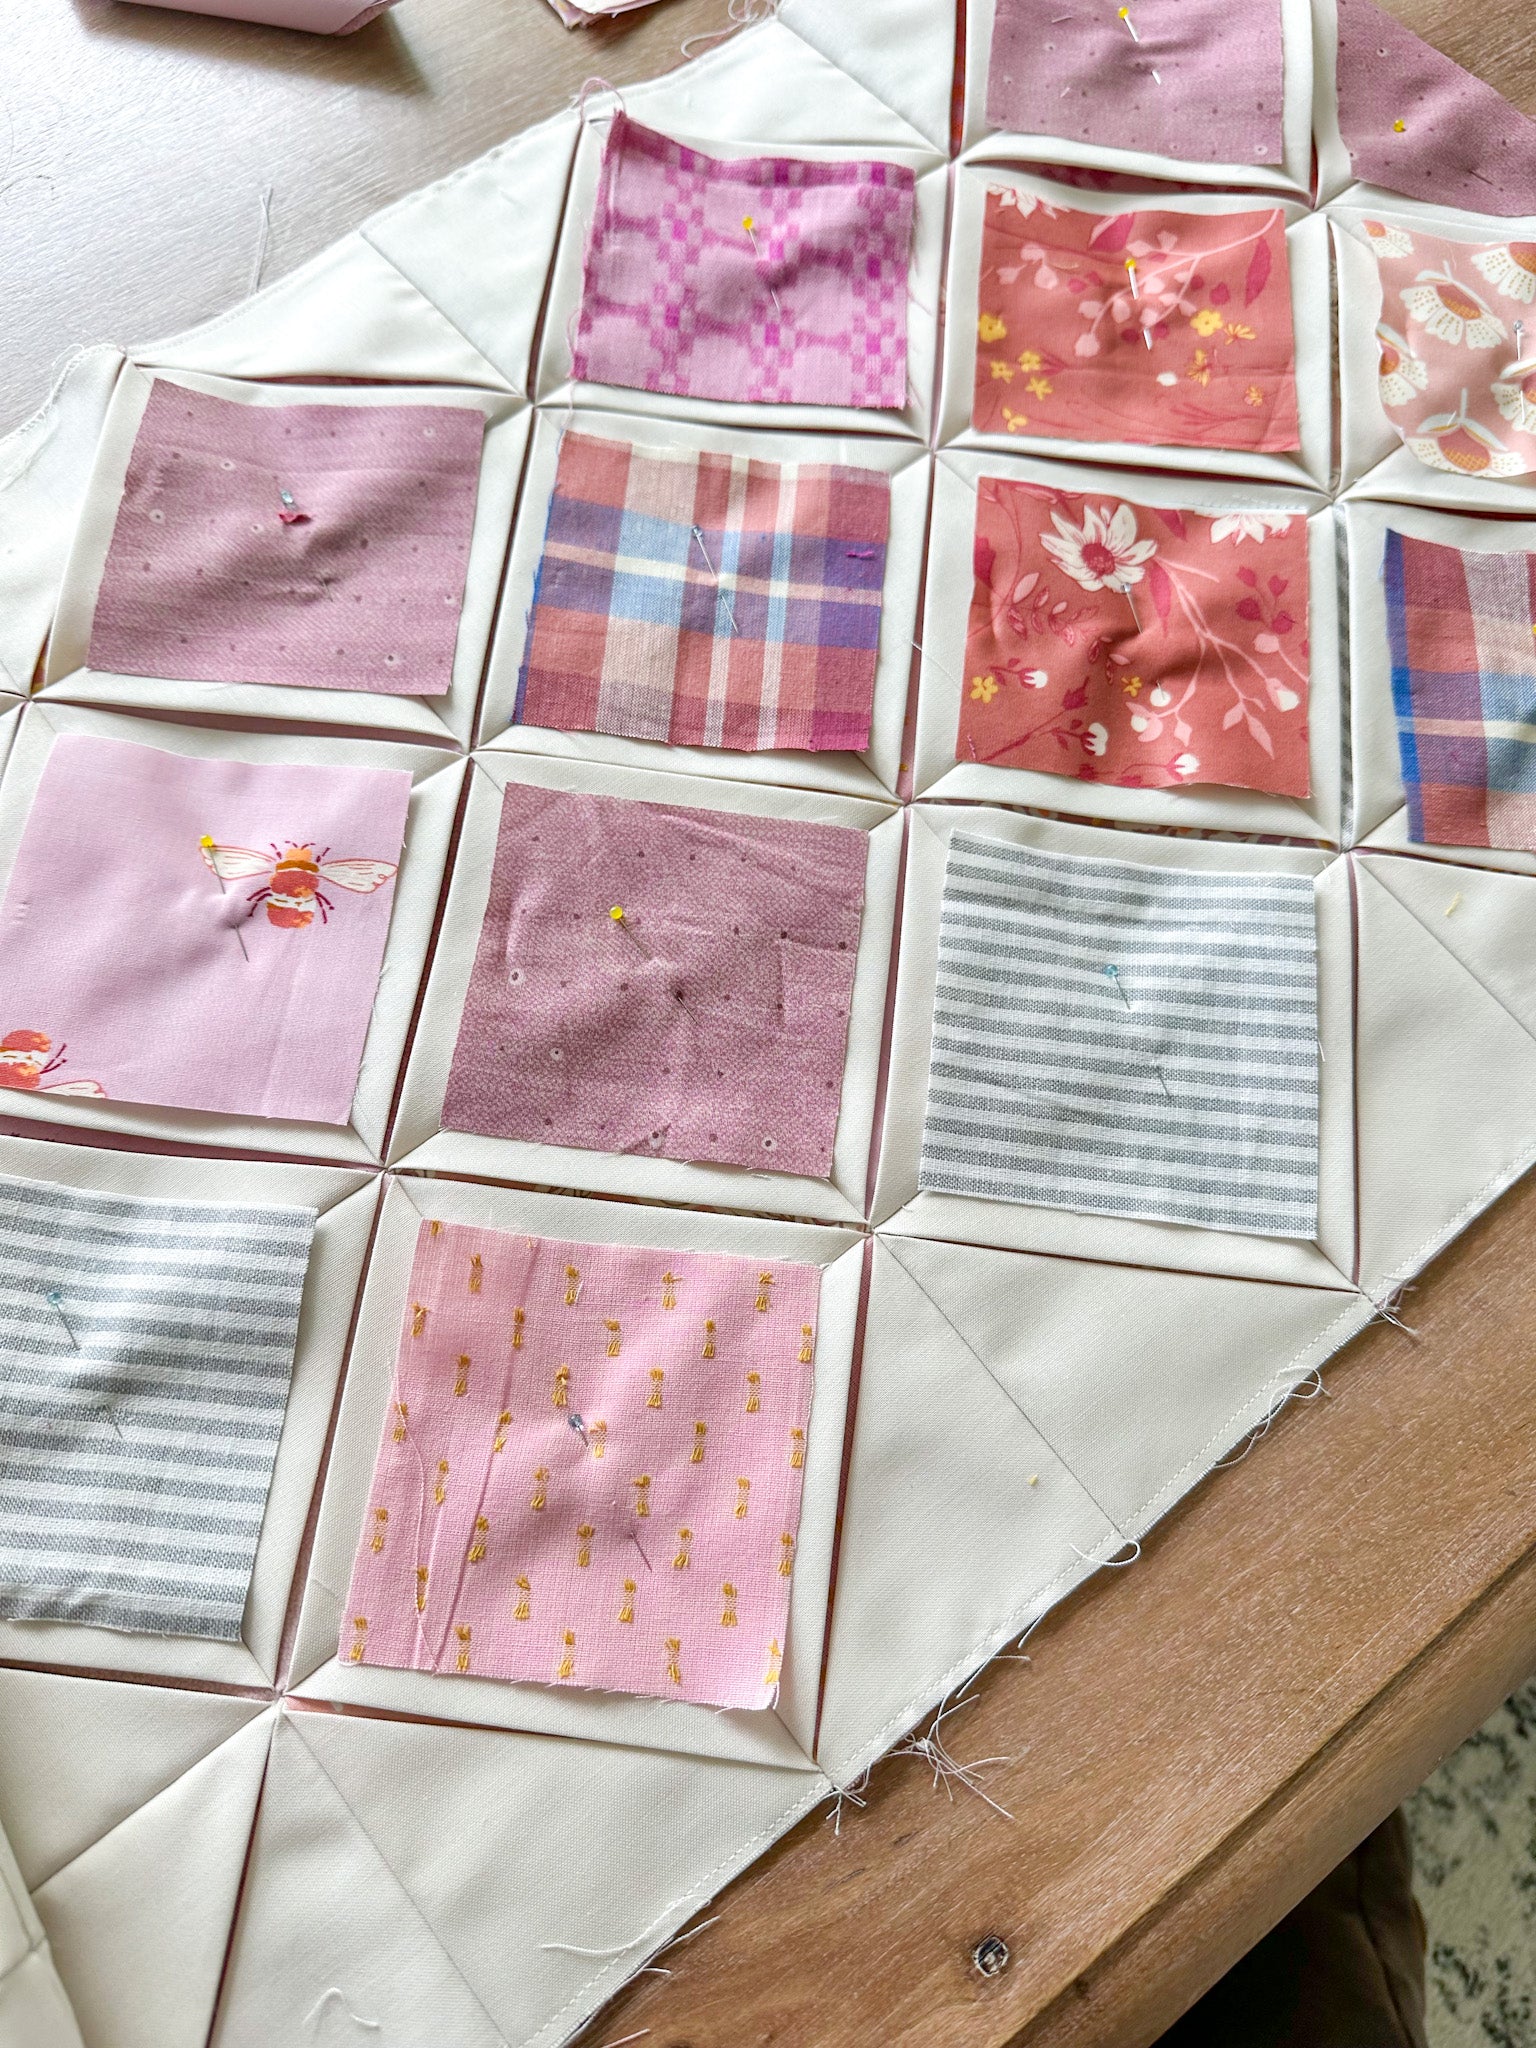
Your Rows and Small Flower Unit should fit together like a puzzle. If not, your seam allowance was likely off somewhere in the process. Refer to the measurements within the pattern to double check that your seam allowance is where you need it to be. It's always better to be a little more scant than a little too big with your seam allowance because you can square up your edges at the end if you need to. If your row is going to over-hang a little bit, it's best to have it do so along the edge of where your block is so that you can square it up later.
Keep the pattern close by and refer to the diagrams to make sure your rows down get rotated incorrectly.
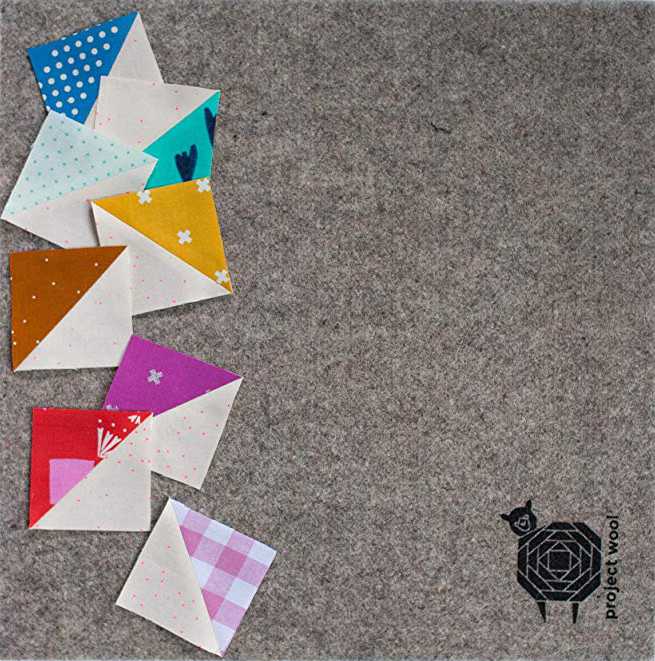
If you are making the Modern version, remember to keep your pieces in piles like you've been doing from the previous weeks. Remember that these piles have Groups A, B and C so you'll want to keep everything together and organized. Group A is the Main Flowers, so that's the Rows 1-8, Group B is the Small Flowers and Group C is the Flower Center.
Back-stitch the beginning of any seams that will be around the perimeter of your blocks. This will help them keep from unraveling when you go to sew your blocks together.
Use pins to align fabric intersections and keep rows from shifting as you are sewing; especially for Rows 3+5 and also Rows 4+6.
You shouldn't need to square up your quadrants too much. I will sometimes have a couple of areas where I have some teeny tiny bits of fabric that need to be trimmed away. Since the Background fabric is around the perimeter of your block, it isn't super noticeable if you need to trim something - as long as it's not too much!
Week 3 + 4 Winners:
The two Week 3 + 4 Winners of the Lo & Behold goodies bundle is @kandijanke + @brandylfarmer ! Yay! Send us an email and we'll get you your prizes asap!
Your Instagram account must be public for us to see your entry.
Take a progress photo of this week's progress. Please make sure that your photo does not include any part of the pattern pages. That is for your eyes only!
]]>
https://www.loandbeholdstitchery.com/blogs/quilt-alongs/knitted-blooms-qal-weeks-3-4-rows-1-82025-02-22T00:26:48-05:002025-03-03T11:34:11-05:00Knitted Blooms Quilt Along - Weeks 3 & 4: Rows 1 - 8Brittany Lloyd
Hello and welcome back!
It's Week 3 & 4 of the Knitted Blooms Quilt Along. By this week, you should have all of your small flower units made. We have grouped Weeks 3 & 4 together as we will be sewing the same thing for both of those weeks! This means it's time to start sewing our rows for our Main Flowers! Before we get started, here are some helpful links that you might find handy:
There are 8 rows in the Main Flower units, so there are several ways to split up the sewing. Normally, when I am making the Modern version I'll go through and make one block at a time. Whenever I made the Traditional and 4- Color version, I made all of my rows first. Once all of my rows were finished I went through and made my blocks. Both of these methods ensured that I was able to streamline the process and not switch tasks so often. Really, either way is great so feel free to work through the pattern however you'd like. For this QAL, we will be assembling all of our rows in Weeks 3 & 4 and weeks 5 & 6 will be our block assembly weeks.
Here are some tips for the process:
We are strip piecing all of our rows. Remember that the Modern version has its own instructions while the Traditional & 4-Color have their own set of instructions.
There is no need to backstitch, but I recommend using a small stitch length like 1.8 - 2.2 mm.
Remember to check your seam allowance as you go through each step. If your block is measuring smaller than the measurement listed in the pattern, your seam allowance is little bit too big. If your block is measuring larger than the measurement listed in the pattern, your seam allowance is little bit too small.
If your seam allowance isn't perfect, seam rip it before you sub-cut your strip pieces as it gets much more difficult to fix after you cut.
If you are making the Traditional or 4-Color Version, this is the perfect time to use a Stripology Ruler.
Remember to use pins! They will help keep your strips from shifting.
Week 2 Winner:
The winner of the Flatter Seams Package is: @mandyschetter! Congratulations! Send us an email and we'll get your prize on its way to you!
Week 3 & 4 Prize:
To enter:
Your Instagram account must be public for us to see your entry.
Take a progress photo of this week's progress. Please make sure that your photo does not include any part of the pattern pages. That is for your eyes only!
Share the photo to Instagram.
Use the hashtags #KnittedBloomsQuilt, #LoAndBeholdPatterns, and #KnittedBloomsQAL in the caption.
Tag @LoAndBeholdStitchery in the photo.
The winner will be shared in the Week 5 & 6' s blog post!
That's all for now! Thanks for joining along. I'll see you in two weeks for Week 5. :)
]]>
https://www.loandbeholdstitchery.com/blogs/quilt-alongs/knitted-blooms-qal-week-22025-02-14T19:09:16-05:002025-03-03T11:34:30-05:00Knitted Blooms Quilt Along - Week 2: Seam Allowance & Small Flower UnitsBrittany Lloyd
Hello and welcome back!
It's Week 2 of the Knitted Blooms Quilt Along. By this week, you should have all of your fabrics cut and ready to go. Now it's time to start sewing! Before we get started, here are some helpful links that you might find handy:
This week, we'll test our seam allowance and making all of our Small Flower Units. There are 4 Small Flower Units per block and by the end of this week, you should have all of them created, which will get us ready for Weeks 3 & 4: Rows 1 - 8.
If you've never tested your seam allowance before or sewn in batches you'll definitely want to check out the Week 2 video. In a nutshell, we will walk through why testing is important and some helpful tips and tricks in making Knitted Blooms and this weeks Small Flower Units. It's quick AND fun!
If you need help with your seam allowance, be sure to check out these two blog posts:
Make a test Small Flower Unit before you start making your blocks!
Every time you sew a portion of the block, get in the habit of putting your ruler over top & measuring to ensure your seam allowance is accurate! The pattern includes measurement benchmarks throughout it. Check your pieces to ensure your seam allowance is staying on track.
If your piece ends up measuring larger than what the pattern says, that means your seam allowance was a little bit too small. If your piece ends up measuring smaller than what the pattern says, that means your seam allowance was a little bit too large.
You are welcome to press your seams how you would like, but I like to press my seams to one side for two reasons. (1) It helps my blocks lay really flat. (2) It gives me a more accurate depiction of what my seam allowance is.
Minute Mark- 7:23
To make the small flower units, refer to page 10 in the paper pattern or page 12 in the digital pattern.
We are going to be strip piecing these petal units.
The modern version has its own set of instructions. You will be making the blocks one at a time. The traditional and 4 color version have their own set of instructions. You will be using WOF strips to strip piece the petal units.
Refer to the column on the far right hand side of the tables. This will tell you how many petal units you will cut from your strip piecing.
I like to pin my strips together and sew with a small stitch length of 1.8-2.0mm. This will keep your seams from unraveling once you cut through them.
Chain piece where you can.
Flatter Spray - helps seams become super flat; I like to water mine down a bit to make it last longer and also cut down on the scent just a smidge. I've tried the Celebration scent and I really liked it!
Tailors Clapper - helps retain heat when pressing & encourages seams to lie flat.
Backstitching is encouraged to help secure the seams around the perimeter of the Small Flower Unit.
If you have any fabric overhang, feel free to square it up.
Week 1 Winner:
The winner of the 18" x 36" wool pressing mat, tailors clapper, and Flatter spray is Melissa Jo, @josews2021 ! Congratulations! Send us an email and we'll get your prize on its way to you!
Week 2 Prize:
This week, our prize is centered around achieving flat seams. One lucky winner will receive:
Your Instagram account must be public for us to see your entry.
Take a progress photo of this week's progress. Please make sure that your photo does not include any part of the pattern pages. That is for your eyes only!
Share the photo to Instagram.
Use the hashtags #KnittedBloomsQuilt, #LoAndBeholdPatterns, and #KnittedBloomsQAL in the caption.
Tag @LoAndBeholdStitchery in the photo.
The winner will be shared in the Week 3's blog post!
That's all for now! Thanks for joining along. I'll see you next week for Week 3. :)
]]>
https://www.loandbeholdstitchery.com/blogs/quilt-alongs/knitted-blooms-quilt-along-week-1-cutting-mix-and-match2025-02-07T15:40:31-05:002025-02-13T15:12:09-05:00Knitted Blooms Quilt Along - Week 1: Cutting + Mix and MatchBrittany Lloyd
Welcome to Week 1 of the Knitted Blooms Quilt Along! This week is all about prepping and cutting fabric for our quilt tops and organizing them. Lets dive in!
]]>
Welcome to Week 1 of the Knitted Blooms Quilt Along! I'm really looking forward to our time together over the next 8 weeks and seeing all of your beautiful quilt tops come together!
Be sure you have a copy of the Knitted Blooms quilt pattern (either a Paper copy or PDF) and let's get started!
We'll be creating a Knitted Blooms quilt top together over the next 8 weeks. Here's a look at our schedule:
Are you ready?!
A LITTLE ABOUT ME...
If we haven't "met", I'm Brittany...the quilter, pattern designer and online educator behind Lo & Behold Stitchery. I started quilting in my grandmother's memory and it's turned into an enormous passion of mine! I love connecting with fellow quilters via the internet via quilt patterns, tutorials and online courses. You can read more about Lo & Behold Stitcheryhere.
This quilt along will live under the "Quilt Alongs" section of our website. Information will be both in a blog post form as well as a video form. You'll find the videos on our You-Tube channel, which will also be linked within the blog posts. I recommend watching the videos AND reading the blog posts, as there will be helpful information in both. So with that said, here we go!
Here's what I cover in the video:
BEFORE YOU GET STARTED
Video Minutes 1:30-4:48
Quilt Sizes: Pillows/Wall Art, Baby, Small Throw, Large Throw, Twin/Full, Queen, King.
Quilt Layout Options: Modern, 4-Color, Traditional
Choosing Fabrics: You should already have your fabrics picked out, but if you don't, please do not worry! You can find lots of inspiration in the pattern, use Pre-Quilt to choose colors, or purchase a kit from our shop or from a shop that we have partnered with!
PreQuilt - We’re happy to share that we’ve again partnered with PreQuilt to bring you free online interactive coloring pages. Thesemake it really easy to test out many different fabric color combinations quickly! Digitally plan this quilt and all Lo & Behold designs with the click of a button. They have a really greatfreeoption that allows you to use different brands of solids; or you can upgrade your plan to use prints, save your designs and more! Use the codeLOANDBEHOLDfor 20% off your annual subscription (either Basic or Market)!
Pre-washing simply means to wash your fabric before you cut into them and start sewing. The benefit of pre-washing is that you will wash away excess dye to reduce possible color bleeding. Reds, blues and purple fabrics are notorious for bleeding, so I sometimes pre-wash when I have high contrast colors such as red and white. While I acknowledge that not pre-washing these fabrics is a "risk," often times, I skip pre-washing and use Shout Color Catchers when I wash my quilt for the first time. Typically, these Color Catchers do the trick, but if I ever find bleeding in my quilt after the first wash, I would rather deal with the aftermath than take the time to prewash. This comes down to personal preference and how much you want to be adventurous with it (or not).
Most fabric manufacturers use starch and stabilizers on their fabrics to keep the fibers stiff while they're on the bolt. When you wash your fabric, either before it's in the quilt or after, you wash away that starch. Personally, I like the added stiffness, as it makes for cutting and sewing to be easier. But if you choose to prewash you may decide that you want to add some starch back to the fabric to make it easier to work with.
Some quilters also choose to pre-wash so that they "pre-shrink" their fabric. This makes a difference if you are using various fabric types within your quilt. For example, linen shrinks at a different rate than cotton does. If you use both types of fabric within your quilt, once they shrink they could cause areas of pulling on your seams. If you go ahead and pre-wash/pre-shrink everything, then the fabrics in your quilt will all behave similarly, which will in turn give you a more stable quilt. That being said, I can probably count on one hand the amount of times that I've pre-washed my fabric.
How to Prewash:
Wash fabrics in cool water with a mild detergent. Feel free to use a mesh bag to prevent fabric from stretching or twisting. Dry on low heat and remove the fabrics from the dryer immediately once it's dry. For yardage, re-align selvedges and press the fabric to create a new fold. Most people do not pre-wash pre-cuts (nor fat quarters) because if the fabric frays too much, you might not have the designated amount that you need for your project. Some people also “stay-stitch” about 1/8" away from the perimeter of the edges to help prevent the fabric from unraveling too much.
Again, pre-washing is one of those a highly debated topic in the quilting world, so don't feel like there's a right or wrong answer. Follow your heart. :)
Using Starch:
Starching - Starch makes your fabric more stiff, which makes it easier to sew and work with. If you do decide to starch, you'll want to starch your fabric before you cut them.For yardage, assess how your WOF is folded. You'll want the two selvedge ends to be right on top of each other. This may mean ironing a new crease in your fabric. When I starch, I spray the entire piece of fabric to get it pretty saturated, then use my iron to press out any wrinkles or creases.This is the starch that I use.
Pressing -You'll want to press your fabrics to get out all of the harsh creases and wrinkles. Here is the link to my large ironing board that I love!
Refolding Fabric -This only applies to yardage, but it is super important to refold your fabric so that your strips are straight. Be sure to refer to the video to see how I do this, especially with yardage. Refer to this blog post for details.
Iron- I recently purchased this iron off Amazon and it does a great job for the price. I also love my new Oliso iron & find myself using it a lot!
Click here for a tutorial on How to Cut WOF Strips. This tutorial also covers how to make "Sub-cuts"
Mix & Match (Modern version): Video Minutes- 18:49 Each block has three different parts: main flower, small flower, and flower center. We are going to separate the fabric into those three groups & shuffle them around to give a little variety in each block.
Color Inspiration: You can find lots of color inspiration in the pattern for each version of the quilt!
PATTERN NOTES
Read through all pattern instructions.
WOF: This pattern assumes your WOF (width of fabric) is at least 42". This is important because if your fabric is less than 42" you might not be able to do exactly as the pattern says and *may* need some extra fabric. The fabric requirements all have some overage, so odds are, you'll have enough, but it's just something to keep in mind.
Similarly, if your fabric is greater than 42", you might be able to cut your fabric slightly differently than what the pattern calls for. I notice this when I work with Kona solids, which is usually around 44"45".
Sub-cuts: Within the Cutting Instructions table, bolded text is a WOF strip. Bullet points listed underneath WOF cuts are "sub-cuts". Here's an example:
This means that you will:
Cut (7) 2.5" x WOF strips first. Set those strips aside.
From those (7) strips, cut (16) 2.5" x 6.25" pieces and (64) 2.5" x 2.5".
Asterisks: Any time you see the asterisk symbol (*), that indicates a square measurement, For example, 2.5"* = 2.5" x 2.5".
WHAT I'M MAKING
I decided to use small scale prints for this version to try something new. I picked out several of my favorite Art Gallery Fabrics prints including ones with carrots, apples and beautiful little florals. I went with AGF Driftwood as my background to give everything a neutral, dark-ish background. We have kits for this quilt in the shop! Remember that our shop will be close 2/9- 2/28 as we travel for QuiltCon (except for digital items!)
WEEK 1 PRIZE:
Video Minutes: 22:46-24:30
There are prizes for each week of the Quilt Along! This week, we are giving away a Stripology Ruler to one lucky winner!
To enter:
Only public Instagram accounts are eligible for entry.
Take a progress photo of this week's progress (ex. your fabrics cut, mix & matched, etc). Please make sure that your photo does not include any part of the pattern material. That is for your eyes only!
Share the photo to Instagram.
Use the hashtags #KnittedBloomsQuilt, #LoAndBeholdPatterns, and #KnittedBloomsQAL in the caption.
Tag @LoAndBeholdStitchery in the photo.
The winner will be shared in the following week's blog post!
"I'm In" Prize:
If you participated in sharing the "I'm In" graphic prior to the QAL starting, it's time to pick a winner for the $75 gift card to our shop! And the winner is...... @a.pair.of.soks!
Congrats! Please send us a DM on Instagram and we'll get you the details!
That's all for this week. I'll see you next week for Week 2!
Brittany
.
.
.
This post contains affiliate links. If you purchase that item through my link, I may receive a small commission from your purchase at no cost to you. I only recommend products that I know and love!
Discover more learning opportunities with a Lo & Behold Stitchery course- enroll today!
]]>
https://www.loandbeholdstitchery.com/blogs/quilt-alongs/knitted-blooms-quilt-along2025-01-10T08:09:44-05:002025-01-26T06:30:43-05:00Knitted Blooms Quilt AlongBrittany Lloyd
It's happening! We're hosting a Knitted Blooms Quilt Along in just a few weeks and we would love for you to join us! Grab the pattern (PDF or Printed) and keep reading for details!
Knitted Blooms Quilt Along details:
WHO: You, me and other quilters from around the world!
WHAT: An 8 week Quilt Along; each week we'll complete a portion of the Knitted Blooms patternand by the end, we'll have a beautifully finished quilt top! Plus we'll share progress and cheer each other on along the way. It's going to be fun! :)
WHEN: February 8th - April 5th; information will be saved on our website. If you cannot participate at this particular time it will be there when you are ready!
WHERE: We'll be sharing weekly QAL content straight to your inbox, so if you're subscribed to our newsletter, you're good to go! You can share weekly progress photos to IG to enter to win prizes. You do not need social media to participate, but you do need a public IG account to enter to win prizes.
WHY: Sewing with a community of friends is FUN! Plus we will be sharing lots of helpful tips for sewing the Knitted Blooms pattern.
How do I sign up? There's no official sign up. We'll be sending out links to content via our newsletter. You'll need to purchase either aPDForPrintedcopy of the Knitted Blooms Quilt Pattern.
Looking for more information about the Knitted Blooms Quilt pattern? Check out the blog post about the Cover quilt here, and also this blog post about the Hydrangea version.
SCHEDULE
We're taking our sweet time with this quilt along! Feel free to make any size of the pattern (more on that below) and follow along with our schedule. If you want to make a larger size, the schedule should allow for you to do so, depending how much time you have for sewing. I plan to make the Large Square Throw size, but again, the weekly prompts work for any of the sizes.
Week 1 - February 8: Cutting + Mix and Match
Week 2 - February 15: Test Seam Allowance + Small Flower Units
Week 3 - February 22: Rows 1-8
Week 4 - March 1: Rows 1-8
Week 5 - March 8: Quilt Blocks
Week 6 - March 15: Quilt Blocks
Week 7 - March 22: Catch Up Week
Week 8 - March 29: Quilt Top Assembly
PLANNING YOUR QUILT
Knitted Blooms has 9 sizes to choose from and 3 different color-way options! Click over to this blog post to read more about all the variations of this pattern.
COLORING PAGES
You can find printable PDF coloring pageshere. Knitted Blooms is also onPrequilt(free digital coloring pages)!
KITS
Want to take the guess work out of selecting fabrics? We have 3 Knitted Blooms quilt kits to choose from ourshop! Note that the Cover kits are for Preorder and will not ship until after the start of the QAL.
OTHER SHOPS CARRYING KITS
We love partnering with various quilts shops from around the world to bring you some beautiful quilt kit options! Click through below to see what I mean!
If you are a quilt shop with Knitted Blooms kits, send us an email and we'll add you to our list!
PRIZES
We will have prizes up for grabs during the Quilt Along. There will be more details to come, but first, we're kicking things off by giving away a $75 gift card to our shop!
To enter:
Share one of the "I'm In" photos to your Instagram feed; please note that we are only able to see your entry if your account is public.
]]>
https://www.loandbeholdstitchery.com/blogs/quilt-alongs/summer-scrap-bash-quilt-along2024-05-31T12:02:55-04:002024-06-29T10:53:41-04:00Summer Scrap Bash Sew-AlongBrittany Lloyd
Find all of the Summer Scrap Bash Sew-Along info on this page. Click below to sign up and read on for all of the quilty details!
WHO: You, me and other quilters from around the world!
WHAT: A slow and relaxing seven week summer Sew Along. We'll be sharing 3 free coordinating block patterns for you to use with your scrap stash, we'll sew a little each week and by August we'll all have a beautifully, scrappy finished quilt top! Plus we'll share progress, cheer each other on and hand out some snazzy prizes along the way. I can't wait! :)
WHEN: June 29th - August 17th; information will also be saved on our website. If you cannot participate at this time it will be there for you when you are ready!
WHERE: We'll be sharing weekly Sew-Along content straight to your inbox! You can share weekly progress photos to IG to enter to win prizes.You do not need social media to participate, but you do need a public IG account to enter to win prizes.
WHY: Sewing with a community of friends AND using your scrap stash is FUN! Plus we will be sharing lots of helpful tips for planning, organizing and sewing scrappy quilts.
We know summers can be busy so we have a very laid back schedule for this Sew-Along with plenty of time to enjoy summer AND fit in some scrappy sewing! While you can easily get this quilt top made in less time, we have spread the steps out over a relaxing 7 week time frame.
Week 1: June 29th - July 5th - Planning & Organizing
Block patterns will be in the Scrap Bash kick-off email on June 29th!
PRIZES
We have some pretty awesome prizes up for grabs during the Sew-Along. There will be more details to come, but first, we're kicking things off by giving away a $75 gift card to our shop!
To enter:
Share one of the three "I'm In" photos from this blog post to your Instagram feed; please note that we are only able to see your entry if your account is public.
Tag @loandbeholdstitchery in the photo AND in the caption.
Use the hashtags #summerscrapbash and #loandbeholdpatterns .
Enter by July 3rd at 8pm EST. Winner will be announced in the Week 2 post on July 6th.
A winner will be randomly selected. Giveaway is open worldwide.
]]>
https://www.loandbeholdstitchery.com/blogs/quilt-alongs/upscale-plaid-qal-week-4-quilt-top-assembly2024-02-17T08:34:03-05:002024-04-06T10:43:21-04:00Upscale Plaid QAL - Week 4: Quilt Top AssemblyBrittany Lloyd
Hello and welcome back!
It is the 4th and final week of the Upscale Plaid Quilt Along! By this week, you should have all of your Quadrant rows assembled...now we are going to sew those Rows together to create our Quadrants, then sew the Quadrants together to create our Quilt Top! Looking at the pattern, we are completing Steps 3 and 4 under "Quilt Top Assembly". Before we get started, here are some helpful links that you might find handy:
Here's our Week 4 video with some tips for this process.
By this week, you should have your layout picked out. That determined how you pressed your row seams last week, which will also help you have nesting seams when you go to sew the Quadrants together this week.
Since I'm making the Layout 1, I have (2) Row 1 seams pressed to the right and (2) Row 1 seams pressed to the left. This applies to all of my Row seams. When sewing the rows together, be careful that you are sewing rows together that have opposite seams so that they are nesting.
I like to use fabric glue for the areas that have open seams. Pins are also crucial for those long seams!
Once your Rows are sewn together, follow the seam pressing chart to see what direction (up or down) those seams should be pressed. Be sure that you follow the chart all the way across. For example in Layout 1, in the Quadrants where Row 1 seams are pressed to the left, then I'm going to press my seam in between Row 1 and Row 2 up. Pay close attention to this. (This is also explained in minute mark 5:30 of the video above.)
I recommend "stay-stitching" around the perimeter of your quilt top once it's finished. This is just a seam that is ~1/8" around the perimeter of your quilt top and it secures any seams that are prone to unraveling.
Once you have your Quadrants sewn together, you now have a completed Upscale Plaid quilt top! YAY!
.
WEEK 3 WINNER
The winner of FREE edge-to-edge quilting on their Upscale Plaid quilt by Stitch Lab Quilting is @iamhollyb . Congratulations! Send us an email (hello@loandbeholdstitchery.com) and we'll get connected with Sara. :)
.
WEEK 4 PRIZE
Our prize this week is a FREE seat in one of our online quilting courses. Doors to Beginner Quilting Academy, Triangle School and Curve College open this April (2024) and we're so excited to host another round of these comprehensive online classes!
Note: Many of you have taken all three of the courses - yay! This prize can also be transferred as a shop credit.
To enter:
Only public Instagram accounts are eligible for entry.
Share a photo of your finished quilt top to Instagram.
Use the hashtags #UpscalePlaidQuilt, #LoAndBeholdPatterns, and #UpscalePlaidQAL in the caption.
Tag @LoAndBeholdStitchery in the photo.
You have until midnight PST on March 1st to enter. The winner will be announced in the March 2nd newsletter!
.
LONGARM DISCOUNT
Sara of Stitch Lab Quilting is offering 20% off quilting for Upscale Plaid quilts through June 30th, 2024! I mentioned this last week, but Sara does a lot of longarm quilting for me and she does an amazing job!
That's all for now! Thanks for joining the Upscale Plaid Quilt Along. I hope you've had fun with it...I know I have. I'll see you next time!
It's Week 3 (of 4) of the Upscale Plaid Quilt Along. By this week, you should have all of your strip piecing out of the way and Blocks A, B, C and D created. Now it's time to start to assemble our quilt top! Before we get started, here are some helpful links that you might find handy:
This week, we're completing Steps 1 and 2 under Quilt Top Assembly. By the end of this week, you'll have all of your quadrant rows completed. If you're making the Coaster, Placemat or Pillow sizes, you'll only have one set of rows to create. Here's our Week 3 video with some tips for this process.
Before you jump into this week, you'll want to decide on a quilt layout. This layout will determine how your press your row seams and your quadrant seams. Refer to the layout options on the bottom of page 9 in the Paper copy or the bottom of page 11 in the PDF.
Also refer to the next page for "Quilt Drape" diagrams. If you are making the Queen or King size, this shows you what part of the quilt will show on top of a mattress.
Lay out your Rows and Row pieces according to the diagram under Quilt Top Assembly on page 8 of the Paper copy and page 9 of the PDF. The chart that follows that diagram gives you a list of each of the pieces within the rows. Measurements are listed as width x height (horizontal measurement x vertical measurement) to indicate how pieces should be rotated.
I like to chain piece each of the pieces in each of the rows. This is demonstrated in the video above and also written in this blog post. Essentially, I create all of my Row 1s at the same time, then all of my Row 2s at the same time and so on. I repeat until I have all of my rows for each of my quadrants created.
Once you choose a layout, refer to the "Seam Pressing" chart at the top of page 9 in the paper version. If you're referring to the PDF copy of the pattern, you'll find it at the top of page 11.
Refer to the left-hand column to reference which layout you are making. Then follow that row across the table to see which direction you should press each of the rows.
For example, each Layout has (4) of each of the Rows 1 through 5. If you are making Layout 1, you'll press (2) Row 1 seams all to the left. and (2) Row 1 seams all to the right. Follow this chart closely because it will help you achieve nesting seams next week when we get to Steps 3 and 4.
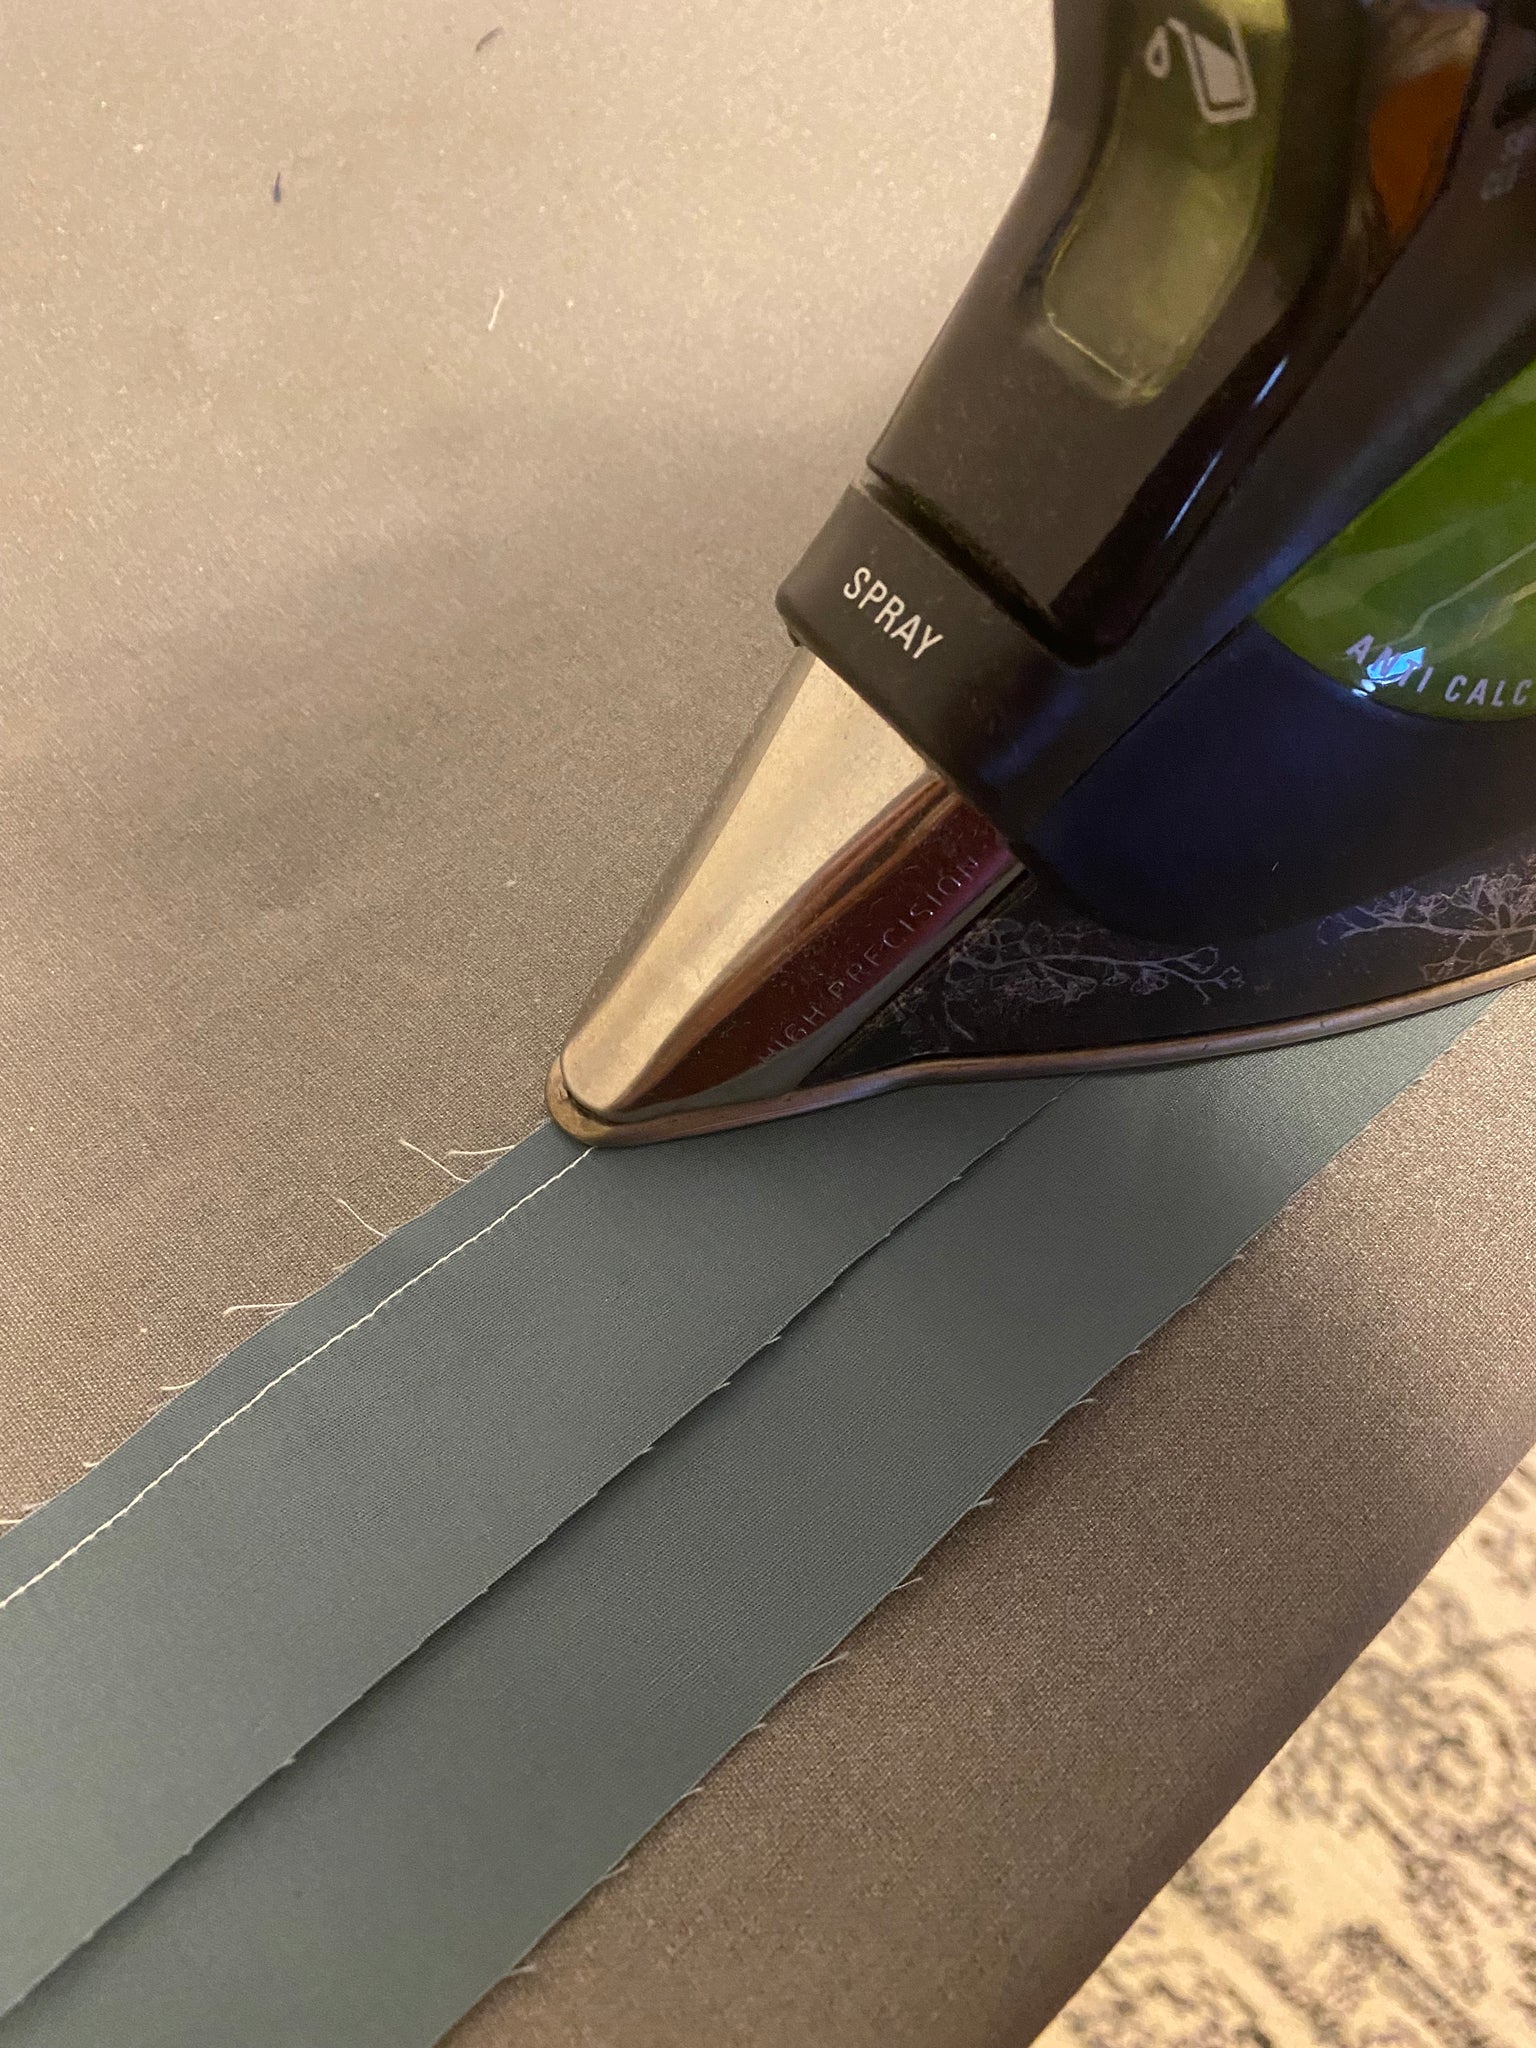
When pressing seams to one side, press the seam flat to start, then gently using the nose of your iron, press the seam according to the instructions. Remember to get the seam as flat as possible without any major folds of fabric around the seam.
By the end of this week, you should have (4) of each of your rows created, which is Steps 1 and 2 under Quilt Top assembly. Next week, we'll complete Steps 3 and 4 of Quilt Top Assembly. Wahoo!! We're almost there!
.
Week 2 Winner
The winner of my "Heirloom" fat quarter bundle and thread collection is @sewtotallyobsessed . Congratulations! Send us an email (hello@loandbeholdstitchery.com) and we'll get your fabric and thread sent right over. :)
.
Week 3 Prize
This week, our prize from Sara of Stitch Lab Quilting. Sara has quilted quite a few of my quilts, including two of my Upscale Plaid sample quilts and she does an amazing job! If you're looking to have your quilt professionally basted, quilted and I think she even does binding...I cannot recommend Sara enough!
This "Winter Blush" Upscale Plaid quilt was long-arm quilted by Sara. You can read more about the quilt, find more photos and quilt kits here.
This week, one lucky winner will get FREE edge-to-edge quilting by Stitch Lab on their Upscale Plaid quilt!
To enter:
Only public Instagram accounts are eligible for entry.
Take a progress photo of this week's progress. Please make sure that your photo does not include any part of the pattern material. That is for your eyes only!
Share the photo to Instagram.
Use the hashtags #UpscalePlaidQuilt, #LoAndBeholdPatterns, and #UpscalePlaidQAL in the caption.
Tag @LoAndBeholdStitchery in the photo.
The winner will be shared in the following week's blog post!
That's all for now! Thanks for joining along. I'll see you next week for Week 3. :)
]]>
https://www.loandbeholdstitchery.com/blogs/quilt-alongs/upscale-plaid-qal-week-22024-02-03T10:47:01-05:002024-02-07T13:54:09-05:00Upscale Plaid QAL - Week 2 - Strip PiecingBrittany Lloyd
Hello and welcome back!
It's Week 2 (of 4) of the Upscale Plaid Quilt Along. By this week, you should have all of your fabrics cut and ready to go. Now it's time to start sewing! Before we get started, here are some helpful links that you might find handy:
This week, we'll be strip piecing to create our blocks. There are 4 different blocks: A, B, C and D. By the end of this week, you should have all of your blocks created, which will lead us to Quilt Top Assembly next week in Week 3.
If you've never done "strip piecing" or "strip sewing" before, you'll definitely want to check out the Week 2 video. In a nutshell, it involves sewing longs strips of fabric together, then cutting it all up to create smaller pieces. It's quick, efficient and a lot of fun. :)
Again, be sure to check out the video above. Here are some tips for this process:
Pay close attention to the instructions regarding how to press seams. If you are making a Coaster, Placemat and Pillow size, you'll be pressing your Strip Set seams to one side. If you're making the Lap, Throw, Queen or King size, you'll be pressing your strips open.
Highlight or circle what size you are making within the Sewing Instruction charts. You want to make sure you're looking at the correct row. (Ask me how I know.)
If your strip set measures larger than what it's supposed to, your seam allowance was a little too small. If your strip set is smaller than what it needs to be, your seam allowance was a little too big. Refer to this blog post for tips on how to check your seam allowance.
Be sure not to trim off too much fabric when you trim away your selvedge ends. We've worked in a little wiggle room to these strips sets but you'll still only want to trim away just enough to give you a fresh edge.
Remember to use the lines on your ruler instead of your cutting mat. (Refer to video for demo.)
If you are using Kona solids or a fabric that is larger than 42", you might be able to cut a little differently than what the pattern depicts.
Keep blocks labeled once they're cut.
For Block D, you'll want to align your seams in between Row D1 and D2. You can do this by either using pins or a washable glue like Elmer's Glue Stick or Sewline.
.
Week 1 Winner:
The winner of both the full AND mini size Oliso irons is Sara @choose_joy_quilt_co ! Congratulations! Send us an email and we'll coordinate from there. :)
Week 2 Prize:
This week, our prize is my next curated fat quarter bundle with Robert Kaufman, "Heirloom" AND my new matching thread collection with Aurifil! One lucky winner will receive both of these prizes. Note that the FQ bundle is currently for "Preorder" in our shop and is expecting to ship in April 2024. You can find the thread and FQ bundle here.
To enter:
Only public Instagram accounts are eligible for entry.
Take a progress photo of this week's progress. Please make sure that your photo does not include any part of the pattern material. That is for your eyes only!
Share the photo to Instagram.
Use the hashtags #UpscalePlaidQuilt, #LoAndBeholdPatterns, and #UpscalePlaidQAL in the caption.
Tag @LoAndBeholdStitchery in the photo.
The winner will be shared in the following week's blog post!
That's all for now! Thanks for joining along. I'll see you next week for Week 3. :)
.
.
.
.
.
This post contains affiliate links. If you purchase that item through my link, I may receive a small commission from your purchase at no cost to you. I only recommend products that I know and love!
Hello there and welcome to the Upscale Plaid Quilt Along!
I'm so glad that you found our little corner of the internet and I'm SO excited to make this quilt with you!
Be sure you have a copy of the Upscale Plaid quilt pattern (either a Paper copy or PDF) and let's get started!
.
ABOUT THE QUILT ALONG
If you're new to this Quilt Along and you haven't read through our Quilt Along Details page, be sure to do that first. There, you'll find information about choosing fabrics, available quilt kits, information about other Upscale Plaid samples that I've made and more.
We'll be creating an Upscale Plaid quilt top together over the next 4 weeks. Here's a look at our schedule:
Let's do this!
.
A LITTLE ABOUT ME...
If we haven't "met", I'm Brittany...the quilter, pattern designer and online educator behind Lo & Behold Stitchery. I started quilting in my grandmother's memory and it's turned into an enormous passion of mine! I love connecting with fellow quilters via the internet via quilt patterns, tutorials and online courses. You can read more about Lo & Behold Stitcheryhere.
Ready to dive in?
This quilt along will live under the "Quilt Alongs" section of our website. Information will be both in a blog post form as well as a video form. You'll find the videos on our You-Tube channel, which will also be linked within the blog posts. I recommend watching the video AND reading the blog post, as there will be helpful information in both. So with that said, here we go!
.
WEEK 1
Here's what I cover in the video:
.
BEFORE YOU GET STARTED
Video Minutes 01:58- 07:42
Quilt Sizes - Upscale Plaid includes 7 different sizes!
Quilt Layouts - There are 5 different quilt layouts to choose from. All of the layouts have the same cutting instructions, so you do not need to decide on a layout quite yet. But maybe start thinking about it!
PreQuilt - We’re happy to share that we’ve again partnered with PreQuilt to bring you free online interactive coloring pages. Thesemake it really easy to test out many different fabric color combinations quickly! Digitally plan this quilt and a few other Lo & Behold designs (we're working on getting more uploaded!) with the click of a button. They have a really greatfreeoption that allows you to use different brands of solids; or you can upgrade your plan to use prints, save your designs and more! Use the codeLOANDBEHOLDfor 20% off your annual subscription (either Basic or Market)!
"Choosing Fabrics" Blog Post
.
FABRIC PREP
Video Minutes 07:43 - 16:02
Pre-washing - Pre-washing simply means to wash your fabric before you cut into them and start sewing. The benefit of pre-washing is that you will wash away excess dye to reduce possible color bleeding. Reds, blues and purple fabrics are notorious for bleeding, so I sometimes pre-wash when I have high contrast colors such as red and white. While I acknowledge thatnotpre-washing these fabrics is a "risk," often times, I skip pre-washing and useShout Color Catcherswhen I wash my quilt for the first time. Typically, these Color Catchers do the trick, but if I ever find bleeding in my quilt after the first wash, I would rather deal with the aftermath than take the time to prewash. This comes down to personal preference and how much you want to be adventurous with it (or not).
Most fabric manufacturers use starch and stabilizers on their fabrics to keep the fibers stiff while they're on the bolt. When you wash your fabric, either before it's in the quilt or after, you wash away that starch. Personally, I like the added stiffness, as it makes for cutting and sewing to be easier. But if you choose to prewash you may decide that you want to add some starch back to the fabric to make it easier to work with.
Some quilters also choose to pre-wash so that they "pre-shrink" their fabric. This makes a difference if you are using various fabric types within your quilt. For example, linen shrinks at a different rate than cotton does. If you use both types of fabric within your quilt, once they shrink they could cause areas of pulling on your seams. If you go ahead and pre-wash/pre-shrink everything, then the fabrics in your quilt will all behave similarly, which will in turn give you a more stable quilt. That being said, I can probably count on one hand the amount of times that I've pre-washed my fabric.
How to Prewash:
Wash fabrics in cool water with a mild detergent. Feel free to use a mesh bag to prevent fabric from stretching or twisting. Dry on low heat and remove the fabrics from the dryer immediately once it's dry. For yardage, re-align selvedges and press the fabric to create a new fold. Most people do not pre-wash pre-cuts (nor fat quarters) because if the fabric frays too much, you might not have the designated amount that you need for your project. Some people also “stay-stitch” about 1/8" away from the perimeter of the edges to help prevent the fabric from unraveling too much.
Again, pre-washing is one of those a highly debated topic in the quilting world, so don't feel like there's a right or wrong answer. Follow your heart. :)
Starching - To be honest, I don't really use starch that much. However, I've found that if I am working with smaller pieces or bias edges, it really does help with accuracy. Starch makes your fabric more stiff, which makes it easier to sew and work with. If you do decide to starch, you'll want to starch your fabric before you cut them.For yardage, assess how your WOF is folded. You'll want the two selvedge ends to be right on top of each other. This may mean ironing a new crease in your fabric. When I starch, I spray the entire piece of fabric to get it pretty saturated, then use my iron to press out any wrinkles or creases.This is the starch that I use.
Pressing -You'll want to press your fabrics to get out all of the harsh creases and wrinkles.
Refolding Fabric -This only applies to yardage, but it is super important to refold your fabric so that your strips are straight. Be sure to refer to the video to see how I do this, especially with yardage.
Fabric Labels / Planning Worksheet - These tools are included in the pattern and highly recommended for organization!
Iron- I recently purchased this iron off Amazon and it does a great job for the price. I'm also to try my new Oliso iron, which just so happens to be the prize for this week. Keep reading for more details!
.
PATTERN NOTES
Video Minutes 18:53 - 27:07
Read through all pattern instructions.
WOF: This pattern assumes your WOF (width of fabric) is at least 42". This is important because if your fabric is less than 42" you might not be able to do exactly as the pattern says and *may* need some extra fabric. The fabric requirements all have some overage, so odds are, you'll have enough, but it's just something to keep in mind.
Similarly, if your fabric is greater than 42", you might be able to cut your fabric slightly differently than what the pattern calls for. I notice this when I work with Kona solids, which is usually around 44"45".
Sub-cuts: Within the Cutting Instructions table, bolded text is a WOF strip. Bullet points listed underneath WOF cuts are "sub-cuts". Here's an example:
This means that you will:
Cut (2) 2.5" x WOF strips first. Set those strips aside.
Cut (3) 2.5" x WOF strips.
From those (3) strips, cut (8) 2.5" x 11.5" pieces.
Diamonds: Any time you see the diamond symbol (seen below), that indicates that you will sew remnant pieces together, then sub-cut from there. For example:
This means that you will:
Cut (2) 2.5" x WOF strips first.
From each strip, cut (2) 2.5" x 25" pieces (since you cannot cut two 25" pieces from one strip, assuming that your WOF is 42".
Sew the two remnant (leftover) pieces from both strips using a straight seam to create a larger piece.
Cut a 1.5" x 28.5" piece from the larger piece.
You will have a seam within that cut piece, but this is in effort to save fabric and decrease waste. This is especially handy with the King size where the pieces are SO large, it really makes a huge difference in how you are able to use your fabric.
Also of note: if you do not want to sew remnant pieces together, you might have enough overage with your yardage that you can cut what you need without needing to sew remnant pieces together.
Additionally, if your WOF is larger than 42", you might not need to sew remnant pieces together. I ran into this using Kona solids with the Throw size. I was able to get all of my pieces from my WOF strips without following the Diamond instructions. Just FYI!
.
CUTTING TIPS
Video Minutes 27:08 - 34:12
"How to Cut WOF" tutorial - This covers things like refolding fabric and how to make subcuts.
Cutting pieces that are larger than ruler -
Cut piece in sections (demonstrated in video).
Fold fabric in half and align the fold with the midway point of the fabric. For example, if you need to cut a piece that is 28.5", you'll fold the the strip in half and align the fold with 14.25", then cut your edges (2 layers) from there.
Slow down and take your time. Cutting your pieces accurately will set you up for success in the following weeks.
How's your rotary cutter blade? If you need a new one, go ahead and change it out.
Whenever possible, it's best to cover your desired measurement with your ruler and use the lines on your ruler vs. the lines on your cutting mat.This will generally give you a more accurate cut. See below for an example:
Place the strip horizontally so that the selvedge end is on the right and the fold is on the left. Place a ruler over the strip and align the edge of the strip with a horizontal line in the ruler.
Trim off the selvedge. Remember to look at your usable WOF... you don't want to trim off too much! Some fabrics are notorious for having extra wide selvedges.
Flip the strip around (or rotate the cutting mat around) 180 degrees. I like to cut two pieces at a time. You could also unfold the WOF strip and cut one piece at a time. Align the fresh edge with the vertical desired measurement in the ruler. In this case, it's 10.5".
Align the perpendicular edge with a horizontal line in the ruler.
Cut the desired measurement to the right of the ruler.
WEEK 1 PRIZE:
Video Minutes 34:50 - 38:21
There are prizes for each week of the Quilt Along! This week, we have teamed up with Oliso (affiliate link) to give away a full size Smart iron AND a mini M3 Pro iron to one lucky winner!
To enter:
Only public Instagram accounts are eligible for entry.
Take a progress photo of this week's progress (ex. your fabrics on the "Plan your Quilt" worksheet, etc). Please make sure that your photo does not include any part of the pattern material. That is for your eyes only!
Share the photo to Instagram.
Use the hashtags #UpscalePlaidQuilt, #LoAndBeholdPatterns, and #UpscalePlaidQAL in the caption.
Tag @LoAndBeholdStitchery in the photo.
The winner will be shared in the following week's blog post!
.
"I'm In" Prize:
If you participated in sharing the "I'm In" graphic prior to the QAL starting, it's time to pick a winner for the $75 gift card to our shop! And the winner is......
@mmd62 ! Congrats! Please send us a DM on Instagram and we'll get you the details!
.
That's all for this week. I'll see you next week for Week 2!
- Brittany
.
.
.
This post contains affiliate links. If you purchase that item through my link, I may receive a small commission from your purchase at no cost to you. I only recommend products that I know and love!
]]>
https://www.loandbeholdstitchery.com/blogs/quilt-alongs/upscale-plaid-quilt-along2023-12-15T18:28:15-05:002024-03-06T12:07:18-05:00Upscale Plaid Quilt AlongBrittany Lloyd
Find all of the Upscale Plaid Quilt Along info here! Grab the pattern (PDF or Printed) and keep reading for details!
Here's a look at the Quilt Along blog posts that are currently published:
WHO: You, me and other quilters from around the world!
WHAT: A four week Quilt Along; each week we'll complete a portion of the Upscale Plaid patternand by the end, we'll have a beautifully finished quilt top! Plus we'll share progress and cheer each other on along the way. It's going to be fun! :)
WHEN: January 27th - February 23rd; information will be saved on our website. If you cannot participate at this particular time it will be there when you are ready!
WHERE: We'll be sharing weekly QAL content straight to your inbox, so if you're subscribed to our newsletter, you're good to go! You can share weekly progress photos to IG to enter to win prizes. You do not need social media to participate, but you do need a public IG account to enter to win prizes.
WHY: Sewing with a community of friends is FUN! Plus we will be sharing lots of helpful tips for sewing the Upscale Plaid pattern.
How do I sign up? There's no official sign up. We'll be sending out links to content via our newsletter. You'll need to purchase either aPDForPrintedcopy of the Upscale Plaid Quilt Pattern.
Looking for more information about the Upscale Plaid Quilt pattern? Check out the blog post about the Cover quilt here, and also this blog post about the Mediterraneo version.
SCHEDULE
We have a very laid back schedule for this QAL. While you can easily get this quilt top made in a weekend, we have all of the steps spread out over 4 weeks. Notice that we are jumping right into Cutting our Fabrics for Week 1, so you'll want to have everything ready to go on January 27th!
Week 1 - January 27: Cutting
Week 2 - February 3: Strip Piecing
Week 3 - February 10: Creating Rows
Week 4 - February 17: Quilt Top Assembly
CHOOSING COLORS & FABRIC REQUIREMENTS
Upscale Plaid uses color to create the illusion that the stripes blend where they intersect and color choices are key in creating this effect. Find helpful tips for choosing colors along with fabric requirements here.
KITS
Want to take the guess work out of selecting fabrics? We just added 3 new Upscale Plaid kits to choose from in ourshop!
OTHER SHOPS CARRYING KITS
Here's a look at other shops carrying quilt kits. Click through to see all of the beautiful options!
If you are a quilt shop with Upscale Plaid kits, send us an email and we'll add you to our list!
PRIZES
We will have prizes up for grabs during the Quilt Along. There will be more details to come, but first, we're kicking things off by giving away a $75 gift card to our shop!
To enter:
Share one of the "I'm In" photos to your Instagram feed; please note that we are only able to see your entry if your account is public.
Tag @loandbeholdstitchery in the photo AND in the caption.
Use the hashtags #upscaleplaidquilt , #upscaleplaidQAL and #loandbeholdpatterns .
Enter by January 26th at 8pm EST. Winner will be announced in the Week 1 post.
A winner will be randomly selected. Giveaway is open worldwide.
Coloring Pages
You can find PDF coloring pageshere. Upscale Plaid is also onPrequilt(free digital coloring pages)!
Let us know if you have any questions about the Quilt Along. We're excited to get started! :)
]]>
https://www.loandbeholdstitchery.com/blogs/quilt-alongs/scrappy-windows-qal-week-7-quilt-bind2023-10-05T10:14:42-04:002023-10-05T10:23:31-04:00Scrappy Windows QAL - Week 7- Quilt + BindBrittany Lloyd
Hello there and welcome back! It's Week 7 of the Scrappy Windows Quilt Along, which means it's time to finish up our quilts!
First and foremost, go ahead and take a look through the#scrappywindowsQALhashtag on Instagram to see everyone's progress. You all have been creating some stunning quilts!
Before we move forward, here are some helpful links:
This is the final step of the process; quilting and binding! Generally speaking, you'll do this like you would any other quilt, but there are a few important tips to call out.
We'll be referring to Minute 42:54 of the Scrappy Windows video tutorial, seen below.
Basting Tips:
I am a die-hard pin baster. When I first started quilting, I spray basted but I started having issues so I switched to pins and never looked back. So naturally with this quilt, I'm going to recommend pin basting, but feel free to use whatever method you prefer! I do wonder with the weight of the quilt top and the bulkiness of the seams, if spray basting would be as effective as pin basting. I'm not sure! If you try it and have great results (or bad ones) reach out and let me know and I'll be sure to share!
I also found that basting this quilt on my table was a HUGE help. I started doing this about a year ago and I haven't basted a quilt on the floor ever since. To do this, you'll need the biggest table you have, extra wide painter's tape and medium curved safety pins. That's it! I would recommend putting one pin in each of the background sections just to give you an idea of how many pins you need.
If you don't have a large table, consider using a picnic table at a local park or even check with your library to see if they have a table that you can borrow.
I've also had lots of questions about protecting the table from the pins. First and foremost you can put a large cutting mat or cutting mats under the area that you are basting. If you want to bypass that step, I just make sure that I don't insert the pin too forcefully. Once the pin goes through the quilt, I lift up pretty quickly before it has time to reach the table. Also make sure that you are gliding the pin in by keeping it close to the edge of the quilt while you are inserting it. If you angle the pin at a 90 degree angle while you are inserting it, you'll be more likely to "jab" your table.
Quilting Ideas:
I hand-tied "x's" at each Window intersection on my first quilt and I LOVED both the process and how it turned out. If you've been wanting to try hand quilting but you're overwhelmed by the process, I think this is a really great happy medium. I would watch the video above for exact details. Using 12 or 8 weight thread is perfect!
I plan to do something a little different for my current quilt. I'm going to machine stitch diagonal lines in the Background portion of the quilt. My lines will intersect where my hand ties were. Then I think I'll go back in and do hand ties as well. They won't be structurally necessary, but I really do love the handmade touch that they add.
You DEFINITELY want a 90/14 quilting needle for this process. You may even choose to quilt with 40 weight thread. (I'm going to be using 50 weight.)
I'll update everyone with how this turns out, so stay tuned!
Binding Tips:
You'll bind this quilt like you would any other quilt. Here are a couple of tips:
I stitched around the perimeter prior to trimming away my batting and backing. I think this is only really necessary if you hand tie; although it doesn't hurt if you want to do it regardless.
I normally use a 2.25" binding; since this quilt has more layers than normal, I used a 2.5" binding.
Make sure the binding covers the raw edges of the edge/corner Window pieces. I was sure to check underneath my binding once it was sewn onto the front to make sure those pieces were well within my seam allowance.
You'll probably want to use a walking foot for this process, if that's something that you don't already do.
Then I did a hand stitched detail on the back of my quilt, which I'll probably do again for my current version. I don't think machine stitching the back of the binding down would turn out well on the front of the quilt. Alternatively, If you want to machine bind, I would sew the raw edges of your binding onto the back of the quilt first, then machine stitch the fold on the front of your quilt. This way the bobbin stitches would show on the backing.
WEEK 7
By the end of this week you will have a finished quilt! YOU DID IT!
I cannot wait to see everyone's finished Scrappy Windows quilts! Please share a photo on Instagram and tag me (@loandbeholdstitchery) so that I can see! Don't forget to use the hashtags:
]]>
https://www.loandbeholdstitchery.com/blogs/quilt-alongs/scrappy-windows-qal-week-6-quilt-top-assembly2023-10-02T14:31:14-04:002023-10-03T09:49:46-04:00Scrappy Windows QAL - Week 6 - Quilt Top AssemblyBrittany Lloyd
Hello there and welcome back! It's Week 6 of the Scrappy Windows Quilt Along! We're finally assembling the entire quilt top this week, so if you created this quilt in sections like the pattern suggests, it's time to sew everything together. Wahoo!
If you haven't already checked out the#scrappywindowsQALhashtag on Instagram, be sure to do that! I love seeing everyone's different approach to this quilt. It's so inspiring!
Here are a few helpful links before we move forward:
There are a couple of ways that you can proceed with making this quilt, but I decided to structure the quilt along similar to how I created myfirst Scrappy Windows quilt. Depending on what size you are making, creating the quilt top in sections REALLY helps with managing the bulk of these fabrics.
We'll be referring to Minute 39:25 of the Scrappy Windows video tutorial, seen below.
Quilt Top Assembly Tips
By this point, you know the gist of how this quilt goes together. Where it gets a little tricky is how to manage the quilt during this final phase.
As for sewing the sections together, you'll be doing the same process as before. Here are a couple of things I do when I'm creating a large piece of work:
Make sure my sewing machine has space to the left of the needle and also behind the needle. You might even want to find a way to support the weight of the fabric that will hang below your left elbow as you sew. I've placed a chair directly left of my chair before and that's helped.
When you go to press the seam, position the ironing board so that you have a table directly behind it to catch the weight of the quilt.
Take frequent breaks.
Adding Final Windows
This is probably the trickiest part of the entire process, especially if you're making a larger quilt. I made my first Scrappy Windows quilt on a Janome M7, so I have (I think 13"?) to the right of my needle, which is incredible! But even with that much throat space, it can still present a challenge.
I found that rolling my quilt parallel to the Row first, then rolling the quilt perpendicular to the Row was the best way to "package" the quilt top for the machine.
WEEK 6
By the end of this week you will have a finished quilt top! Next week is a catch up week so feel free to take your time with this step!
In case you were wondering, I still only have one section created for my second Scrappy Windows quilt. I got a little behind with the launch of our online quilting courses this week, but I hope to get caught up in a few weeks!
I cannot wait to see everyone's finished quilt tops!!!
]]>
https://www.loandbeholdstitchery.com/blogs/quilt-alongs/scrappy-windows-qal-week-32023-09-01T08:57:58-04:002023-09-22T11:36:48-04:00Scrappy Windows QAL - Weeks 3-5: SectionsBrittany Lloyd
Hello there and welcome back! It's Week 3 of the Scrappy Windows Quilt Along!
It's been so fun to see everyone's progress for this quilt. :) If you haven't already checked out the#scrappywindowsQALhashtag on Instagram, be sure to do that! I love seeing everyone's different approach to this quilt. It's so inspiring!
Here are a few helpful links before we move forward:
There are a couple of ways that you can proceed with making this quilt, but I decided to structure the quilt along similar to how I created my first Scrappy Windows quilt. Depending on what size you are making, you might decide to follow this schedule as well, or if you are making a smaller size, you can create all of your pockets this week, sew them together next week and add windows the following week.
I'm going to stick to the schedule, since I'm anxious to see this quilt top come together but feel free to proceed however you wish!
So for the next 3 weeks, we're creating sections for our quilt. Here is our Scrappy Windows Video Tutorial that we'll be referring to with minute marks listed below.
There are four main steps to create a "section" for this quilt:
Creating Pockets (Minute 7:11)
Creating Rows (Minute 9:19)
Creating Sections (Minute 12:28)
Adding Windows (Minute 15:20)
First and foremost, you'll need to decide how many sections you are creating. My first quilt was the Large Throw, so 20 pockets across and 22 pockets down. Since this was my first time making this quilt, I experimented with sections that were between 4-5 rows down. The size of your sections will really depend on your machine, sewing comfort level and what size you are making. You might even decide to create sections vertically as well (quadrants) if you are making a larger size. Don't forget that you'll eventually have to add the Windows between sections, so keep that in mind as you are splitting it up. (Another quick thought: looking ahead, you can always stitch those final Window sections by hand!)
Creating Pockets
Referring to minute 7:11 of the video we'll start by creating pockets. A couple of highlights to note:
Frame squares are folded so that the wrong sides are together. They stay like this when you place them on the Background squares.
Use 1/8" seam around the perimeter of the Background squares. An alternative is to glue baste these squares in place, if that's more your speed.
Sometimes these squares shift a little while sewing. Using a pin to hold in place can help. Otherwise, don't stress if your pieces get "off" just a little bit.
I use a 1.8 mm stitch length to create pockets, rows and sections.
Create all of your pockets for each of the rows that you are creating in your sections.
Creating Rows
Referring to Minute 9:19 of the video, then you'll create your rows for the section. It's important to note that there was a small pattern correction early on when we released the pattern. It is very important that you arrange your pocket units so that they create a "zig zag" pattern and that the pattern alternates from row to row. Watch the video closely to see what I mean.
Here's an example using the Pillow size of the pattern. You'll see that the square on the left side of Row 1 has the Frame folds rotated so that they're from the bottom left to top right. The square to the right of it has the Frame folds rotated so that they're from the top left to bottom right. Then in Row 2, it's the opposite (or it should be, this is where the pattern correction came in.) We sent an updated copy of the pattern on August 7th, so if you signed up for the pattern after that then you have the latest copy.
When you sew these square together to create rows, you'll use a standard 1/4" seam allowance. This will hide your 1/8" basting seam allowance.
Here's a look at what the rows will look like once they're sewn together.
If you have a specific layout to your quilt, you'll want to make sure you keep your pieces in order from row to row. For me, this meant keeping the row labels tucked in with each row.
In the video, I demonstrate how I like to chain piece pockets. You can even take that a step further and chain piece your rows. I have a blog post about that, found here, if you want to give that a try.
BACKSTITCHING
You can backstitch at the beginning and end of your seams as you sew pockets together. I only really found this necessary for the rows that are on the outside of my section or quilt top. So I'll definitely backstitch the beginning of the pocket seams for Row 1. If I'm creating a section that has 4 rows, I'll also backstitch the ending seams for my pockets in Row 4.
PRESSING POCKET SEAMS
Remember that we're pressing all pocket seams to one side. So for Row 1, press all pocket seams to the right; for Row 2 press all pocket seams to the left. Alternate from row to row to create nesting seams. These seams are bulky, so you might find that steam helps.
QUILTING NEEDLES
Speaking of bulky seams, this is when you might notice that you're really sewing through lots of layers! If you find that your stitches are skipping or your machine is having a hard time sewing through the layers, I recommend using quilting needles.
Creating Sections
Referring to minute 12:28 of the video, now let's create a section. Here are a couple of tips for this step:
In the video, you'll see me use clips to align my seams within my rows and they really do help keep things together as you sew!
Backstitch at the beginning and end of each row seam.
Press row seams open. Again, these seams are bulky. I found it helpful to finger press first, then use my iron to press the seam. Don't forget to flip the rows around and press the right side of the piece.
Try not to stretch the rows as you sew.
Use a walking foot if you need help moving the layers through your machine.
Notice the orientation of my Frame folds? You'll see "diamonds" appear as you sew rows together, which is where your Window pieces will go. :)
Adding Windows
Now it's time for the fun part! Refer to Minute 15:20 of the video for this step. It's time to add our Window pieces!
This step is probably best explained by watching the video. Know that you can sew your Window Frames using two different methods: One at a Time and Continuous Line. I definitely recommend trying both (seen in the video) to see which one you prefer.
A couple of tips for this step:
This thread will be visible in your finished quilt. Consider using a thread color that matches the Frame fabric or a contrasting thread color if you want it to stand out.
I use a stitch length of 2.0 mm for this step.
If you have speed control, turn it all the way down.
If your machine has the capability to stop with your needle in the down position, that's helpful.
If your machine has the the capability to raise the presser foot automatically when you stop sewing, you might find that helpful too.
Remember not to pull the Frame pieces too far. If you see any warping or distorting in your Background pieces, then you'll pulling too much. (You can see this a little bit on my quilt if you go back and look at photos. Overall, it isn't too bad and you can't really notice it now that it's quilted.
Roll up the section that you aren't working with and clip it in place.
IMPORTANT: Make sure your Frame pieces overlap to cover the corners of the Window pieces by at least 1/4". You want to make sure those pieces are nice and secure.
WEEKS 3-5
By the end of this week you should have your first section complete. If you aren't working in sections, then you'll want to have all of your pocket units created by the end of the week.
For the next 3 weeks, we'll be repeating these steps until we have all of our sections created. You won't hear from me again until September 23rd when we go to assemble our entire quilt top. But if you have any questions pop up, feel free to reach out!
]]>
https://www.loandbeholdstitchery.com/blogs/quilt-alongs/week-22023-08-25T08:41:36-04:002023-09-01T07:01:59-04:00Scrappy Windows QAL - Week 2 - Plan & OrganizeBrittany Lloyd
Hello there and welcome back! It's Week 2 of the Scrappy Windows Quilt Along!
It's been so fun to see everyone's progress for this quilt. :) If you haven't already checked out the #scrappywindowsQAL hashtag on Instagram, be sure to do that! I love seeing everyone's different approach to this quilt. It's so inspiring!
Here are a few helpful links before we move forward:
This week, we are planning, organizing and pressing frames. If you are creating a quilt that has a very specific layout (especially if it's larger), this week is very important!
PLANNING
By this point, you've probably given your layout some thought. Or maybe you haven't...that's okay too! Regardless, let's talk about that for a moment.
Similar to the Ombre Puff Quilt, I designed this quilt with ombre in mind. It feels modern, organized, aesthetically pleasing and I just love how they it can add interest and variety to any design. That said, I do also love a random, more "patchwork" feel that is unplanned and maybe a bit more traditional.
Randomized Approach
If you are going this route and creating a more random feel, then you're in luck. The planning phase will be super easy for you! This is actually true for me with the new Scrappy Windows quilt that I'm making for this quilt along. I have low-volume fabrics for the Window and Background fabrics and a solid contrasting fabric for the frames. I actually don't plan to lay out any squares or organize any rows before I start sewing my pockets. I will simply move forward next week with sewing my Pocket units without a care in the world about which fabric goes where. It'll be nice. :)
Ombre Layout
If you are creating a layout that has an ombre fade or a specific design, then you'll want to lay out all of your squares at this point. This is when things start to get real!
You'll first want to lay out your Background Squares. If you're making the larger sizes, you'll probably need to do this on a bed or the floor. These squares might all be solid, or they might be multi-color. Decide where you want each one to go, keeping in mind that they're the "orange peel" shape within the quilt. They aren't quite as prominent as the Window piece.
Then, as messy or disorganized as it may feel, it's time to take it a step further and plan your Window squares. This means putting those squares diagonally throughout the quilt. It seems a little awkward and chaotic at first but trust the process. You want to figure this out before next week!
When it comes to ombre quilts, I've been asked why I tend to create a gradient along the diagonal of the quilt. I never really noticed that I did this until someone pointed it out! I have several designs that use color gradients but I will say that the diagonal gradient is my favorite. I think it's because I feel like I have more room to randomize things and potentially introduce new colors. This isn't always necessarily the case, but it's generally how my brain works.
I borrowed this graphic from a blog post that I wrote a 2 years ago during our Ombre Puff Quilt Along. All of the same principles apply to this quilt if you want to take a look!
If ombre isn't your thing, that's okay too! There are a few designs in the pattern that are unique and make a statement without being necessarily ombre.
Organizing
Once you have all of your fabrics planned and you know exactly where you want each piece to appear within your quilt, then you'll want to label all of your Window rows and all of your Background rows. Again, if you're doing a randomized layout, you're off the hook for this step!
It's really important to stack these pieces the same exact way from row to row. So the pieces that are on top are from the far right edge of my quilt. The pieces that are on the bottom of the stack are on the far left edge of my quilt.
Pressing Frames
Now let's press all of our Frames in half diagonally. You'll want to fold the Frame squares so that they're wrong sides together. If you're using a print or a fabric that has a right side, it'll be on the outside of the Frame pieces.
Supplies
Iron - If you're in the market for a new iron, I have been too. I recently purchased this iron for less than $30 on Amazon and I love how light weight it is.
Clips - I use these clips for all sorts of things. If you need something like in the photo above, these would be a great option.
Video
We're completing minutes 4:32-7:06 in the Scrappy Windows video tutorial.
Week 2
By the end of this week (Friday, Sept. 1) you should have your pieces all organized by rows (if applicable) and all of your Frame squares press in half diagonally.
]]>
https://www.loandbeholdstitchery.com/blogs/quilt-alongs/scrappy-windows-qal-week-1-cutting2023-08-19T08:17:05-04:002023-08-24T21:40:55-04:00Scrappy Windows QAL - Week 1 - CuttingBrittany Lloyd
Hello there and welcome to the Scrappy Windows Quilt Along!
If you're looking for the original Scrappy Windows blog post, you can find that here. You can find the FREE Scrappy Windows pattern here.
I'm so glad that you found our little corner of the internet and I'm SO excited to make this quilt with you!
A little about me...
If we haven't "met", I'd like to introduce myself! I'm Brittany...the quilter, pattern designer and online educator behind Lo & Behold Stitchery. I started quilting in my grandmother's memory and it's turned into an enormous passion of mine! I love connecting with fellow quilters via the internet via quilt patterns, tutorials and online courses. You can read more about Lo & Behold Stitchery here.
A little about this quilt...
Scrappy Windows was inspired by a sampler quilt that my granny made many many years ago. My favorite block in the quilt is a cathedral window quilt block, so this is my take on what she created. This quilt is a part of a series called the Lois Quilt Collection, which is a group of quilts that I am creating based off of the quilts that she created. You can see her original quilt below. Read more about the Lois Quilt Collection here.
Schedule
Here's a look at our schedule these next several weeks. Don't worry if you fall behind or want to work ahead. As long as you're having fun, that's all that matters!
Week 1
This week, we are cutting our fabrics. Refer to page 3 and 4 of the Scrappy Windows quilt pattern.
If you still need to download the FREE pattern, CLICK HERE!
Before we jump into cutting tips, let's talk about choosing our fabrics and fabric prep.
CHOOSING FABRICS
If you haven't already picked your fabrics yet for this quilt, be sure to check out the pattern or this blog post for some mock-ups! Since the Frames, Background and Window portions of the quilt are all split up in the Fabric Requirements, you really can customize this quilt in so many ways!
If you are looking to use fabrics from your stash, check outthis blog postabout how to create an ombre quilt. Here, you'll find my top tips for choosing fabrics for ombre color palettes. I have a few different approaches that I like to use, so if you're feeling stuck, start here!
But don't let the word "ombre" scare you! You can do a completely random layout, if that's more your speed. You can also do a 3 or 4 color quilt as well.
Personally, I think this really makes a great scrap-buster project or even just a great way to show off your favorite prints. The Window pieces are a "picture frame" so to speak, just remember that the squares that you cut for the Windows will be at a 45 degree angle.
Scrappy Windows is now on PreQuilt! Digitally plan this quilt and a few other Lo & Behold designs (we're working on getting more uploaded!) with the click of a button. They have a really great free option that allows you to use different brands of solids; or you can upgrade your plan to use prints, save your designs and more! Use the code LOANDBEHOLD for 20% off your annual subscription (either Basic or Market)!
MEMORY QUILT IDEA
Another great ideas for this quilt is to create a memory quilt using clothing. I'm always asked if I have any advice for a memory quilt and while I've only made a few, I know that they can be really tricky. But I think this quilt would be a really great option!
I would leave the Background and Frame squares as regular quilting cotton, maybe in a solid/neutral color. The the Windows can be pieces of clothing. You could even do a knit or jersey fabric without any issues, since the Frames and Backgrounds are what "stabilize" the quilt. The top-stitching on the Windows is just the icing on the cake.
I really think I'm going to try this with some of my granny's blouses. I've been holding onto many of them for quite some time, fearful that I'll ruin them by using them for just any ole' project. I think this will be the right fit!
WEEK 1 SUPPLIES
You'll need all the traditional quilting supplies for this quilt. A few supplies to note for this week:
Iron - I recently purchased this iron off Amazon and it does a great job for the price.
PRE-WASHING
Everyonehas different opinion about pre-washing. Pre-washing simply means to wash your fabric before you cut into them and start sewing. The benefit of pre-washing is that you will wash away excess dye to reduce possible color bleeding. Reds, blues and purple fabrics are notorious for bleeding, so I sometimes pre-wash when I have high contrast colors such as red and white. While I acknowledge thatnotpre-washing these fabrics is a "risk," often times, I skip pre-washing and useShout Color Catcherswhen I wash my quilt for the first time. Typically, these Color Catchers do the trick, but if I ever find bleeding in my quilt after the first wash, I would rather deal with the aftermath than take the time to prewash. This comes down to personal preference and how much you want to be adventurous with it (or not).
Most fabric manufacturers use starch and stabilizers on their fabrics to keep the fibers stiff while they're on the bolt. When you wash your fabric, either before it's in the quilt or after, you wash away that starch. Personally, I like the added stiffness, as it makes for cutting and sewing to be easier. But if you choose to prewash you may decide that you want to add some starch back to the fabric to make it easier to work with.
Some quilters also choose to pre-wash so that they "pre-shrink" their fabric. This makes a difference if you are using various fabric types within your quilt. For example, linen shrinks at a different rate than cotton does. If you use both types of fabric within your quilt, once they shrink they could cause areas of pulling on your seams. If you go ahead and pre-wash/pre-shrink everything, then the fabrics in your quilt will all behave similarly, which will in turn give you a more stable quilt. That being said, I can probably count on one hand the amount of times that I've pre-washed my fabric. I did not prewash my original Ombre Puff quilt fabrics and I do not plan to pre-wash fabrics for this quilt either.
How to Prewash:
Wash fabrics in cool water with a mild detergent. Feel free to use a mesh bag to prevent fabric from stretching or twisting. Dry on low heat and remove the fabrics from the dryer immediately once it's dry. For yardage, re-align selvedges and press the fabric to create a new fold. Most people do not pre-wash pre-cuts (nor fat quarters) because if the fabric frays too much, you might not have the designated amount that you need for your project. Some people also “stay-stitch” about 1/8" away from the perimeter of the edges to help prevent the fabric from unraveling too much.
Again, pre-washing is one of those a highly debated topic in the quilting world, so don't feel like there's a right or wrong answer. Follow your heart. :)
.
STARCHING
To be honest, I don't really use starch that much. However, I've found that if I am working with smaller pieces or bias edges, it really does help with accuracy. Starch makes your fabric more stiff, which makes it easier to sew and work with. That said, with the Frame portion of this quilt, we want those pieces to able to bend around the curve, so I don't necessarily find starching beneficial for this particular quilt.
If you do decide to starch, you'll want to starch your fabric before you cut them.For yardage, assess how your WOF is folded. You'll want the two selvedge ends to be right on top of each other. This may mean ironing a new crease in your fabric. When I starch, I spray the entire piece of fabric to get it pretty saturated, then use my iron to press out any wrinkles or creases.This is the starch that I use.
.
How to Cut From Yardage
If you're using yardage for any portion of your quilt, then be sure to check out this "How to Cut WOF Strips" blog post. Personally, I used yardage for the Frames of my first quilt and also again for the Frames of my new quilt. This blog post has great tips for future projects as well!
Other Cutting Tips
Here are a few things to keep in mind for this week:
Slow down and take your time. Cutting your pieces accurately will set you up for success in the following weeks.
How's your rotary cutter blade? If you need a new one, go ahead and change it out.
Measure your fabric pieces before you get started.Note that some fabric types (fat quarters, 1/4 yards, 1/2 yards) don't have any wiggle room. This doesn't mean that you can't use them, but you might get less squares from these pieces, depending on how much wiggle room you start with.
Whenever possible, it's best to cover your desired measurement with your ruler and use the lines on your ruler vs. the lines on your cutting mat. This will generally give you a more accurate cut.
Now let's talk about time saving techniques! Normally when I'm making the same cuts over and over, I'll either batch cut, as seen below or cut multiple layers at once (seen in the video linked below).
.
BATCH CUTTING
One of my favorite things to do, especially if I'm doing a lot of the same cuts over and over again, is batch cutting.
Any time I'm cutting many pieces that are the same size, I'll batch-cut those pieces. A sharp rotary blade is key for this process. To do this:
Start by cutting 3.5" strips. These can be strips from FQs or WOF strips.
Align the pieces horizontally on your cutting mat. Use the horizontal lines to make sure the strips are nice and straight. I like to overlap my strips a bit so that I can fit more strips, but you can just have the edges aligned if you wish.
Trim off the selvedges.
Cover the desired measurement with the left edge of your strips (assuming you're right handed) and make sure that your strips are all parallel with the horizontal lines in your ruler.
Cut.
If you're a newer quilter, feel free to cut your pieces one at a time. There's no rush. :) But maybe give this a try if you have a few quilts under your belt and you're looking to save a little bit of time and energy. Note that the photo below shows me cutting 10.5" pieces, you'll be cutting 3.5" pieces. :)
CUTTING MULTIPLE LAYERS
I've gotten adventurous with this quilt and I'm now addicted to cutting multiple fabrics at once. This involves pressing your fabrics first, then laying them on your cutting mat, using a vertical line to roughly align the selvedges. I normally don't cut any more than 4-6 layers at once. Again a sharp rotary blade is key!
The Scrappy Windows Video Tutorial demonstrates this method at minute mark 3:15.
Speaking of video....hello new You-Tube video! :)
The 48 minute Scrappy Windows tutorial is now on You-Tube! You're welcome to watch the entire thing, but know that we will be referring to specific minute marks over the next few weeks. This week you don't need to watch past minute 4:30. It might be tempting to skip ahead, but try not to, as I'll also be sharing key tips with the Weekly Blog posts as well!
.
WEEK 1 PROMPT
Whew! We've covered a lot, haven't we?
This week, we are only focusing on cutting, so once you have cut ALL of your 3.5" squares cut (Windows, Frames, Background), then you're ready for next week!
If you're a little ahead and looking for some "extra credit" feel free to go ahead and fold and press your Frame square in half diagonally. This is technically slated for next week, but if you have time to kill, then you can work a little bit ahead with those. :)
.
WHAT I'M MAKING
I'm making the Baby size, using some low-volumes for my Background and Windows and AGF Magnetism for my Frames. It'll kind of be the inverse of my first quilt, so I'm excited to see how it turns out!
]]>
https://www.loandbeholdstitchery.com/blogs/quilt-alongs/getaway-qal-week-4-quilt-top-assembly2023-06-30T16:06:06-04:002023-08-22T14:31:30-04:00Getaway QAL - Week 4 (Quilt Top Assembly)Brittany Lloyd
Hello hello and welcome back to the fourth and final week of the Getaway QAL! I hope you've enjoyed our time together. I know I sure have. :)
If you haven't already read through our information page, you can find logistics and what-not here. You can also access the posts under the "Quilt Along" section of our site.
Week 4
This week, we are creating our edges and corners and then assembling our quilt tops!
Let's start with the first step. This quilt uses a "minimal waste" diagonal row construction method. So instead of using whole blocks on the edges, then trimming away excess, we are preemptively trimming blocks in half and using both halves of those blocks. This saves time, energy and fabric, but it isn't the "traditional" way to create a quilt that has diagonal rows. I always weigh the pros and cons of that with all of my diagonal row patterns, and the amount of fabric that this no-waste method saves is a game changer! Plus this doesn't affect the overall design of the quilt, so it's a win-win all around!
Creating Half Blocks
Refer to the "Creating Half Blocks" section of the pattern. Here are a few things to keep in mind before you get started.
It is extremely important that you are paying close attention to this step. All blocks need to be cut exactly how the pattern depicts.
Pay attention to the number of blocks that you need for each step.
Align a ruler with diagonal corners of the block as seen below. If you want extra assurance, you can also use the 45 degree line on your ruler to line up with an outside edge of the block.
Trim slowly and carefully. This is a step that you definitely do not want your ruler to slip. If this step really makes you nervous to use a ruler and rotary cutter, then mark a line diagonally, then trim with scissors.
I like to use fusible interfacing before I make my cuts. Essentially, you place the interface on your block, iron in place, then cut. It gives some structure and stability to the area of the block that you're cutting while securing the seams that you are cutting through. I usethis 1.5" x 15 yard roll.
Once my blocks are cut in half, I trim off the excess tape.
For the corners, make the first cut, then rotate your entire cutting mat so that the pieces stay in place, then make the second cut.
If you didn't use the fusible stabilizer, you may want to "Stay Stitch" at this point. This is a method to help secure those bias edges and unfinished seams and it's a simple seam that's about 1/8" from the edge. You can do this prior to Quilt Top Assembly or you can wait until your entire quilt top is pieced together to do this step.
Take note that the Block 2 half blocks are labeled with either a star or a heart, just to help clarify which one goes where in the next step.
Once you have your Edges and Corners cut it's time to assemble our quilt tops!
Quilt Top Assembly
Plan for Nesting Seams
First and foremost, go ahead and read page 7 of the pattern then flip to page 8, 9 or 10 based on which layout you are creating. Regardless if you are making the City, Mountain or Beach Trip versions, you'll want to lay out all of your blocks before you get started. This gives you an opportunity to double check and make sure that you have everything oriented correctly; but most importantly, it allows you to plan your nesting seams.
Block 1s are all stationary in the quilt. So I find it helpful to lay those blocks out first to give you a starting point.
Then place adjacent Block 2s where they need to go and rotate them so that the seams are opposite of the Block 1 seams. The beauty of these Block 2s is that the strip appearance is the exact same when you rotate the block 180 degrees.
You can also work in quadrants, as seen below.
Even though all of the corner pieces are the same, remember to swap those around based on their seam directions.
Creating these nesting seams will really help you keep your strips lined up so be sure not to skip this step!
I use this Fons and Porter design wall. It's pretty easy so I would recommend it if you're looking for one. You can also lay out these blocks on the floor or a bed.
Once you have your blocks laid out, double check the Figure C diagram and make sure that it's all correct.
Row Construction
There are 8 rows in this quilt. I like to start with Row 2, then I'll sew the Row 1 corner to that. Let's take a closer look.
When you place the half block right sides together with the full block, align the edges, as seen below. They should align perfectly with no 1/4" overlap (remember that the blocks were the same size before you cut them).
Sew your first seam, then add the other half block. Press these two seams in one direction, according to the arrow in the pattern.
Once you have created this row, sew the corner onto the Block 1 piece.
Since my seams are pressed to one side, the corner block will overlap that bottom corner by 1/4" (since that seam is tucked underneath). This is indicated by the red circle in the above photo. The other corner of that piece will alsooverlap by 1/4", but it'll look a little differently. It should be aligned with the little dog ear from the previous row, as indicated by the yellow circle. Depending on the direction that your block seams are pressed from row to row, will determine how this step will look when you go to sew rows together. Bottom line, just make sure that the corner block is centered the middle block and you're good to go. :)
Also don't forget about the nesting seams! I like to find each one and place a pin in them.
Here's a closer look at what the seam will look like.
Press all row seams open.
Here's a closeup of how that seam will look.
Then construct the 3rd row in the same exact manner. I like to chain piece, so I'll sew the first two pieces together, followed by the second two pieces. I'll snip my thread and sew the first set of two blocks to the next set of two blocks. Snip those threads and sew the final block. The process becomes more beneficial with the longer rows, but you could definitely just sew one seam at a time if you'd like. :)
Before you sew rows to other rows, be sure that you have the blocks aligned properly. Look for those nesting seams to help make sure that you are sewing things in the right place. When you put rows right sides together, it will look like the photos below, depending on how you pressed your seams in the previous row. Pins are your friend!
It'll look a little funny when you place rows right sides together, but align your blocks and nesting seams and trust the process!
Once I've added rows together past a certain point, I like to start on the other half of the quilt. I'm not sure why I switched from the design wall to the floor then back to the design wall, but here we are, hah. :)
Quilting Ideas
I have a few quilting ideas saved on myQuilting Ideas Pinterest Board. This includes a mix of walking foot quilting and long arm pantographs. Since this design is on-point, my go-to idea is to stitch lines that are parallel to the diagonal seams. You can find my straight line quilting tutorialhere. This creates such a nice texture, and if you want to kick it up a notch, you can add extra vertical and horizontal lines as seen inmy reelfrom a year or two ago. Here are some examples of quilting on previous Getaway quilts; click where you see the underline to find more photos!
DIY - These three Getaway quilts are either all hand quilted, all machine quilted or a combination of both
Longarm quilted - I had my Speckled and Cover Getaway quilts longarm quilted. The two pantographs are Interwoven Dark and Best Fronds
Scrap Project
Don't forget to use up those scraps! Page 15 of the pattern has instructions for how to use up your scraps. A couple of ideas include a pillow, tote bag, wall hanging, mini quilt, coasters, mug rug, table runner....the possibilities are endless! Here's an example of my scrap pillow made from my Speckled Getaway. :)
Grand Prize Bundle
Share a weekly progress photo for each of the 4 weeks of the QAL and you'll be automatically entered to win our GRAND PRIZE BUNDLE (valued at over $300!) Here's what's in the bundle:
Free edge-to-edge longarm quilting byStitch Labon your Getaway quilt of any size - includes quilting and batting, (shipping not included).
Take a photo of your weekly progress (please do not share a photo of the inside of the pattern). This week, share a photo of your finished quilt top!
Share the photo to your Instagram account before 8am EST on Wednesday, July 12th.
Use the hashtags #GetawayQAL #GetawayQuilt and #LoAndBeholdPatterns . Tag @loandbeholdstitchery in the photo. Your account must be public in order for us to see your entry.
Share one a progress photo each of the four weeks of the QAL and you'll be entered to win! I'll announce the winner in our newsletter on July 15th. Good Luck!
Thanks so much for joining me for this Quilt Along. I hope that you've had fun and maybe picked up on a few tips along the way. :)
If you haven't already read through our information page, you can find logistics and what-nothere. You can access the posts under the "Quilt Along" section of our site.
Week 3
This week, we are creating our Block 1s. It's a little out of order within the pattern, since we created our Block 2s last week, but I wanted you to start with a more simple block before you jumped into these log-cabin blocks. Last week, we also talked about our seam allowances, so if you haven't gone through the Week 2 blog post, be sure to do that before proceeding!
Block 1a & 1b
Looking at the Getaway quilt pattern, Block 1a and 1b are the same exact blocks with the light and dark fabrics reversed. Again, refer to the "Block Configuration" chart on page 4 for the block quantities and block sizes for your specific quilt size.
If you've never made a "log cabin" style block before, you're in for a treat! These blocks are super fun, easy and so versatile in the quilting world. Here are a couple of tips before you get started:
Test seam allowance before you get started. If you did that last week, you should be good to go, but maybe make a test block too before you get started...especially if this is your first time making a log cabin block. There are also more seams in this block than our blocks from last week, so you might need to slightly tweak.
With that said, if you cut your pieces accurately, you shouldn't need to do any "squaring up" or trimming in between pieces. With an accurate 1/4" everything should line up perfectly with no overlaps or short pieces. This is like a "built-in" seam allowance check. This means as you add pieces according to the chart on page 5:
If your new piece is larger than the previous unit that you created, your previous seam allowance was too small.
If your new piece is smaller than the unit that you created, your previous seam allowance was too big.
TROUBLESHOOTING
What do you do if you have a one-off piece that has a little bit of an overlap?
Like I mentioned above, make sure your seam allowance is dialed in! This will really set you up for success with this pattern. Again, refer to the "How to Check Your Seam Allowance" blog post if needed.
But let's be real, we're human and sometimes we end up with slight imperfections. Does that necessarily mean you should seam rip everything over and over again until it's perfect? Well, that's for you to decide. We all have different levels of perfectionism. :)
Generally speaking, if I have a one-off incongruent piece, if it's ~1/8" or 1/16", I'll sometimes let it ride. What I mean by that is if I split the difference and center the piece so that there is equal amounts of overlapping on both sides, then the overlap is minimal. Now, instead of having an overlap of 1/8", it's now 1/16" on the left and right edge of the new piece, seen below.
Again, this goes back to how much of a perfectionist you are, so feel free to do something like this if you need to. I wouldn't recommend doing this for large inconsistencies, but for small, one-off mishaps, it's okay to "fudge" things if needed. :)
Chain Piecing - Similar to last week, I chain piece everything in this block. I start out by sewing ALL "A" and "B" pieces together. Once I press those seams, I rotate the units so that I can seperate out the Block 1A units from the Block 1B units. Then I sew the appropriate amount of pieces to each unit, taking note that I need (6) Block 1A and (2) Block 1B
Pressing - Refer to the arrows in the block diagrams on the left side of page 5. We're pressing these seams to one side, away from the starting square. This is true for both blocks 1A and 1B. Again, refer to this blog post for tips for flat seams.
Pins really help minimize any shifting that may occur while you are sewing. Especially for those longer pieces!
Be aware of your seams as you sew. It's easy for seams to become "flipped" as you sew over them. As you are adding pieces to your log cabin, check underneath and make sure that the seams are laying flat.
Go ahead and create all of your Block 1s. Once you are finished, at this point, you should have ALL of your Block 1s AND Block 2s complete! YAY! Easy peasy, right?
Grand Prize Bundle
Share a weekly progress photo for each of the 4 weeks of the QAL and you'll be automatically entered to win our GRAND PRIZE BUNDLE (valued at over $300!) Here's what's in the bundle:
Free edge-to-edge longarm quilting byStitch Labon your Getaway quilt of any size - includes quilting and batting, (shipping not included).
Take a photo of your weekly progress (please do not share a photo of the inside of the pattern). This week, it's your Block 1s!
Share the photo to your Instagram account before 8am EST on July 1st.
Use the hashtags #GetawayQAL #GetawayQuilt and #LoAndBeholdPatterns . Tag @loandbeholdstitchery in the photo. Your account must be public in order for us to see your entry.
Share one a progress photo each of the four weeks of the QAL and you'll be entered to win! Good Luck!
That's all for this week, my friends! I cannot wait to see everyone's progress!
Next week is the fourth and final week of the Getaway Quilt Along...and it's a big one! We'll cover tips for creating half blocks and diagonal row construction.
Let us know if you have any questions, otherwise, I'll see you next week for Week 4!
]]>
https://www.loandbeholdstitchery.com/blogs/quilt-alongs/getaway-qal-week-2-block-22023-06-16T19:39:35-04:002023-06-22T13:01:50-04:00Getaway QAL - Week 2 (Sewing Block 2s)Brittany Lloyd
Hey there and welcome back to the Getaway QAL! If you're just now joining us, you can find our Week 1 Blog Post, which covers cutting our fabrics here. If you haven't already read through our information page, you can find logistics and what-nothere.
Check back every Saturday for the next few weeks for our weekly information. You can access the posts under the "Quilt Along" section of our site.
Let's start sewing! This week, we'll be making our Block 2s. Keep scrolling for tips!
Sewing Supplies
Here are some links to my favorite sewing supplies:
Iron - As far as irons go, I'm in the market for a new one. Previously, I've used a Rowenta iron similar to this one but after several years of use, I'm finding that it's not getting quite as hot. Let me know if you have an iron that you love and recommend. I'm thinking about trying an Oliso.
Testing Seam Allowance
First and foremost, before we get started with creating out blocks, I want you to test your seam allowance. Even if you have several quilts under your belt it's always really helpful to double check everything before you get started.
To do this, I recommend using some scrap fabric to cut 5 of the small squares of whatever size you are making. So if you're making the crib size, cut (5) 2.5" squares and sew them all together to create one line of squares. Press the seams to one side, since that's what we'll be doing in the pattern. Measure this unit to gauge if your seam allowance is too small, too large or just right.
Once these squares are sewn together, they should measure whatever your block size should be for the size quilt you are making. Again, this can be found in the "Block Configuration" chart on page 4.
You can find an in-depth tutorial for "How to Test your Seam Allowance" here, so if this is something you're struggling with, be sure to checkout this post!
Block 2a & 2b
We're working out of order in the pattern and we're starting with Block 2 instead of Block 1. Block 2 is a little more straight-forward and I wanted us to start out with that so that we can test our seam allowance with some simple strips.
You'll notice that both Block 2a and 2b are the same with the exception of the number of light and dark strips in the block. Refer to the "Block Configuration" chart on page 4 for the number of each block that you'll need.
Chain Piecing
After you've tested your seam allowance, this is a really great pattern for chain piecing. If you haven't chain pieced before, it's a very simple way to batch like-tasks together to save time, energy and thread.
Essentially once you stitch off of your first pieces, you'll stitch onto the next pieces, leaving just a few stitches or "chain stitches" in between. Continue to do this for all of your pieces. Once you're done, go back through and snip the connection threads and proceed with pressing or sewing more strips.
Again, make sure you have your seam allowance dialed in before you get started!
Chain piecing can be done in a variety of different ways. You can sew the first two strips of all Block 2s at once. Then go back and add the third strip to all Block 2s and so on. Or you can sew the first two strips together and the third and fourth strips together. Then sew those two units together followed by adding the 5th strip. I always find it fun to experiment with various different shortcut combinations. :)
Remember that pins can help with any shifting that might happen with your strips as you are sewing.
Pressing
We're creating nesting seams with these blocks, so we're pressing almost all of our seams within this quilt to one side. For these blocks, remember to press all seams within each block in one direction. To do this, I place my piece on my wool pressing mat, use my fingers to press the seam to one side, then gently insert the nose of my iron into the seam to press it flat. You can also "set" the seam by pressing the seam flat first, then pressing it to one side.
Repeat this process as you continue to create your blocks.
Tips for Flat Seams
I really love using my wool pressing mat and tailor's clapper for extra flat seams. I explain both of these tools a little more in this blog post.
Another thing that I'll typically do once I'm done piecing blocks is place my large square ruler on the blocks with something heavy on top. I'll leave this overnight or longer for extra extra flat seams. :)
Double Check Seam Allowance
Using this formula in this post, double check your seam allowance as you add strips. Even if you've only sewn 3-4 strips together, you don't have to wait until your block is finished to re-check your seam allowance.
Grand Prize Bundle
Share a weekly progress photo for each of the 4 weeks of the QAL and you'll be automatically entered to win our GRAND PRIZE BUNDLE (valued at over $300!) Here's what's in the bundle:
Free edge-to-edge longarm quilting byStitch Labon your Getaway quilt of any size - includes quilting and batting, (shipping not included).
]]>
https://www.loandbeholdstitchery.com/blogs/quilt-alongs/getaway-qal-week-1-cutting2023-06-09T17:54:45-04:002023-06-15T22:51:10-04:00Getaway QAL - Week 1 (Cutting)Brittany LloydMore]]>
Hello there and welcome to the Getaway Quilt Along (QAL)! I'm so excited that you're here. If you haven't already read through our information page, you can find logistics and what-not here. This is a super casual quilt along in which I'm going to be sharing some tips and tricks for the Getaway Quilt pattern.
Check back every Saturday for the next 4 weeks for our weekly information. You can access the posts under the "Quilt Along" section of our site.
Let's get started. :)
Getaway Pattern
First and foremost, if you haven't already purchased the Getaway quilt pattern, you'll need to grab a copy in our shop. We have PDF (instant download) copies and also printed copies. Please note our current shipping pause from June 6-23, so if you need the copy right away, I recommend getting a digital copy!
If you haven't read this blog post about the quilt pattern details, be sure to take a look for some helpful information.
Choosing Fabrics
If you're looking for inspiration or a starting point for choosing your fabrics, refer to this blog post. You'll find tips for choosing fabrics, using prints, etc. You can also find Getaway on PreQuilt - a free digital coloring page app that allows you to try out different fabrics prior to making a final decision. They also have a paid version of the program if you'd like to use prints in your mock-ups.
While you're in PreQuilt, play around with switching up the Light and Dark fabric. Within the pattern, I was really intentional with which fabric is light and which is dark. Note how the design slightly changes when you swap the two.
Choosing a Getaway Version & Size
There are three different versions of the Getaway quilt pattern. The fabric requirements and cutting instructions are the same for each version. So the biggest decision that you need to make this week is what size quilt you are making and your fabrics.
Quick note about the sizes: the Crib size can also double as a lap quilt or small throw. It's a generous smaller size! Take a look at the pattern and note that all 5 of the sizes require the same number of blocks, but your blocks will be larger or smaller based on which size you are making. You can make any size quilt for this quilt along.
I do want to point out that if you plan to use any sort of print, the City Trip version has less seams to line up, which means you'll have less "breaks" in your fabric. That said, for a smaller scale, more scattered and random print, like my Speckled version seen here, the seams really disappear once it's all sewn together.
Quilt Kits
We have quilt kits in our shop but note that we currently have a shipping pause until June 23rd. Here are other shops that are carrying kits, each have four kits to choose from:
Pre-washing is a matter of personal preference. Ivery rarelyprewash my fabrics. I could probably count the amount of times that I've pre-washed my fabrics on one hand. The reasons that I don't like it? For one, it takes a lot of effort and I can be impatient when I'm ready to start a project (hah). Secondly, I like the "crisp-ness" of fabric that is unwashed...it seems to hold it's shape better and be easier to work with.
What are the reasons for prewashing? You might want to prewash if you are using lots of red or navy, as these are colors that tend to bleed more easily. That being said, once my quilt is assembled, I am very generous with the Shout Color Catchers. These are little sheets that you put in the washing machine with your quilts first wash and they help prevent bleeding. They're relatively cheap, so I usually use a generous amount.
Another reason for prewashing is if you are using a few different substrates in your quilt (linen, cotton, flannel, etc.). Prewashing also "preshrinks" the fabrics so that they all behave similarly. These different substrates all have different rates of shrinking, so doing that upfront could help eliminate problems later on once they're all sewn together.
This is mypersonal preference. If it would make you feel better to prewash your fabrics, go for it! :) I've found that the quilting community is split pretty evenly on this topic.Just keep in mind: You will need the full WOF for certain parts of this pattern. I know some fabric manufacturers (Ruby Star Society is one of them) that have smaller width of fabric measurements and larger selvedges. If you choose to prewash your fabric just be aware that if your fabric shrinks to be less than 42" wide, you may need additional fabric depending on the size quilt you are making. This is something to keep in mind for all quilt patterns as you decide whether or not you want to prewash.
STARCHING FABRICS
To be honest, I don't really use starch that much. However, I've found that if I am working with smaller pieces or bias edges, it really does help with accuracy. Starch makes your fabric more stiff, which makes it easier to sew and work with. Some fabrics have a stiffer "hand" than other, so you may or may not find this necessary with what you're working with.
Remember that you'll want to starch your fabric before you cut them. So you'll do so as you're ironing your fabric. This is the starch that I use.
Favorite Cutting Supplies
I have a few different size cutting mats, but my favorite is myFiskars 24" x 36". I highly recommend getting this size, if you have the space for it. It's great for cutting yardage. I also use the 18" x 24" cutting mat by Christopher Thompson (for Riley Blake). That cutting mat seems to be unavailable, but it looks like they're bringing it back at some point this summer.
For rotary cutters, I have a Fiskars 45 mm, which is probably the most popular size.
CUTTING BASICS
Here are a few things to keep in mind before you get started:
How's your rotary cutter blade? If you need a new one, go ahead and change it out.
Pay attention to the width of your selvedge. Be sure not to trim off too much because in some instances, you'll need the full 42" Width of Fabric (WOF).
For yardage, try your hardest to cut "on-grain". Sometimes fabric isn't stored on the bolt perfectly square. Since you'll be cutting some WOF pieces, in order to ensure that the fabric around the fold stays straight, you'll want to make sure that your fabric is square before you cut it.
Whenever possible, it's best to cover your desired measurement with your ruler and use the lines on your ruler vs. the lines on your cutting mat. This will give you a more accurate cut.
Consider batch cutting for sub-cuts.
Label your pieces to help stay organized.... if that's your thing. :)
Slow down and take your time. Cutting your pieces accurately will set you up for success in the following weeks.
When cutting your background fabric, cut on the largest surface that you have. Fold the fabric "accordion style" and keep it just off your cutting mat.
How to Cut Width of Fabric Strips
I've put together a tutorial for how to cut your Width of Fabric strips so that they're nice and straight. You can find that tutorial here.
Pattern Notes
I usually like to go through and cut all of my WOF strips before I make any subcuts. Once your WOF strips are cut:
Subcut your fabrics in the order that they appear within the listed bullet points.
This means you'll be cutting larger pieces first. Set aside any leftover pieces from these strips and use them to cut smaller pieces, if needed.
I'll usually like to do a little bit of math before I get started. Say that I need to cut 10.5" pieces from my WOF strip. I'll divide 42" (WOF) by 10.5", which will tell me that I can get (4) 10.5" pieces from that strip. Then I will divide the total number of 10.5" pieces that I need, (50) by (4) and that will tell me how many strips I use, which is 12.5. So that means I'll need 12.5 WOF strips to get all 50 of my 10.5" pieces. I do this for each bullet point so that I keep track of what I'm using and it also allows me to batch cut if I'd like. More on that in a second. :)
If you're making the bed size, sew your remnant WOF pieces together to create larger pieces. This helps decrease waste by allowing you to use up more of your leftover fabric.
BATCH CUTTING
Any time I'm cutting many pieces that are the same size, I'll batch-cut those pieces. A sharp rotary blade is key for this process. To do this:
Align the pieces horizontally on your cutting mat. Use the horizontal lines to make sure the strips are nice and straight. I like to overlap my strips a bit so that I can fit more strips, but you can just have the edges aligned if you wish.
Trim off the selvedges.
Cover the desired measurement with the left edge of your strips (assuming you're right handed) and make sure that your strips are all parallel with the horizontal lines in your ruler.
Cut.
If you're a newer quilter, feel free to cut your pieces one at a time. There's no rush. :) But maybe give this a try if you have a few quilts under your belt and you're looking to save a little bit of time and energy. I only do this with the first bullet point of each fabric in the Cutting Instructions table.
What I'm Making
For this Quilt Along, I'm making the Crib size and I having decided on the version yet. I'm leaning Mountain, but I may go Beach. :)
My "dark" fabric is Sketchbook Kiss from Alexia Abegg for Ruby Star Society and my "light" fabric is Always Together by Elizabeth Chappell for Art Gallery Fabrics. My backing is AGF Bougainvillea and my binding is Wings in Dark Fuchsia by Fableism.
Grand Prize Bundle
Share a weekly progress photo for each of the 4 weeks of the QAL and you'll be automatically entered to win our GRAND PRIZE BUNDLE (valued at over $300!) Here's what's in the bundle:
Free edge-to-edge longarm quilting by Stitch Lab on your Getaway quilt of any size - includes quilting and batting, (shipping not included).
]]>
https://www.loandbeholdstitchery.com/blogs/quilt-alongs/getaway-quilt-along2023-05-19T16:02:20-04:002023-07-08T08:43:06-04:00Getaway Quilt AlongBrittany Lloyd
Find details, along with resources, tips and tricks by clicking the underlined links below!
WHO: You, me and other quilters from around the world!
WHAT: A four week Quilt Along; each week we'll complete a portion of the Getaway quilt pattern and by the end, we'll have a beautifully finished quilt top! Plus we'll share progress and cheer each other on along the way. It's a fun time. :)
WHEN: June 10 - July 8 ; information will be saved on our website if you cannot participate at this particular time.
WHERE: We'll be sharing weekly QAL content straight to your inbox, so if you're subscribed to this newsletter, you're good to go! You can share weekly progress photos to IG to enter to win prizes. You do not need social media to participate, but you do need a public IG account to enter to win prizes.
WHY: Sewing with friends is FUN! Plus I'll be sharing lots of helpful tips for the Getaway pattern.
How do I sign up? There's no official sign up. We'll be sending out links to content via this newsletter. You'll need to purchase either a PDF or Printed copy of the Getaway Quilt Pattern.
FABRIC REQUIREMENTS
KITS
We have 6 different Getaway kits to choose from in our shop!
Coloring Pages
You can find PDF coloring pages here. Getaway is also on Prequilt (free digital coloring pages)!
]]>
https://www.loandbeholdstitchery.com/blogs/quilt-alongs/summer-pop-qal-week-42022-06-25T16:49:00-04:002023-08-24T21:21:32-04:00Summer Pop QAL - Week 4Brittany Lloyd
Hello hello and welcome back! It's the fourth and final week of the Summer Pop Quilt Along, which means we are piecing our quilt tops! By the end of this week, you should have a finished Summer Pop quilt top! Here's a look at our schedule. If you are just now joining us, click where you see an underline to catch up on the previous week!
This week is straight forward, especially if you've ever made a block-based quilt. First and foremost, you'll want to lay out your blocks to determine where you want them to appear within the quilt. I try to space everything out so that there is an even mixture of color throughout the quilt. The pattern has the columns of popsicles flipping directions every other row....but I've seen shop quilt tops on Instagram with the popsicles all facing the same direction. Either way works! Play around with it and see what you like.
.
Once I like my layout, I like to create a stack of blocks from each row, then I bring the entire stack to my machine for chain piecing. I'll sew the first block to the second block, the third block to the fourth block, and the fifth block to the sixth block.
.
Then I'll trim my threads and sew the first two blocks to the second two blocks, and the third two blocks to the last block in the row. Then I'll snip my thread and sew those final two units together. THEN I'll bring the entire row to my ironing board to press seams.
.
An alternative is to chain piece your entire rows, which I demonstrate here. I used this method for three of my rows. Honestly, I much prefer using this technique with smaller blocks or individual components of blocks. I've found that I get a little overwhelmed when I do this with larger blocks.
.
Then once you create an entire row or column, press all of those seams in one direction. This is how I press my seams to one side:
.
.
Then when you go to create your next row, you'll press those seams to the opposite side, which will create nesting seams from row to row...as seen below:
.
Once your rows are created, sew them together and press those seams open. Remember to pat your iron in an up and down motion, don't slide! It helps to use your fingers to open the seam and press from the wrong side. Then flip it over and press from the right side.
.
OTHER TIPS:
Create space behind your machine and to the left of it to help support the weight of the quilt top as it grows.
.
Pay attention to the seams on the underside of your piecing as you sew blocks together. If they get flipped in the seam, it's really not a big deal. But I usually try to avoid it as best I can.
.
Stay stitch 1/8" around the perimeter of your finished quilt top to help secure seams....especially if you're one to go out and take quilt photos like me. :)
.
.
GRAND PRIZE BUNDLE
If you've been participating in the entire Quilt Along, be sure to share a photo of your finished quilt top! If you've been sharing photos for all 4 weeks of the QAL, you'll be automatically entered to win our GRAND PRIZE BUNDLE (valued at over $500!) Here's what's in the bundle:
Remember that your account must be public for us to see your entry. Use the hashtags #summerpopQAL, #summerpopquilt & #loandbeholdpatterns and you'll be entered to win! You have until Wednesday July 6th to get your entry in. The winner will be announced via newsletter on the 7th!
.
Sip & Sew
Don't forget about the Sip & Sew happening over on the String & Story's IG page (@stringandstory) Monday night at 7PM EST. HollyAnn and Darcy will be working on their Summer Pop quilts live and I invite you to join them for more Summer Pop tips, community and general entertainment. :)
I'll see ya'll next week with a Grand Prize winner!
Brittany
]]>
https://www.loandbeholdstitchery.com/blogs/quilt-alongs/summer-pop-qal-week-32022-06-19T20:00:50-04:002023-08-24T21:18:29-04:00Summer Pop QAL - Week 3Brittany Lloyd
Hey there and welcome back! It's Week 3 of the Summer Pop Quilt Along, which means we are finishing up our blocks! wahoo! By the end of this week, you should have all of the blocks made for your Summer Pop quilt top! Here's a look at our schedule. If you are just now joining us, click where you see an underline to catch up on the previous week!
I don't have anything new to share this week! Just keep chugging along at your blocks, my friend! If you missed the tips from last week, be sure to check those out!
.
GRAND PRIZE BUNDLE
Share a weekly progress photo for each of the 4 weeks of the QAL and you'll be automatically entered to win our GRAND PRIZE BUNDLE (valued at over $500!) Here's what's in the bundle:
Enter to win by sharing your weekly progress photo to your public Instagram account (note that if your account is private, we will not see your entry). Use the hashtags #summerpopQAL, #summerpopquilt & #loandbeholdpatterns and you'll be entered to win!
One lucky winner will be chosen at random at the end of the QAL. This giveaway is not sponsored by IG.
.
Next week, we'll sew all of our blocks together to create our quilt top!
See you then!
Brittany
]]>
https://www.loandbeholdstitchery.com/blogs/quilt-alongs/summer-pop-qal-week-22022-06-12T14:31:28-04:002023-08-24T21:18:44-04:00Summer Pop QAL - Week 2Brittany Lloyd
Hello and welcome back! It's Week 2 of the Summer Pop Quilt Along, which means we are starting to sew! Yay! Here's a look at our schedule. If you are just now joining us, click where you see an underline to catch up on the previous week!
First and foremost, I highly recommend creating a test block before you get started. It's always better to fine-tune and make adjustments before you start working with your precious fabrics rather than after. First, let's take a look at Step 1 under the Block Assembly instructions on page 4.
MARKING
There are a few different ways to "draw" a line on the back of your Background squares. Here are some of my go-to methods:
temporary marking pen- If you go this route, do some reading before you make a purchase. Some pens are "air erasing" meaning that the mark lasts for a set amount of time before it disappears. You wouldn't want this if you plan to mark your squares one day, then sew them the next. There are also "water erasing" and "heat erasing" pens. As a general rule of thumb, I only ever use pens if I'm marking the WRONG side of my fabric. I've heard too many horror stories of pen marks not disappearing or coming back after a set amount of time. This actually happened with some of my grandmother's quilts, so I'm a always a little leery. A safer option would be achalk pen.
.
.
hera markeror butter knife - These tools create a crease in your fabric, which is a much less permanent and cost-effective way to mark your fabric. This is my favorite marking method! Hera markers are relatively inexpensive and literally last forever, but an alternative is the back-side of a butter or table knife.
.
.
iron - Another option is to press a crease in your fabric with a hot iron. This might be my least favorite option, just because I feel like the crease isn't quite as crisp, but it definitely still works!
.
.
Diagonal Seam Tapeor regular masking tape - This is also my favorite method because it require no marking at all! You place the tape on your machine, line up the red line with your needle (or edge of the tape with your needle if you are using masking tape). Then when you go to sew, you'll align one corner with the needle and the diagonal corner with the red line on the tape. As you stitch, keep that corner aligned and voila!Hereis a video tutorial for the Diagonal Seam tape!
.
Diagonal Seam Tape alternative: masking tape
.
CHAIN PIECING
Once I have everything organized and laid out, then I sew my Background square to my Ice Cream pieces. Instead of doing once piece at a time, I always like to chain piece like-tasks. So I'll chain piece all Background squares to the left side of each Ice Cream piece. Then I'll repeat this on the opposite side. This simply means that you stitch all of your seams as one continuous "chain" piece to save time, energy and thread. Once you are finished, snip the connecting stitches and move on to trimming!
I do this for every step of making this block!
.
TRIMMING
Once both of the Background squares are sewn to each Ice Cream piece, you'll trim away the excess fabric to create your 1/4" seam. I like to trim these pieces while leaving my ruler in place for both seams, as seen below:
.
PRESSING SEAMS
I've found that pressing seams open for this step give the best results. To do that, use your fingers to open up the seam and press the wrong side with your iron. Try not to slide the iron around, but rather use an "up and down" motion. Then flip the block over and press the right side. If you plan to use a tailor's clapper, I usually wait to do that until the final step.
.
STEP 2
Step 2 under the Block Assembly instructions is to sew strips to the Ice Cream portion of your block. Any time you sew longer strips of fabric, there is a natural tendency for those strips to stretch as you sew. Pinning really helps decrease that risk and keep everything lined up and in place.
.
Note that everything should fit together nicely; you shouldn't need to do any trimming. If you go to sew the longer strips on the left and right edges of your block and they're longer than the block, then your seam allowance in the previous step was too large. If you go to sew the left and right pieces to the block and they're shorter than the block, then your seam allowance in the previous step was too small.
Recheck your seam allowance to make sure that it's accurate before moving forward!
Worst case, if you do want to trim as you go, you're welcome too, just make sure all of your blocks are the same size.
.
STRIP PIECING
The Stick portion of the block is "strip pieced" meaning instead of cutting up all of your pieces *then* sewing them together, you'll sew longer pieces together *then* cut it all apart. I always like to strip piece with a smaller stitch length so that my units don't unravel once I cut them apart. 1.8mm - 2.0mm should be good!
Test out your seam allowance! This pattern requires a regular 1/4" seam but you'll definitely want to test it out before you go to town and get everything stitched up. Be sure you have a clear understanding of where your seam allowance needs to be before you strip piece everything!
If your strip set measures less than 4", your seam allowance was too large. If your strip set measures more than 4", your seam allowance was too small. Again, make a test strip set (consider doing an entire WOF strip just for the practice) then place a ruler over the strip set to see where you are.
.
KEEPING PIECES SQUARE
I highly recommend using pins to keep things aligned and square. Also, take note of the edges that will be perpendicular to your seam. You'll want those to align, as well.
.
.
TIPS FOR FLAT SEAMS
If you have a tailor's clapper, this is a good place to use it. I normally press with my iron for a few seconds, then immediately follow up with pressing with the clapper for a few seconds. This helps keep the seams nice and flat.
.
An alternative (or an addition) to the clapper is to stack your blocks and place a ruler with something heavy on top. I usually let these sit overnight and it helps keep those seams super flat as well.
.
OTHER TIPS
If your machine "eats" your fabric for the stitch & flip portion of these blocks, this can be a common problem! Check and see if your machine came with another needle plate. Ideally if you can use a needle plate with a single, small hole for the needle, that'll help. Also using a "leader" piece of fabric can help as well. This is just a scrap piece of fabric that you start sewing on to begin your seam, then you'll stitch off that fabric and onto the fabric for your quilt. The thought is that the tension from the leader will keep the following fabric above the needle plate. Once you get going, continue to chain piece.
With this "stich and flip" technique, it's always a good idea to use a fresh needle (I really like sewing with a Microtex needle) and a 2 ply, 50 weight thread like Aurifil. If your thread is thicker, it can throw off your final results.
Some people sew *just beside* the drawn line to create a "scant seam" situation. You can always do this and then trim away excess if you need to after you press the seam.
Last but not least, make sure you're paying attention as you sew. What's wrong with this picture? haha!
.
.
GRAND PRIZE BUNDLE
Share a weekly progress photo for each of the 4 weeks of the QAL and you'll be automatically entered to win our GRAND PRIZE BUNDLE (valued at over $500!) Here's what's in the bundle:
Enter to win by sharing your weekly progress photo to your public Instagram account (note that if your account is private, we will not see your entry). Use the hashtags #summerpopQAL, #summerpopquilt & #loandbeholdpatterns and you'll be entered to win!
Please refrain from sharing photos of the *inside* of the pattern! This is copyrighted information for your eyes only. If you want to share a photo of part of the pattern, use the cover. :)
One lucky winner will be chosen at random at the end of the QAL. This giveaway is not sponsored by IG.
.
Sip & Sew
Last, but not least! I wanted to share about a "Sip & Sew" happening over onString & Story's IG page (@stringandstory) every Monday night at 7PM EST. HollyAnn and Darcy will be working on their Summer Pop quilts live and I invite you to join them for more Summer Pop tips, community and general entertainment. :)
Next week, we'll create the remainder of our blocks!
See you then!
Brittany
]]>
https://www.loandbeholdstitchery.com/blogs/quilt-alongs/summer-pop-qal-week-12022-06-05T19:17:14-04:002023-08-24T21:18:01-04:00Summer Pop QAL - Week 1Brittany Lloyd
Hello and welcome to the Summer Pop Quilt Along! I am so excited that you are here!
.
If we haven't "met", I'd like to introduce myself! I'm Brittany...the quilter and designer behind Lo & Behold Stitchery. I started quilting in my grandmother's memory and it's turned into an enormous passion of mine! You can read more about me and my story here!
Otherwise, let's jump in!
SCHEDULE
Here's a look at our schedule these next 4 weeks.
Week 1 - June 6th - Cut Fabrics
Week 2 - June 13th - Sew 15 Blocks
Week 3 - June 20th - Sew 15 Blocks
Week 4 - June 27th - Assemble Quilt Top
.
SUPPLIES
If you don't already have the pattern, be sure to grab that in my shop! You can purchase a PDF Digital Downloadhereor a Printed Paper copyhere. (Note that starting on Tuesday, June 7th, we will be "out of the office" until July 1st, so if you want to order a paper pattern and have it ship immediately, I recommend ordering from String & Story!)
You'll need basic quilting supplies like a rotary cutter and cutting mat. You can find a complete list of my favorite beginner quilting supplieshere. Here are a few extra items that are nice to have....
Diagonal Seam Tape- This comes in handy when constructing the "snowball" or "stitch and flip" portion of the blocks. You can also DIY this tape using regular masking or washi tape. Alternatively, you can draw a line using a temporary marking pen orhera marker.
Tailor's Clapper - If you've never used a Clapper before, essentially, you place the clapper over a seam immediately after you've pressed that seam with your iron. The wood absorbs the heat and helps lock in the seam to keep it nice and flat. It can be really helpful when you are pressing lots of seams open, like in this quilt! Again, I'll show you a DIY option as well!
.
.
INSPIRATION & QUILT KITS
If you already own the Summer Pop PDF, these mock-ups are all listed within the pattern. The Paper version of Summer Pop has most of these listed, but not all. And if you don't already own the pattern yet, you'll be seeing these for the first time! :) Let's take a look!
First up, we have fabrics from Carolyn Friedlander for Robert Kaufman. It's a little hard to envision Summer Pop with prints but I've found that abstract motifs, or designs like strips, dots, or some sort of small repeating theme....work really well! Exhibit A:
.
Next up is the "Holiday" pop that would be so cute for a July 4th celebration! The solids are Kona by Robert Kaufman.
.
This next one is one of my favorites....for obvious reasons. It uses fabrics from my Palette Picks bundle with Robert Kaufman! You can read about that bundle inthisblog post. If the Caramel background isn't your speed, I recommend something like Kona Snow or if you want to go dark...Gotham Grey.
.
If you're looking for a super fun and bright Summer Pop quilt, this one using Rashida Coleman Hale's Speckled fabrics is SO pretty. I'm calling it "Tropical Pop" because it gives me all the tropical, fruity vibes.
.
If you're looking to make a Bed size quilt you can grab the Fisherman's Bend Coordinates FQ bundle by Violet Craft for Robert Kaufman. It makes the most beautiful muted rainbow quilt!
.
Summer Pop includes two different "BONUS" sections and the first explains how to create a multi-color Background. To do this, you'll replace the Background yardage with fat quarters. You need 6 FQs for the Crib size, 10 for the Throw and 19 for the Bed size. For this method, you need the entire 18" x 21" of your FQ. If you would like more wiggle room then you'll need a few more fat quarters. Take a peak at page 7 of the pattern and you'll see more instructions for this method! This is actually what I'll be making for the QAL! We have kits available in our shop! (Note that we are currently out of the office and kits will not ship until the very end of June). All fabrics are Kona solids by Robert Kaufman.
There's also a bonus section that explains how to create layered popsicles like this "Firecracker" pop. :)
.
And here is a look at some online shops that are carrying Summer Pop Kits:
This week, we are jumping right in and cutting our fabrics! There are three main sections to this quilt top: Ice Cream, Stick and Background.
The Ice Cream portion is the most straight forward. You need one rectangle (see pattern for measurements) for each block in your quilt. You can cut this rectangle from a Layer Cake (Precut 10" square), fat quarter or 1/4 yard. Instructions for half yards or fat eighths aren't listed in the pattern, but the math is really easy if you want to use those as well! You can also use your scraps...especially if you end up creating the layered popsicle, seen in the Bonus section of the pattern.
The Stick portion of the block is strip pieced. So look ahead to the Sewing Instructions and you'll see what I mean by that. We'll talk more about that next week, but for now, know that you'll just be cutting a WOF (width of fabric) piece. This pattern assumes that your WOF is at least 42", so if yours is a little bit less than that (especially for the Throw and Bed size), then you'll have to individually piece a few of your Stick units according to Step 4b in the Sewing Instructions section.
The Background portion of the blocks uses yardage, but you can also follow the Bonus instructions to use FQs, which is what I'll be doing for the QAL. :) I also think it'd be really fun to use low-volume fabrics or scraps for the background section.
.
.
General Cutting Tips
Be sure you have a fresh rotary blade (or that it was recently changed)
Try to use the lines on your ruler vs. the lines on your cutting mat for a more accurate cut
Measure twice, cut once! Double check your measurements before you cut.
"Subcuts" mean that you cut smaller pieces from the larger piece of fabric. For example, if the bullet point says to cut (2) 2" x WOF; subcut (32) 2" squares.....that means that you'll cut your 2" x WOF strips first, then from those strips, you'll cut (32) 2" squares.
.
Video Tutorial
Here is a video tutorial for how to cut the Ice Cream portions from 1/4 yards and Fat Quarters...and also how to cut a Fat Quarter according to the Bonus instructions on page 7. Be sure to take a look if you are newer to quilting! If you're confident with your cutting, feel free to move right along...you got this. :)
.
.
BACKGROUND (yardage)
When you go to trim your selvedges, make sure you aren't trimming too much. You'll need the entire 42" of selvedge for some of these cuts, so be sure you are leaving yourself with at least that. If you accidentally trim off too much or if your WOF is less than 42", you should have a little bit of leftover fabric at the end to cut those remaining pieces.
You'll use the same cutting techniques that I mention in the above video (align selvedges to make sure the fold is square, cover your desired measurement with your ruler, etc.). I also recommend folding your fabric accordion style. This is to help manage the bulk of your fabric as you are cutting. You can also press/ realign selvedges as needed in this same fashion. It can be a lot of steps back and forth from your cutting table & ironing board, but I really prefer doing it in chunks rather than all at once.
.
.
If you are using yardage for the Background portion, check out this videofrom the Deco Quilt Along last year. Obviously it's a different pattern but there are alotof similarities. Topics covered in this video are how to cut "on-grain", how to square up fabric, batch-cutting, how to interpret "sub-cuts" and more!
.
.
BACKGROUND (fat quarters)
If you are creating a multi-color Background, according to page 7 of the pattern, refer to the Summer Pop video at minute mark 09:22 for a demonstration of how to cut one fat quarter. It's a little tight to squeeze 3 Background portions from each fat quarter, but if you cut carefully and accurately, you should be fine! Be sure to measure your FQs before you start. If you want to play it safe and only get 2 Background portions from each FQ, then you'll need, (8, 15, 28) FQs for the Background.
Once all of my pieces were cut from each FQ, I kept them in a pile like this:
.
PRE-WASHING FABRICS
I've gotten a lot of questions about pre-washing and it's simply a matter of personal preference. Ivery rarelyprewash my fabrics. I could probably count the amount of times that I've pre-washed my fabrics on one hand. The reasons that I don't like it? For one, it takes a lot of effort. Once you take the fabric out of the dryer, you then have to refold and iron it. If it's a large cut of fabric, this can be a bit of a daunting task. Secondly, I like the "crisp-ness" of fabric that is unwashed...it seems to hold it's shape better and be easier to work with.
That being said, once my quilt is assembled, I am very generous with the Shout Color Catchers. I know some people only use 1 or 2....at minimum, I use 5, depending on the size of the quilt. They're relatively cheap, so there's no harm in using a liberal amount. Feel free to use Color Catchers for the first few washes, or just once.
Alternatively, you might want to prewash if you are using lots of red or navy, as these are colors that tend to bleed more easily. Also, if you are using a few different substrates in your quilt (linen, cotton, flannel, etc.) prewashing also "preshrinks" the fabrics so that they all behave similarly. These different substrates all have different rates of shrinking, so doing that upfront could help eliminate problems later on once they're all sewn together.
Again, this is justMYpersonal preference. If it would make you feel better to prewash your fabrics, be my guest! I've found that the quilting community is split pretty evenly on this topic.Just keep in mind: You will need the full WOF for certain parts of this pattern. I know some fabric manufacturers (Ruby Star Society is one of them) that have smaller width of fabric measurements and larger selvedges. If you choose to prewash your fabric just be aware that if your fabric shrinks to be less than 42" wide, you may need additional fabric. Just be aware of this if you're on the fence about pre-washing. :)
I also want to point out that most people choose not to prewash pre-cuts. If you are using a FQ, you can choose to "stay-stitch" or zig-zag stitch around the perimeter of your FQ to prevent it from fraying too much. I would not prewash Precut 10" squares.
.
STARCHING FABRICS
To be honest, I don't really use starch that much. However, I've found that if I am working with smaller pieces (like this pattern) or bias edges, it really does help with accuracy. Starch makes your fabric more stiff, which makes it easier to sew and work with. I also tend to starch fabrics that are thinner/more "silky". Two brands that come to mind are Ruby Star and Art Gallery. I LOVE love love their fabrics; they're high quality, super soft and quilt up very nicely... but I've noticed that I'm more likely to use starch when I sew with these two fabric brands. I don't think I've ever starched Kona, just because it already has a naturally stiff hand.
Remember that you'll want to starch your fabric before you cut them, so if you decide to use it,I recommend going ahead and doing that before you cut.For yardage, assess how your WOF is folded. You'll want the two selvedge ends to be right on top of each other. This may mean ironing a new crease in your fabric. When I starch, I spray the entire piece of fabric to get it pretty saturated, then use my iron to press out any wrinkles or creases.This is the starch that I use.
.
FACEBOOK GROUP
If you have any burning questions, or if you're just looking for community and support, join theLo & Behold Patterns Facebook group! It is not required- all of the information for the QAL will be delivered via email/blog. That being said, if you are looking for advice with fabrics or anything else, the FB group is a great place to look!
.
MY FABRIC PULL
I am making the Berries & Cream Summer Pop, seen on page 7. I'm so excited to see how this will turn out!
.
GRAND PRIZE BUNDLE
Share a weekly progress photo for each of the 4 weeks of the QAL and you'll be automatically entered to win our GRAND PRIZE BUNDLE (valued at over $500!) Here's what's in the bundle:
Enter to win by sharing your weekly progress photo to your public Instagram account (note that if your account is private, we will not see your entry). Use the hashtags #summerpopQAL, #summerpopquilt & #loandbeholdpatterns and you'll be entered to win!
Please refrain from sharing photos of the *inside* of the pattern! This is copyrighted information for your eyes only. If you want to share a photo of part of the pattern, use the cover. :)
One lucky winner will be chosen at random at the end of the QAL. This giveaway is not sponsored by IG.
.
.
Sip & Sew
Last, but not least! I wanted to share about a "Sip & Sew" happening over on String & Story's IG page (@stringandstory) every Monday night at 7PM EST. HollyAnn and Darcy will be working on their Summer Pop quilts live and I invite you to join them for more Summer Pop tips, community and general entertainment. :)
I cannot wait to see everyone's progress! Next week, we'll start sewing. See you then!
Brittany
]]>
https://www.loandbeholdstitchery.com/blogs/quilt-alongs/summer-pop-quilt-along2022-05-18T14:31:08-04:002022-09-01T17:32:58-04:00Summer Pop Quilt AlongBrittany Lloyd
.
The Summer Pop Quilt Along has ended, but you can still access all of the information! Click below where you see an underline!
This pattern is labeled as "Confident Beginner" and would make a great first or second quilt. The pattern does assume that you have a basic knowledge of sewing, seam allowances, etc....but with the help of the Quilt Along, you shouldn't have any trouble with these blocks. Here's a closer look at some of the details:
When: June 6th - June 27th - July 3rd (4 weeks)
What: We'll cover topics like how to achieve an accurate and consistent seam allowance, strip piecing, how to "snowball" corners & more!
Where: Information will be shared in a blog post under the Quilt Alongs section of our website. We will send out an email reminder to everyone who signs up so that you don't miss anything! You can also join the Lo & Behold Patterns Facebook group to ask questions and share progress.
How: Complete the weekly prompts and share your progress on Instagram using the hashtag #SummerPopQAL ! Using the hashtag will enter you to win the Grand Prize - remember your account must be public for us to see what you share!
Supplies: You'll need to purchase the pattern before the Quilt Along begins. You can find the PDF (Instant Download) copy of the pattern here and the printed Paper copy here. You'll need basic quilting supplies...you can find a list of my favorites here. A few specific (optional) supplies that I love for this quilt are:
If you are a a shop that is carrying kits, please email me and I'll add you to the list. :)
]]>
https://www.loandbeholdstitchery.com/blogs/quilt-alongs/heirloom-hearts-qal-week-52022-02-07T11:26:45-05:002023-08-24T21:30:57-04:00Heirloom Hearts QAL - Week 5Brittany Lloyd
WE MADE IT!
It's the final week of the Heirloom Hearts QAL!
If you are just now joining us, here's a look at our schedule. If you need to go back to any of the weeks, click on where you see the underline.
This week, we are assembling our quilt tops! Take a look at the Quilt Top Assembly instructions in your pattern and let's get started!
Lay out everything on the floor or on a design wall to determine where you want each heart to appear in your quilt. I usually put my favorite blocks in the corners and fill in from there.
.
Once I like my layout, I like to create a stack of blocks from each row, then I bring the entire stack to my machine for chain piecing. I'll sew the first block to the second block, the third block to the fourth block, and the fifth block to the sixth block. Then I'll trim my threads and sew the first two blocks to the second two blocks, and the third two blocks to the last block in the row. Then I'll snip my thread and sew those final two units together. THEN I'll bring the entire row to my ironing board to press seams.
.
.
Remember to press your seams towards the Heart blocks. Since the blocks alternate from row to row, this will create nesting seams. This is how I press seams to one side:
.
.
Once your rows are created, sew them together and press those seams open. Remember to pat your iron, don't slide! It helps to use your fingers to open the seam and press from the wrong side. Then flip it over and press from the right side.
.
.
When I have nesting seams in my quilt top, I normally don't use pins for the entire row, but I do find it helpful for at least the first block. If you notice any shifting while sewing, maybe consider using them for the entire length of the row.
.
As your quilt top grows, it's helpful to have space to the left of your sewing machine and behind it. My machine is on a pretty large table, so that helps. If you have a smaller table, you can put something beside it like an ironing board to help support the weight of the quilt top. All this to say: be aware of gravity and how it can pull your quilt top as you are sewing. You want as much of the weight supported as possible.
.
I like to sew my rows together to create two halves, then I'll sew those halves together.
.
Last but not least: once your quilt top is finished, I recommend "stay-stitching" around the perimeter. This is just a seam that is ~1/8" from the edge and it holds all of the other seams in place....especially those Forty Nine Patch Blocks!
.
.
PRIZES
We have one giant Grand Prize bundle! Enter to win the bundle by sharing a weekly photo of your progress. Use the hashtags #heirloomheartsQAL, #heirloomheartsquilt and #loandbeholdpatterns and you'll be automatically entered to win! Just make sure your account is public so that we can see your post. :)
We have ONE more prize to enter into our bundle. Remember that one winner will win everything in the bundle!! And that prize is......
.
A $100 gift card to one of my favorite long-arm quilters, Ashley of Henhouse Quilting!!
She is also offering 20% off edge-to-edge quilting; Heirloom Hearts quilt top must be received by August 15th, 2022.
All you have to do to enter to win is share a photo of your finished Heirloom Hearts quilt top. Remember to use the hashtags so that we can see and there you have it! You have until Wednesday, Feb. 16th at 8pm EST to get your entry in. The winner will be announced via the QAL newsletter the next morning.
Thank you so much for participating, everyone! This has been so fun! :)
.
Until next time,
Brittany
]]>
https://www.loandbeholdstitchery.com/blogs/quilt-alongs/heirloom-hearts-qal-week-42022-01-31T09:36:35-05:002023-08-24T21:30:33-04:00Heirloom Hearts QAL - Week 4Brittany Lloyd
Alright, my friends....we are moving right along! It is the fourth week of the Quilt Along, meaning we are assembling our Forty-Nine Patch Blocks! After this week, we will be ready to assemble our quilt tops! Let's finish strong and get these Heirloom Hearts finished by Valentines Day. :)
If you are just now joining us, here's a look at our schedule. If you need to go back to any of the weeks, click on where you see the underline.
If you successfully completed last week, then this week should be a breeze! Refer to Step 4 under the "Forty Nine Patch Blocks" (FNP) sewing instructions in your pattern. You are simply creating 3 rows, then sewing those rows together. Here are some tips for this week:
Remember to press seams toward the Background squares. This will give you nesting seams from row to row.
Chain piecing tip: Multiply 3 times the number of FNP Blocks that you need for your size, and that'll tell you how many Background squares and Nine Patch Blocks to chain piece at first. So for the throw size, you'll chain piece 84 Background squares and Nine Patch Blocks. Then I'll press those seams, and then chain piece the remainder of the rows.
.
Sometimes the Nine Patch Blocks can be a little wonky. As best as you can, center them on the Background squares and align as many sides as possible.
.
Press the row seams open. Remember to pat your iron up and down instead of sliding from side to side. This will help already pressed seams stay open.
.
Use a tailor's clapper and/or place something heavy on the blocks after you press them to help the seams stay nice and flat.
.
Remember that as you create these blocks, the Chain portion that is along the edges will look a little longer than the Chain pieces on the inside of the block. Once you sew this block to the next block, the seam allowance will make them look like a square. You want these blocks to be exactly the same size as the Heart blocks, as indicated in the pattern.
.
.
PRIZES
We have one giant Grand Prize bundle! Enter to win the bundle by sharing a weekly photo of your progress. Use the hashtags #heirloomheartsQAL, #heirloomheartsquilt and #loandbeholdpatterns and you'll be automatically entered to win! Just make sure your account is public so that we can see your post. :)
Each week, I'll reveal one portion of the prize bundle. Remember that one winner will win everything in the bundle!!
Alright! The hard part is behind you!! Next week, we will assemble both our Heart and Forty-Nine Patch blocks and then we'll be done!
See you then :)
Brittany
]]>
https://www.loandbeholdstitchery.com/blogs/quilt-alongs/heirloom-hearts-qal-week-32022-01-24T09:13:36-05:002023-08-24T21:30:47-04:00Heirloom Hearts QAL - Week 3Brittany Lloyd
Hello hello and welcome back!
Last week was fun, right?? I just love seeing those heart blocks come together. This week is Week 3 of the Quilt Along, which means that we are making our Nine Patch blocks. Here's a look at our schedule. Click where you see an underline if you need to go back!
This week is pretty straight forward. We are completing Steps 1-3 under the "Forty-Nine Patch Blocks" instructions. This means we are only creating those Nine Patch blocks. There is a LOT of sewing this week. To help break things down, here's a suggested sewing schedule to help you stay on track:
Monday - Sew, press & cut Row A
Tuesday - Sew, press & cut 1/2 of Row B
Wednesday - Sew, press & cut 1/2 of Row B
Thursday - Create (19, 35, 69) Nine Patch blocks
Friday - Repeat
Saturday - Repeat
Sunday - Repeat & Rest!
Here are some tips for this week:
Since we are "strip piecing" in this segment, you'll want to decrease your stitch length....I always do 1.8mm.
Test out your seam allowance! This pattern requires a regular 1/4" seam but you'll definitely want to test it out before you go to town and get everything stitched up. One of my pattern testers said that she actually used a *scant* 1/4" seam so remember that everyone's seam allowance can look a little different based on how well you press your fabrics, thread thickness, etc. If you're curious, or if you run into issues, you can read about scant 1/4" seams here. Be sure you have a clear understanding of where your seam allowance needs to be before you chain piece everything! It is very important that your units measure exactly what the pattern says they should measure. If these blocks are larger or smaller than the Heart Blocks from last week, you could run into issues when you go to piece your quilt top together.
I like to check my seam allowance as I go. After you sew two strips together, then should measure 2.5". Then when you add the third, it should be 3.5".
.
If your strip set measures less than 3.5", your seam allowance was too large. If your strip set measures more than 3.5", your seam allowance was too small. Again, make a test strip set (consider doing an entire WOF strip just for the practice) then place a ruler over the strip set to see where you are.
.
PRESSING
These blocks have very specific pressing instructions to create nesting seams. This just means that you'll press the seams in Row A a certain direction, then you'll press the seams in Row B in the opposite direction. Remember that you are pressing towards the darker fabric. When you go to sew Row A and Row B together, the seams will lay nice and flat. Plus it'll be easier to keep things aligned!
.
When pressing long strip sets, you'll want to be careful that your strip set doesn't distort or stretch as you are pressing. I like to press the seam first like this:
.
Then gently, using the nose of my iron, press the fabric open, with the seam towards the darker side.
.
CHAIN PIECING
For Step 1, I like to chain piece the first two strips for Row A. So I'll chain piece 5 sets of a Background and a Chain strip together. Then I'll press those seams. Then I'll sew the final Background strip to each of the previous Strip Sets. Press those seams. Then cut all of my Row A pieces. Then I'll repeat this process for Row B.
.
Just be sure you are sewing the strips in the correct order. ;)
.
CUTTING
Once you have your strip sets created, you'll cut them up to create Row A and Row B. Remember to cover the measurement with the ruler, then cut. I really prefer to do this versus using the lines on my cutting mat!
You should get 28 Row units per strip set. For the Throw size, you'll use every single unit, so there isn't really any wiggle room. Keep them in mind when you go to trim off the selvedge ends...you don't want to trim off too much.
If you have a Stripology Ruler (by Creative Grids), this is a good time to bring that out! What I really love about this ruler is that you don't have to lift it up and move it in between each cut. You just line up the horizontal lines on the ruler with the edge fo the fabric, cut on the "zero" then cut on the stars (which indicate 1.5"). Here is an IG Reel of the Stripology ruler in action.
.
Of course, you do not *need* this ruler. Refer back to the Cutting tips from Week 1 if you need to!
I also want to point out that I like to cut my Strip Set while it's folded in half. This means that I am cutting 2 pieces at a time. It also means that if the fold of my fabric was a little bit wonky when I started, I don't have to use that portion of my strip set.
.
SEWING ROWS A & B
This is Step 3 under the "Forty-Nine Patch Blocks" section.
Once all of your Rows are created (it's a lot, I know!) then you'll sew them together to create the Nine Patches. My biggest tip for these is to align those nesting seams and make sure your seam is square. It can sometimes be easy to start and stop seams a little on the skinny side, so you really want to make sure that they aren't crooked. Again, you'll need just a standard 1/4" seam for this but as always, measure a test block before you start chain piecing. I like to chain piece all of my Row A and B pieces, press those seams open to reduce bulk. Then chain piece the final Row B piece to the previous unit and press those seams.
.
.
PRIZES
We have one giant Grand Prize bundle for end of the Quilt Along! Enter to win the bundle by sharing a weekly photo of your progress. Use the hashtags #heirloomheartsQAL, #heirloomheartsquilt and #loandbeholdpatterns and you'll be automatically entered to win! Just make sure your account is public so that we can see your post. :)
Each week, I'll reveal one portion of the prize bundle. Remember that one winner will win everything in the bundle!!
This week, we are adding a 14" x 14" wool pressing mat from Project Wool Mats! This is where I got my wool mat from a few years ago and I absolutely love it!
.
Here's what our Grand Prize bundle looks like so far:
Want to go ahead and purchase a wool pressing mat? Project Wool mats is offering us 10% off their 14" x 14" mat using the codeloandbehold10 ! Click here for the mat! She's also about to open up Preorders for the larger mat size too...which I will most definitely be purchasing!
.
.
I think that's all for now! Next week we will finish up our Forty-Nine Patch Blocks! I'll see you then. :)